


The Variation Swatches feature in Wow Elements Pro allows you to replace default WooCommerce dropdowns with attractive color, image, and label swatches for product variations. It helps improve product presentation and enhances the overall shopping experience for users. In this documentation, we will show you how to customize the Variation Swatches feature in Wow Elements Pro.
Enable the Variation Swatches Feature #
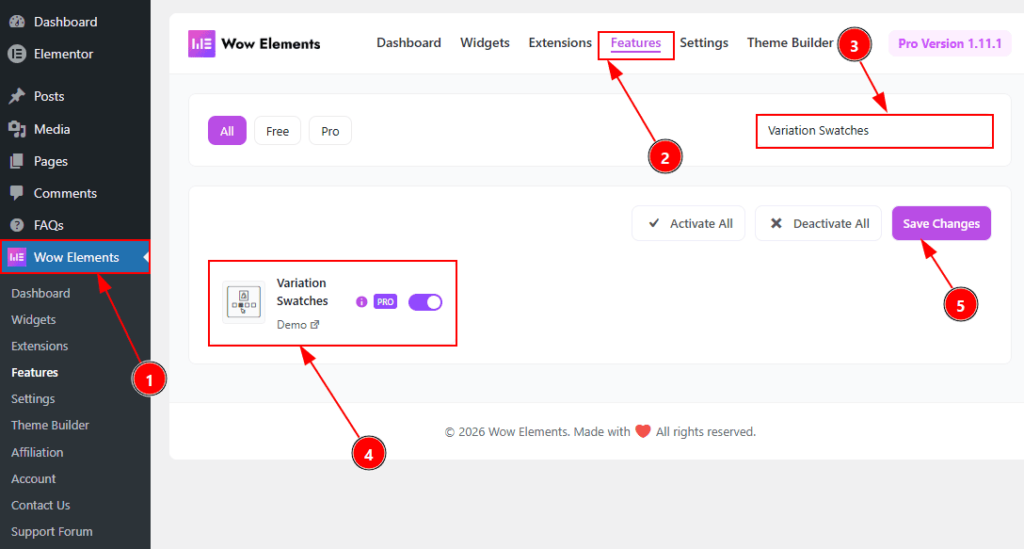
To use the Variation Swatches Feature from Wow Elements Pro, you must first enable the feature.
- Go to WordPress Dashboard →Wow Elements Plugin dashboard.
- Then Click the Features Tab.
- Search the Variation Swatches feature Name.
- Enable the Variation Swatches Feature.
- Hit the Save Settings Button.
Note: As the feature is enabled now, you can set up the variation swatches for your products. But before that you need to Install the Woocommerce Plugin to your site. Make sure you have activated the plugin and then you will get the option to set up the Variation Swatches.
Settings Up The Variation Swatches #
For setting up the Variation Swatches you need to create the Attributes first, then you need to add a product where you want to add the variation swatches and set those up. Let’s explore the process step by step –
Adjust the Attributes #
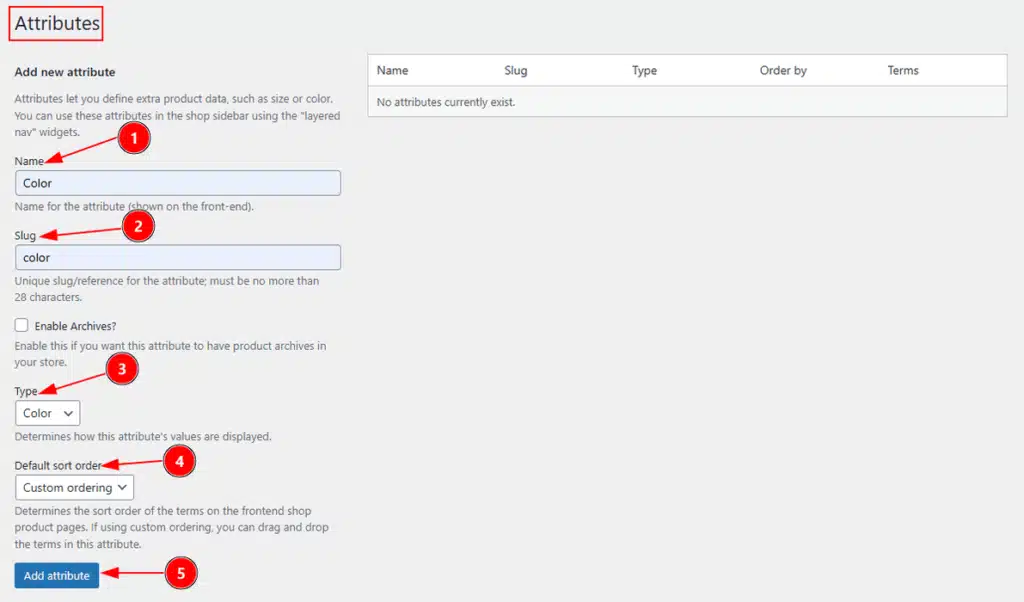
1. Name: You can set the name of the attribute with this option. Here we have named the attribute as Color.
2. Slug: You can set the slug for the attribute with this option.
3. Type: You can select the type between color, image, label & button with this option.
4. Default Sort Order: You can set the sort order with this option. You can choose between Custom ordering, Name, Name (numeric) or Term ID.
5. Add Attribute: After input all the information click on the add attribute to complete the process and save the settings.
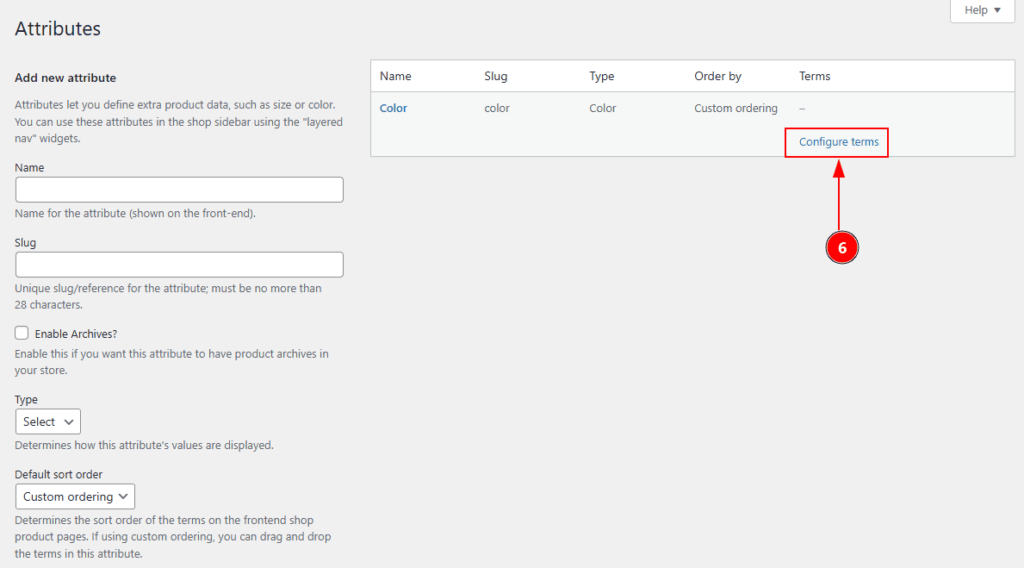
6. The attribute that you have added will appear in the right top corner. Click on the configure Items to customize the added attribute.
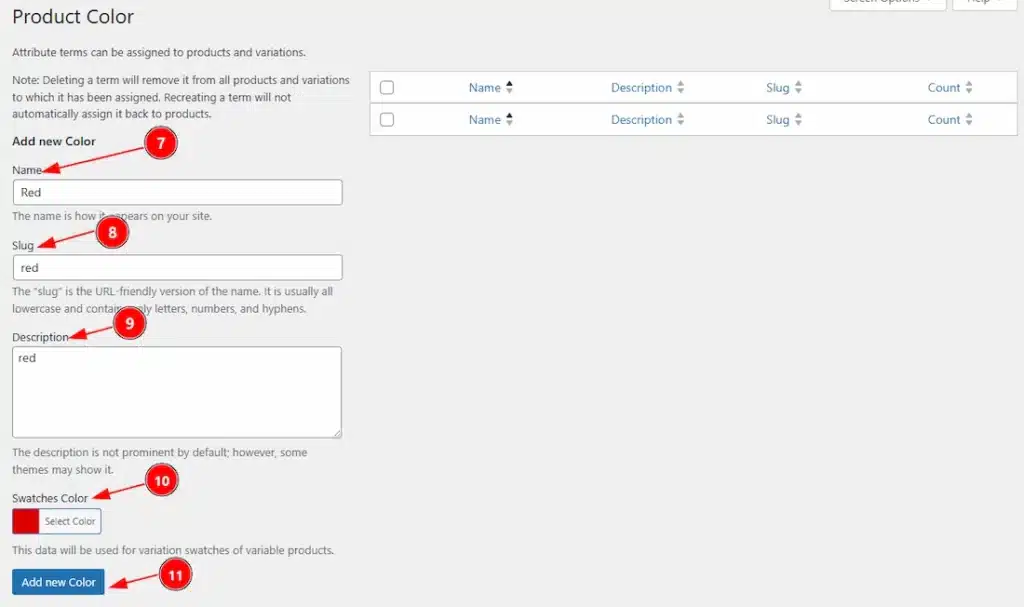
When you clicked on the Configure Items, again a new set up page will appear to configure the product color attribute. Let’s see what we have here –
7. Name: You can set the name of the color ( e.g.: Red ).
8. Slug: You can set the slug for the attributes ( unique slug/references ).
9.Description: You can add the description for the color here.
10. Swatches Color: You can set the color as you want with this option.
11. Add New Color: Click on the ” Add new Color ” button to add new variation.
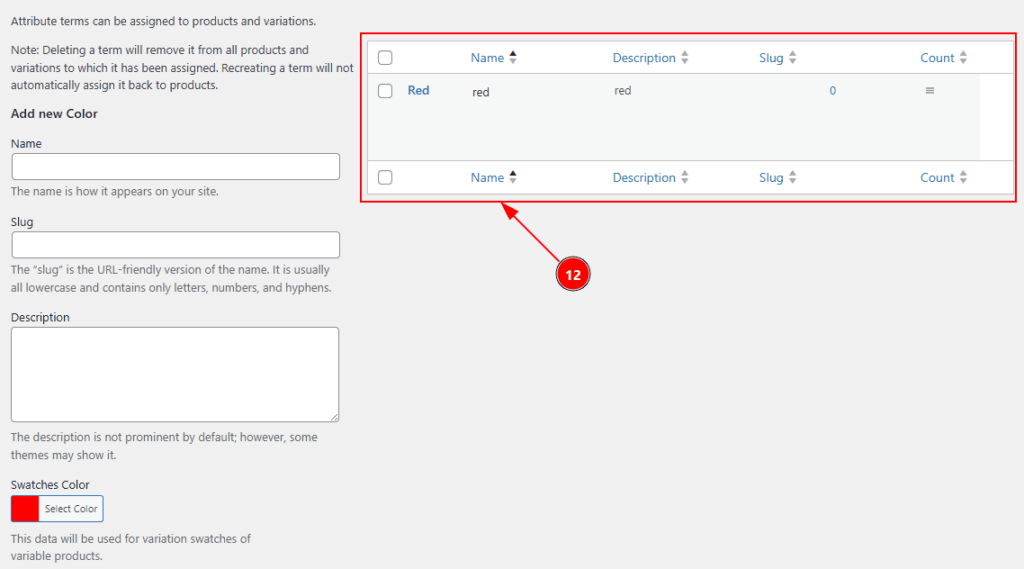
12. Here you can see the color attributes swatches appearance.
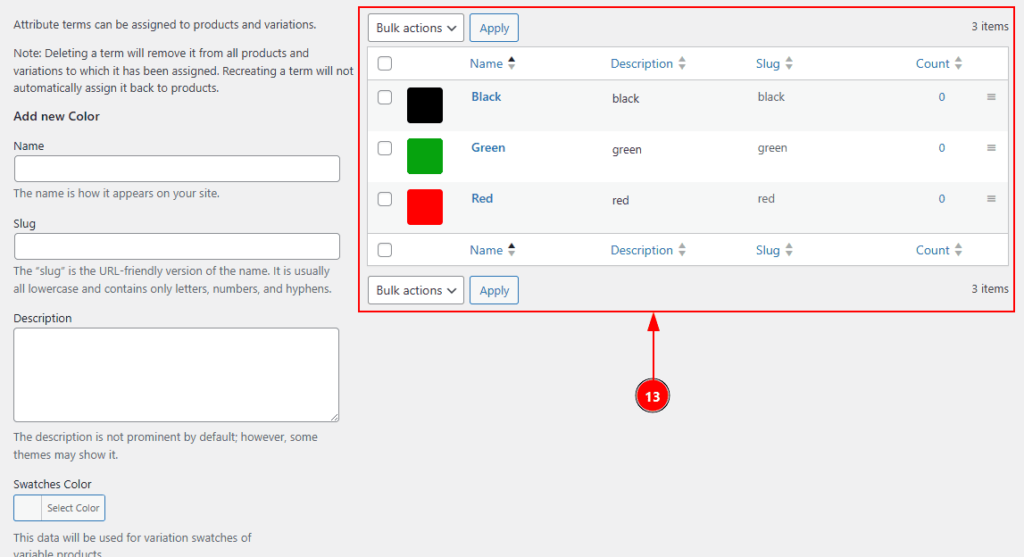
13. In the same way, create the colors that you want and you can see this upper visual.
Image Attributes #
Now let’s move to adding the Image Attributes –
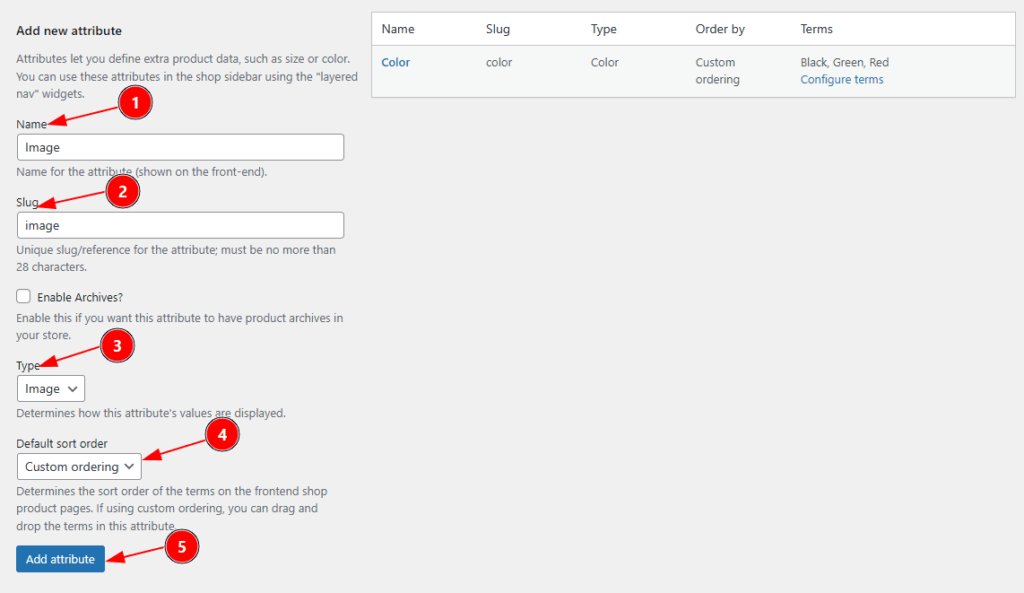
1. Name: You can set the name of the attribute with this option. Here we have named the attribute as Image.
2. Slug: You can set the slug for the attribute with this option.
3. Type: You can select the type between color, image, label & button with this option. Here, we have choose the attribute type as Image.
4. Default Sort Order: You can set the sort order with this option. You can choose between Custom ordering, Name, Name (numeric) or Term ID.
5. Add Attribute: After input all the information click on the add attribute to complete the process and save the settings.
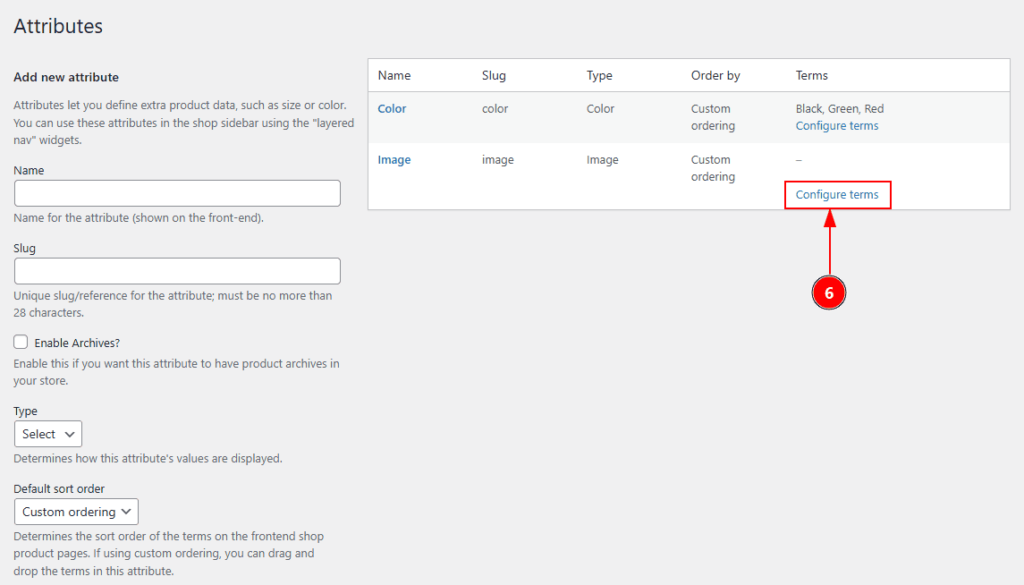
6. The attribute that you have added will appear in the right top corner. Click on the configure Items to customize the added attribute.
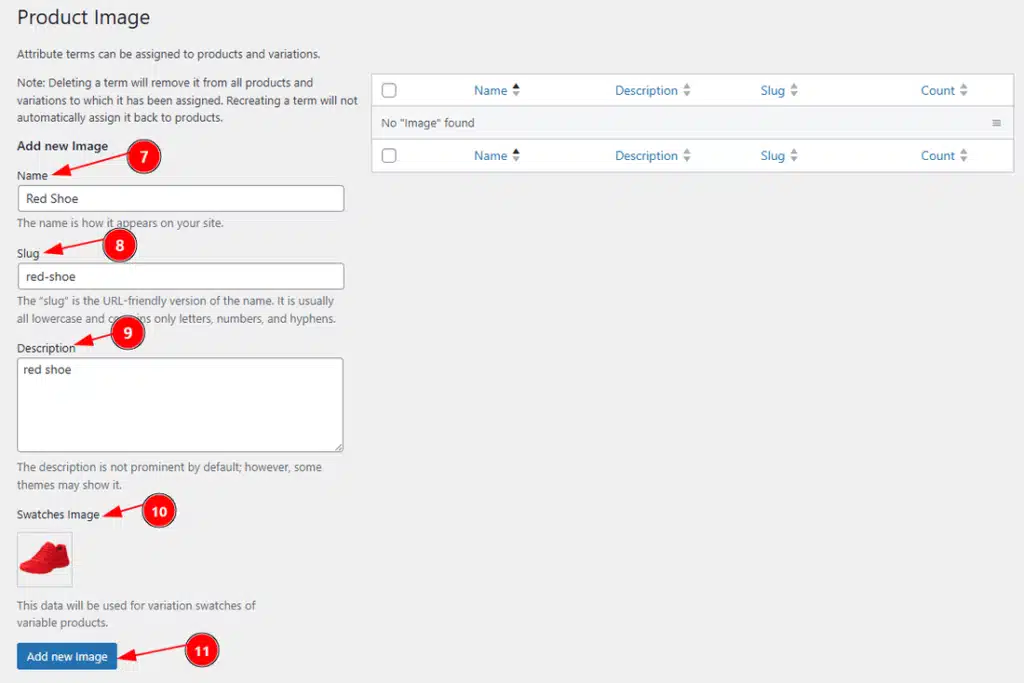
7. Name: You can set the name of the attribute as image with this option.
8. Slug: You can set the slug for the attributes ( unique slug/references ).
9.Description: You can add the description for the image here.
10. Swatches Image: You can set the image as you want with this option.
11. Add New Color: Click on the ” Add new Color ” button to add new variation.
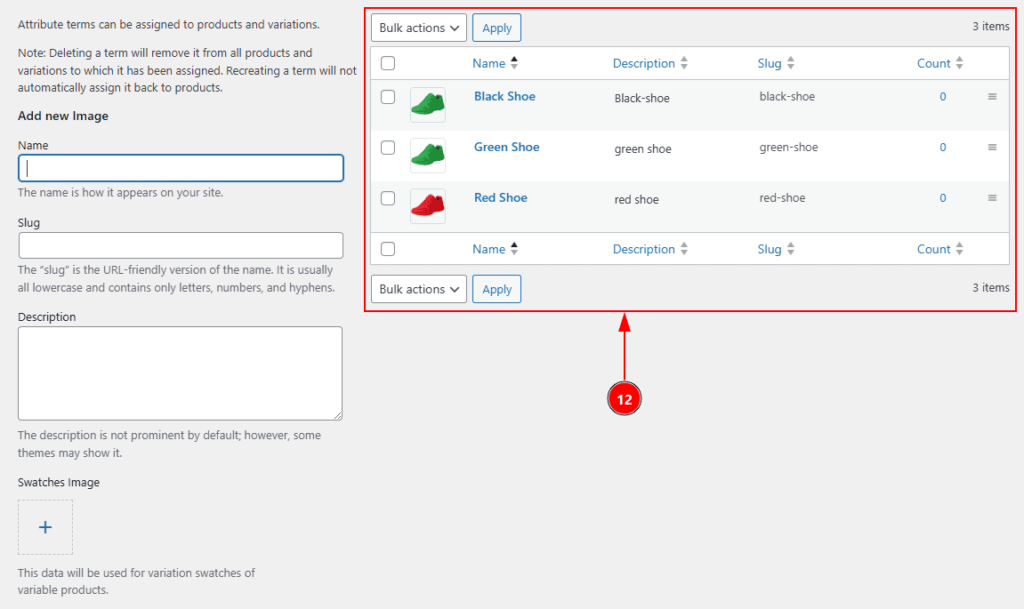
12. By following the upper process of adding you can add the image and you will get this visual.
Label Attributes #
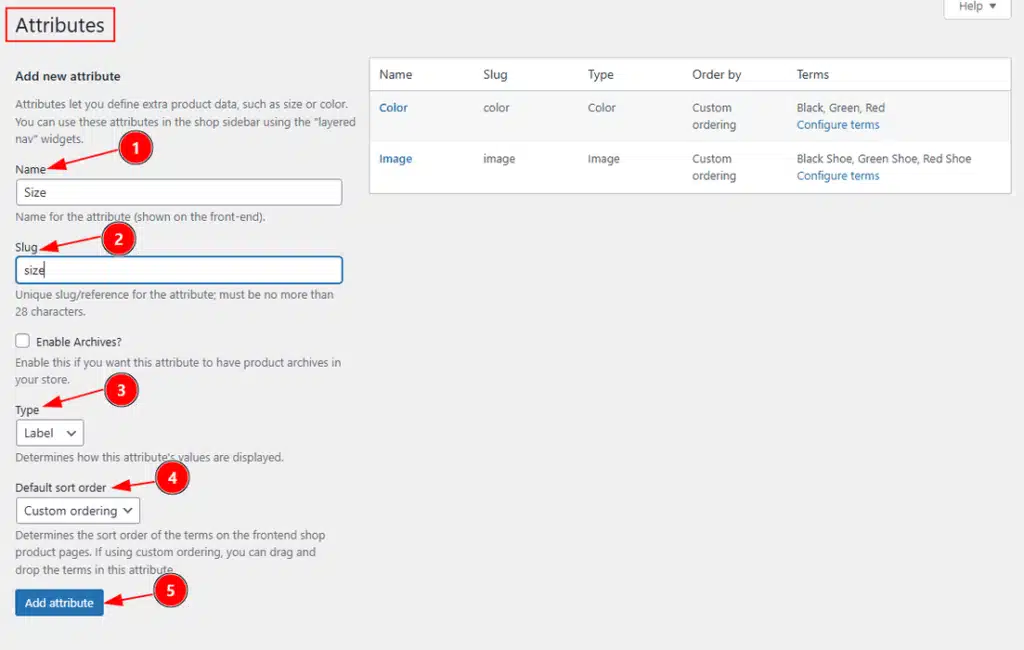
Now, let’s move forward and add the size attribute for your product. For this you need to select the Label attribue.
1. Name: You can set the name of the attribute with this option. Here we have named the attribute as Size.
2. Slug: You can set the slug for the attribute with this option.
3. Type: You can select the type between color, image, label & button with this option. Here, we have choose the attribute type as Label.
4. Default Sort Order: You can set the sort order with this option. You can choose between Custom ordering, Name, Name (numeric) or Term ID.
5. Add Attribute: After input all the information click on the add attribute to complete the process and save the settings.
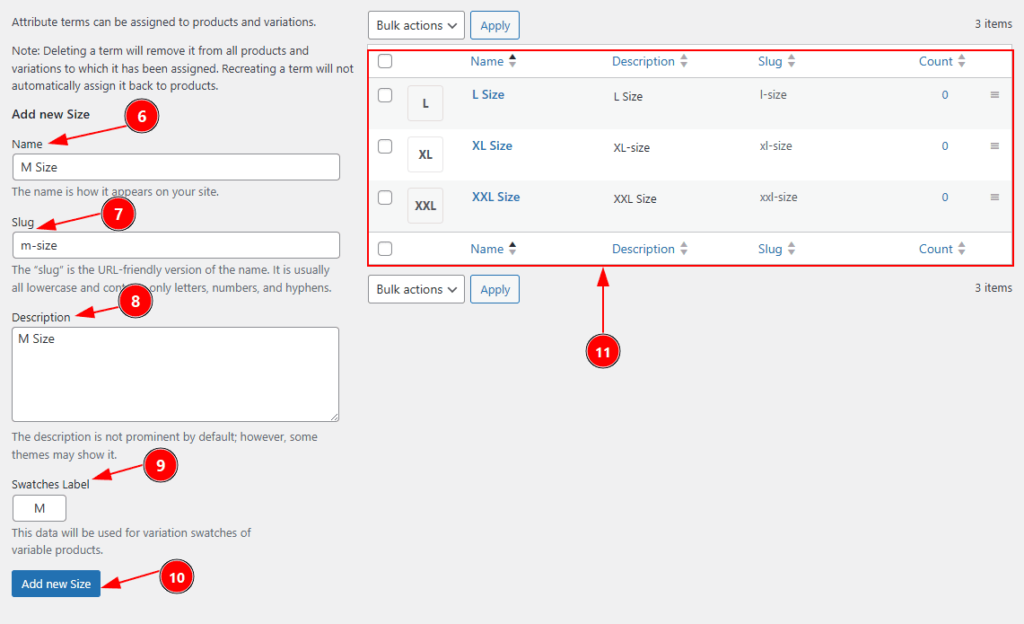
After that, like the same process click on the configure items and then move forward to configure the label attributes –
6. Name: You can set the name of the attribute as image with this option.
7. Slug: You can set the slug for the attributes ( unique slug/references ).
8.Description: You can add the description for the image here.
9. Swatches Image: You can set the image as you want with this option.
10. Add New Color: Click on the ” Add new Color ” button to add new variation.
11. After adding the sizes you can see the output here.
Add Variation Swatches To Product #
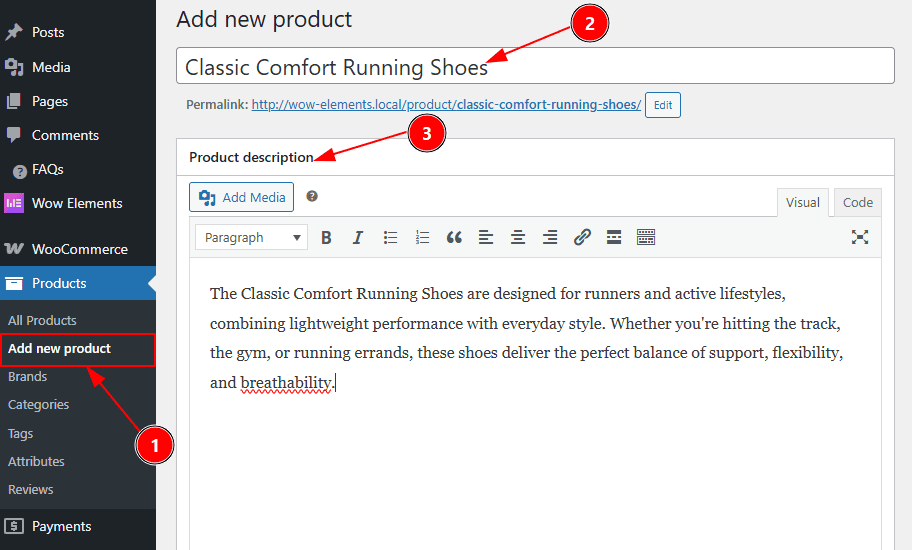
1. Navigate to WP Dashboard → Products → Add New Product.
2. You can add the product name with this option.
3. You can add the product description in this field.
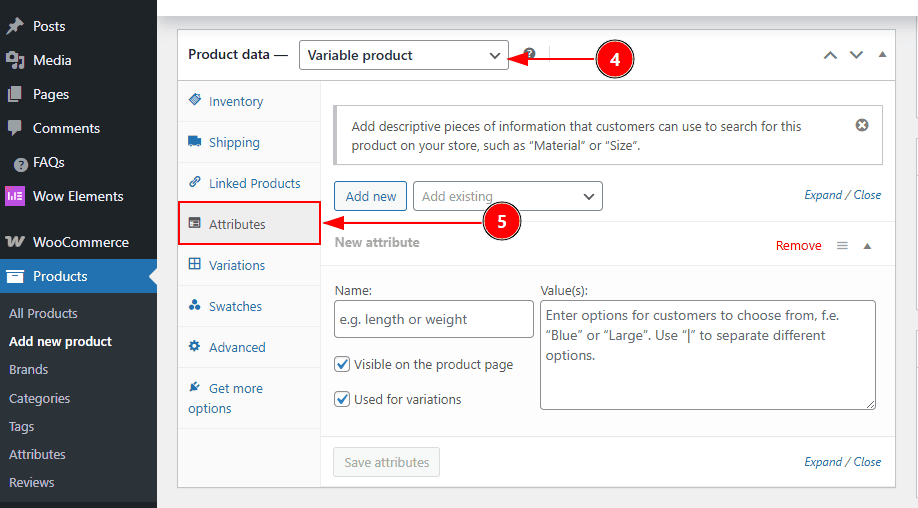
4. Now move to product data and change it to Variable Product.
5. Click on the Attributes tab to set up the attributes that you have created for your product.
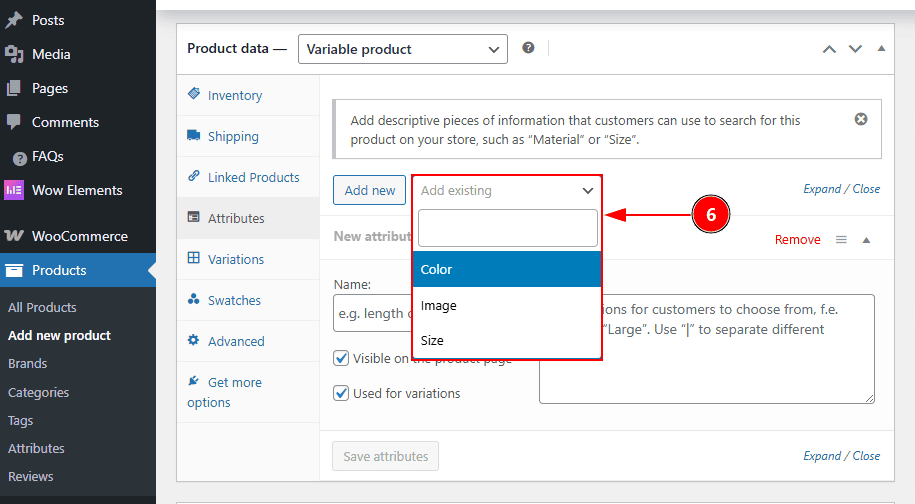
6. After opening the attributes tab click on the add new button and select the attributes that you want to add to the product. Here we can see all the attributes that we have created.
By clicking on the Add New button, you will get options to create new attributes.
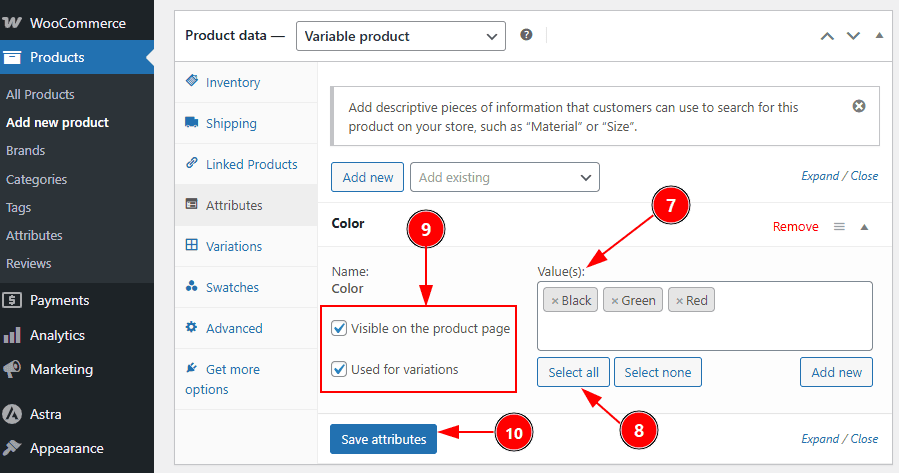
7. You can add the values here.
8. You can click to select all to select all the values.
9. You can select the options if you want to visible on the product page and want to use it for variations.
10. After make changes click on the save settings button to apply the changes.
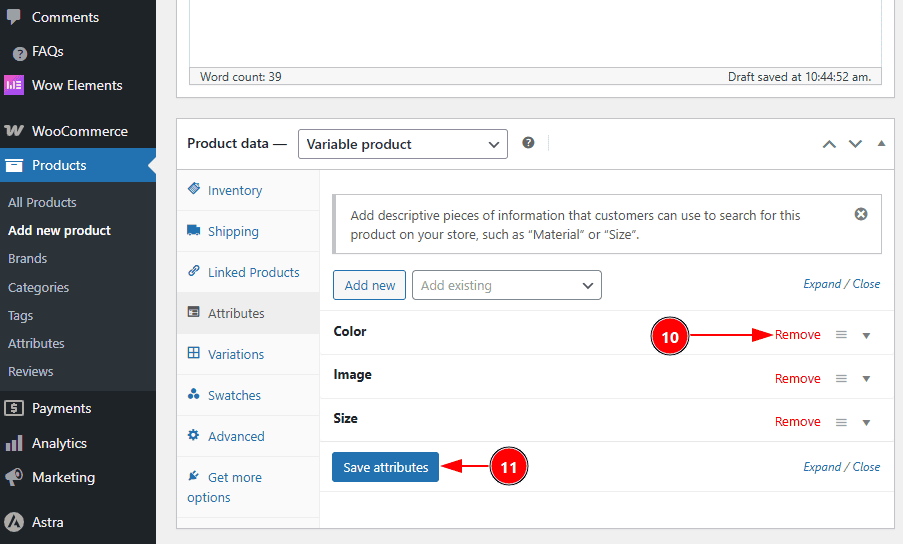
After adding the existing attributes –
10. You can click to the remove option to remove the attribute from the product.
11. You can click on the save attribute button to save the settings.
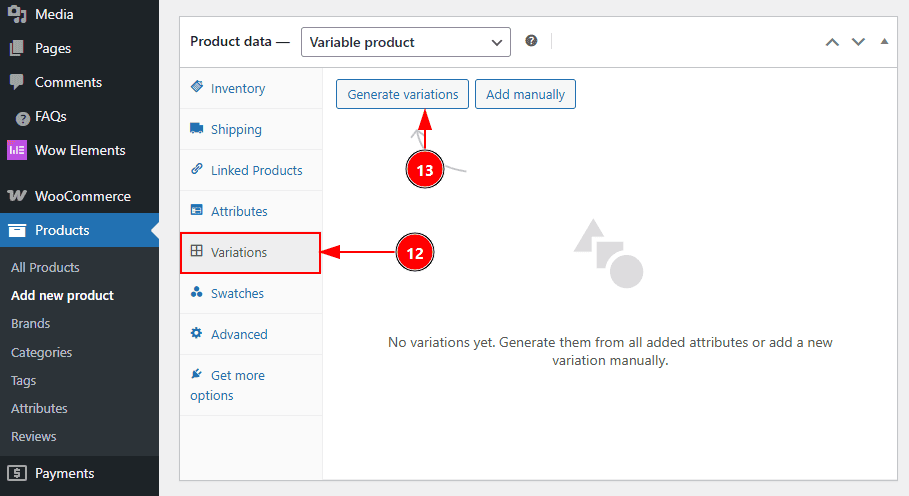
Now, let’s move to Variation tab to set up the variation to the product. This is a very crucial part, so please do it carefully or else your user will face issues while selecting the product to purchase.
12. Click on the Variations tab to open the variations settings.
13. Here you see two option. One is Generate Variations and the other is Add manually. We will refer you to use the add manually option to avoid any mistakes and input as you like.
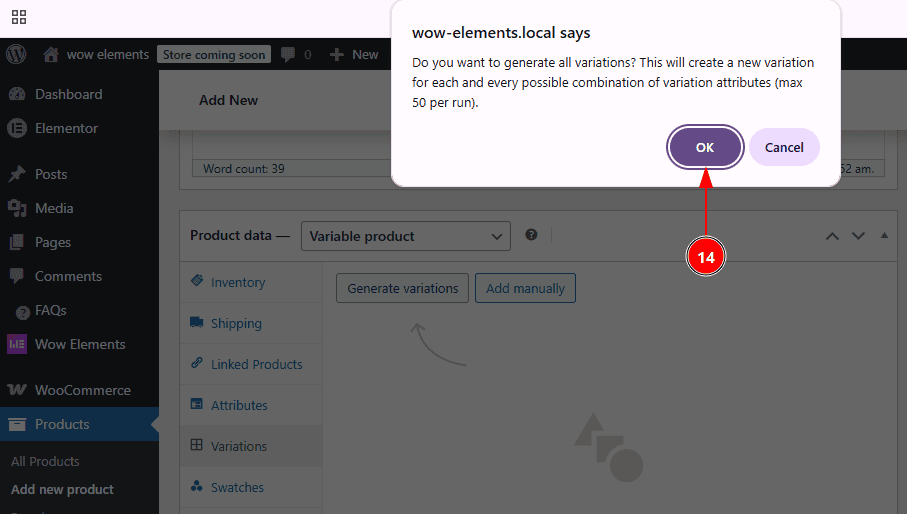
14. After clicked on the Generate Variations you will see this notice pop-up to confirm if you really want to add the variations, click ok if you want to continue.
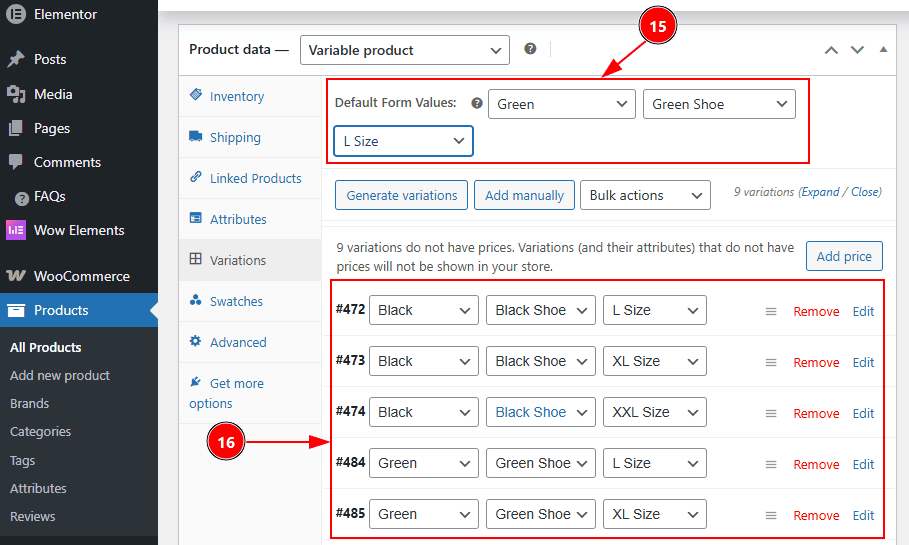
Now as the geneate is completed, you can see the variations –
15. Here you have to set up the default value that you want to show to your customer. here we have choose Green color, Green Shoe, & L size. You can select as you want.
16. All these are the variations that are generated. It’s like connect the products with each attribute so it shown when clicked on it to the customer.
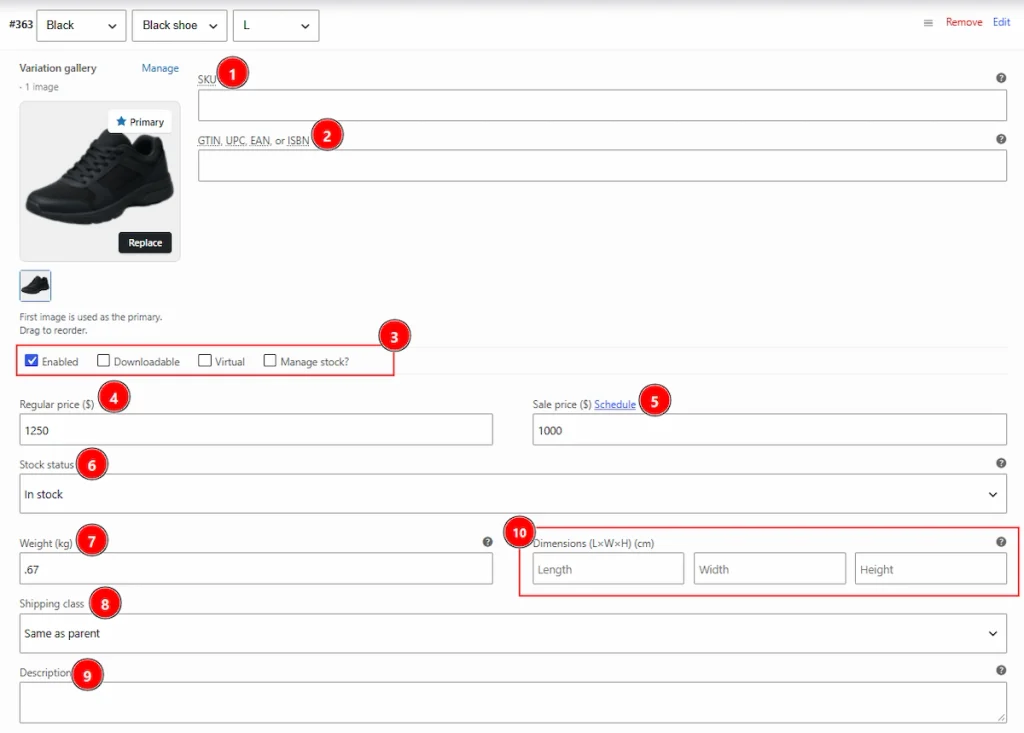
Click on a single Variations and you will get to see many options that need to be filled up to provide the customer and proper information. Let’s see what we have here –
1. You can add the Product SKU here.
2. You can make changes to the GTIN, UPC, EAN or ISBN here.
3. Here, you can select the product how to show to your audience. The available options are – Enabled, Downlaodable, Virtual & Manage Stock. You can choose as per your products structure.
4. You can set the product regular price here.
5. You can set the product discounted sale price here.
6. You can adjust the products stock status in this field.
7. Wight: You can adjust the product wight information here.
8. Shipping Class: You can choose the product deliver method here.
9. You can add a description of the product here.
10. You can adjust the dimension of the product here in this field.
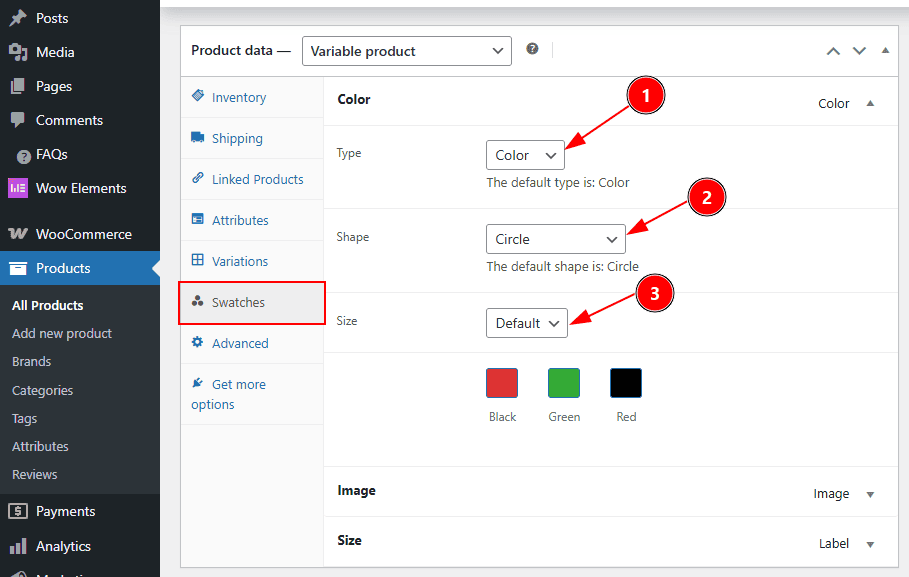
Now, move to the final steps of adding the swatches and it’s design. Click to the Swatches tab and here you will find the attributes to customize –
1. You can select the type of the attribute that you want to customize in this field. Here we have choosed the Color attribute.
2. You can make changes to the shape of the attribute visual in product page with this option.
3. You can make changes to the size of the attributes shape with this option.
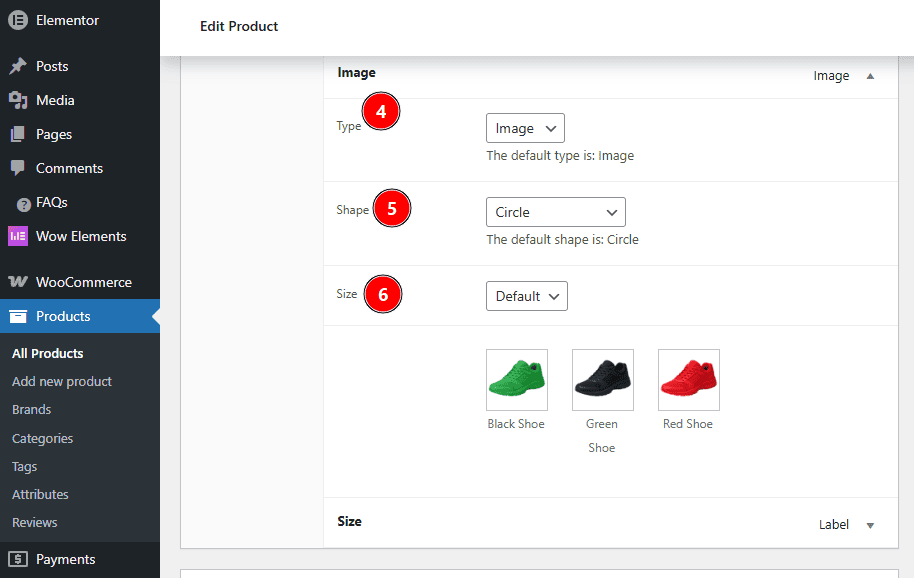
To Customize the image swatches follow the same process like the color.
4. Select the type of the attributes in this field.
5. Select the shape of the attribute to show to your audience in this field.
6. Select the size of the attribute to default or custom with this option.
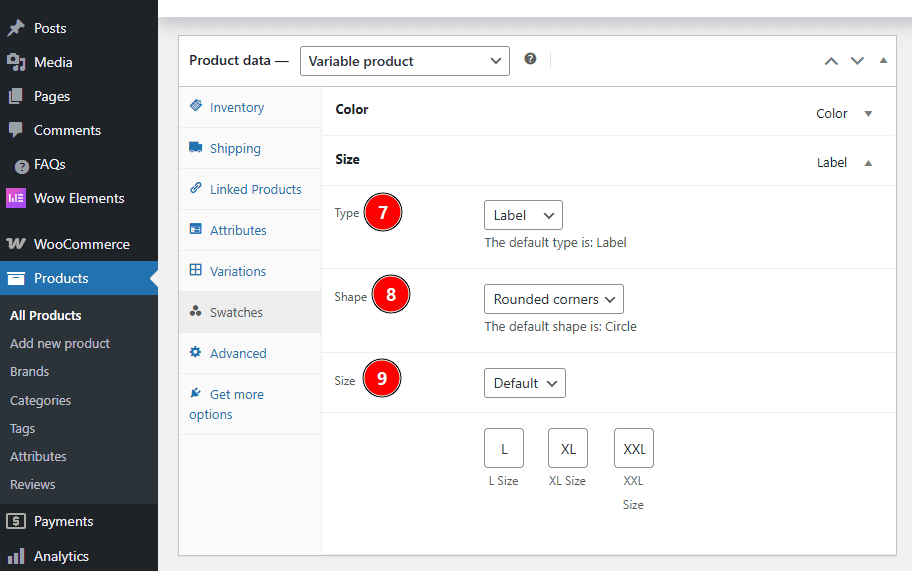
In the same way, make changes to the size attributes as well.
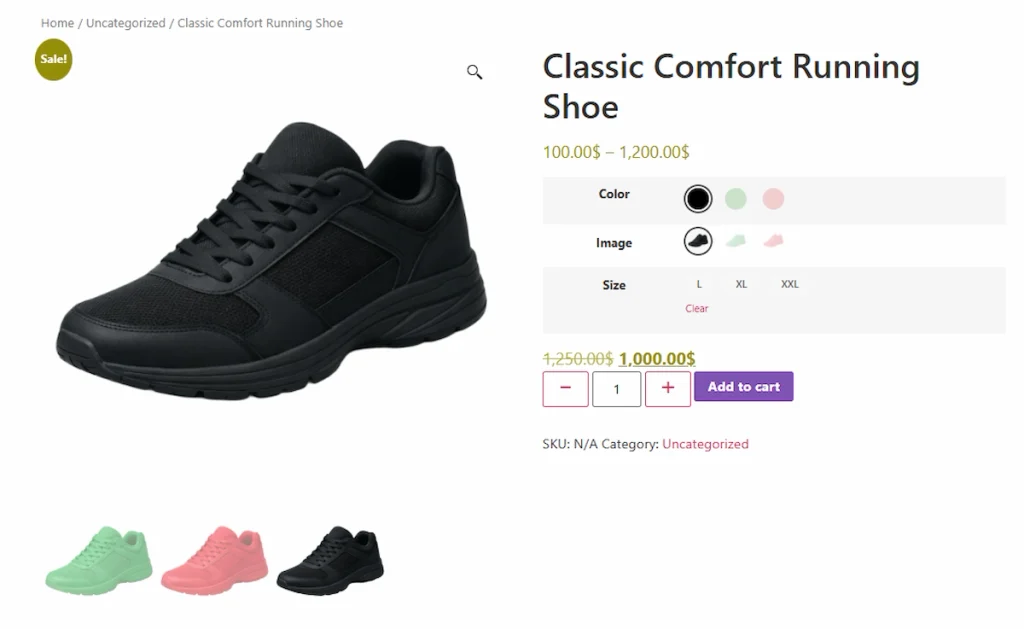
After that, publish the product by filling up the necessary information that you need to provide and preview the page. You will get to see this layout of the variation swatches. You can click on the color and size and the price and the product will change as per that. You don’t need to create seperate products for this but in a single product page you can show the exact same product with it’s different color, image, size & price.
All done, you have successfully added variation to your product and customize it.
Video Assist #
You can see the video tutorial to learn more about the Variation Swatches or visit the demo page to get more information. Thank you for staying with us.