



The Dynamic Tags feature in Wow Elements Pro allows you to display dynamic content from your website automatically without any coding. It helps you create more personalized and flexible layouts by pulling data such as post titles, featured images, author information, custom fields, and other dynamic content directly into your Elementor designs. With extensive dynamic data options and seamless Elementor integration, you can build more powerful and content-driven websites with ease. In this documentation, we will guide you through how to use and customize the Dynamic Tags feature in Wow Elements Pro.
Enable The Dynamic Tags Feature #
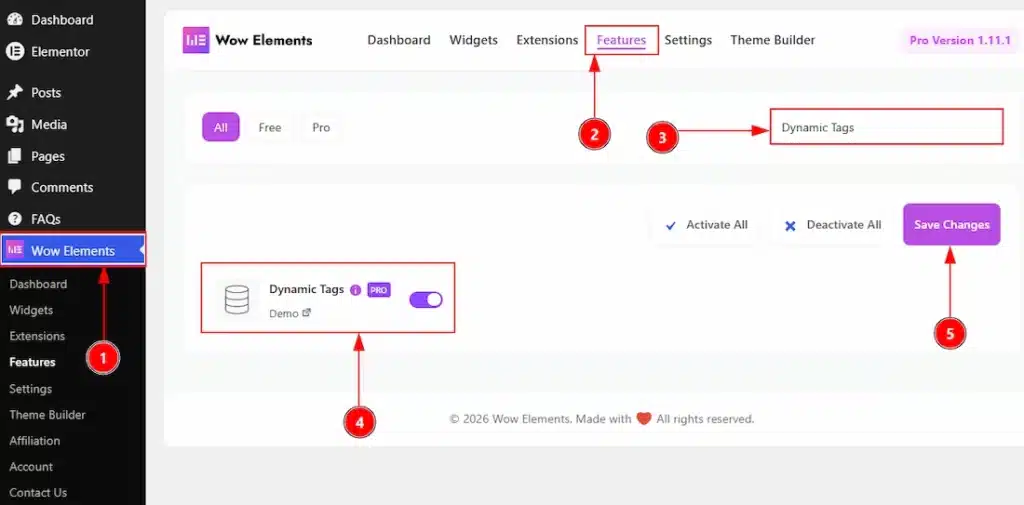
To use the Dynamic Tags Feature from Wow Elements, first, you have to enable the widget.
- Go to WordPress dashboard → Wow Elements Plugin dashboard.
- Then, Click the Core Widgets Tab.
- Search the Dynamic Tags Feature Name.
- Enable the Dynamic Tags Feature.
- Hit the Save Settings Button.
Where to Find the Dynamic Tags Feature #
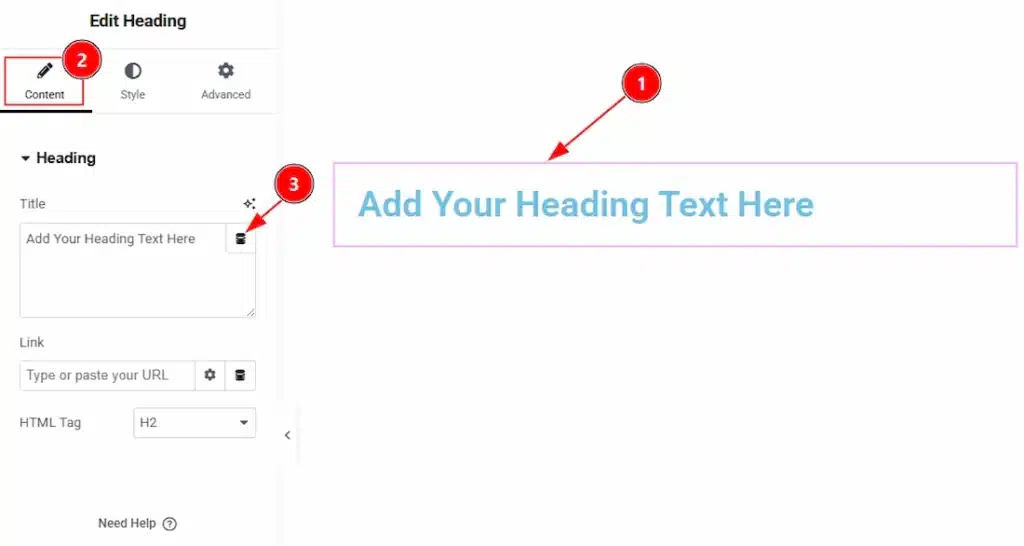
You can apply the Dynamic Tags feature on widgets. Here, to show you an example we have taken the Heading widget and let’s see where we will get the Dynamic Tags feature –
1. Select the Heading widget on the Elementor Editor.
2. Go to the Content Tab of the Heading widget.
3. Here on the Title field where you have to add the heading text, you can see a icon on the top right corner. By clicking on this icon you will get the visual of the Dynamic Tags.
Identifying The Features of Dynamic Tags #
To show you the example we are using the Heading widget. Now, let’s click on the Dynamic Tags icon, and a pop up will appear. Let’s see one by one, what features we have of the Dynamic Tags here –
Dynamic Tags of Wow Elements – Post #
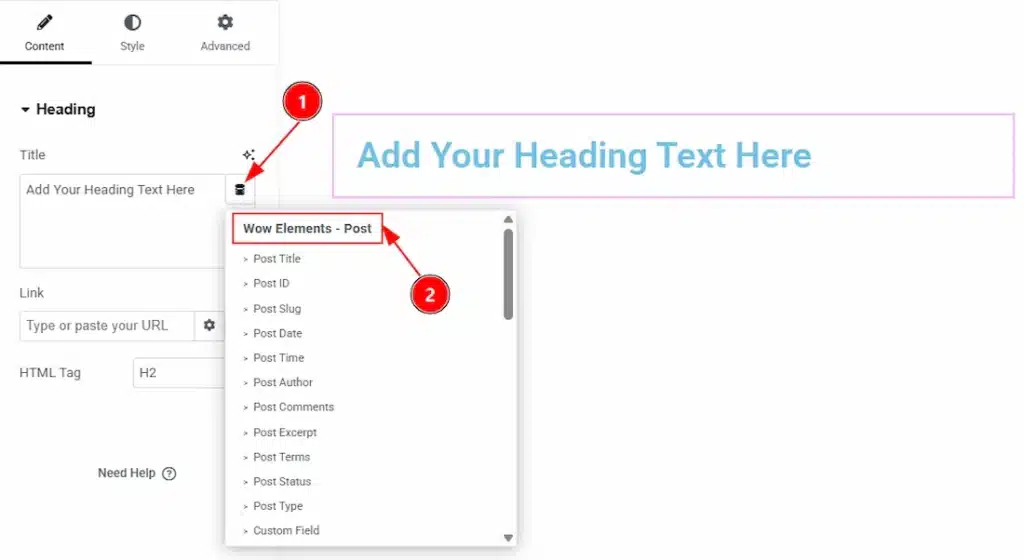
The Dynamic Tags feature of Wow Elements – Post allows you to automatically pull and display dynamic post data such as Post Title, Post Date, Author, Excerpt, or Custom Fields in the heading instead of typing static text, so the content updates automatically based on the current post. Let’s see what we have here –
- Post Title – This dynamic tag allows you to display the title of the current post.
- Post ID – This dynamic tag allows you to display the unique WordPress ID of the current post.
- Post Slug – This dynamic tag allows you to display the URL-friendly slug of the current post.
- Post Date – This dynamic tag allows you to display the publication date of the current post.
- Post Time – This dynamic tag allows you to display the publication time of the current post based on your WordPress date and time settings.
- Post Author – This dynamic tag allows you to display the name of the author who published the current post.
- Post Comments – This dynamic tag allows you to display the number of comments associated with the current post.
- Post Excerpt – This dynamic tag allows you to display the excerpt or summary of the current post.
- Post Terms – This dynamic tag allows you to display the categories, tags, or custom taxonomy terms assigned to the current post.
- Post Status – This dynamic tag allows you to display the current status of the post, such as Published, Draft, or Pending.
- Post Type – This dynamic tag allows you to display the content type of the current item, such as Post, Page, or Custom Post Type.
- Post URL – This dynamic tag allows you to display the permalink URL of the current post.
- Custom Field – This dynamic tag allows you to display data from any custom field associated with the current post.
Dynamic Tags of Wow Elements – Site #
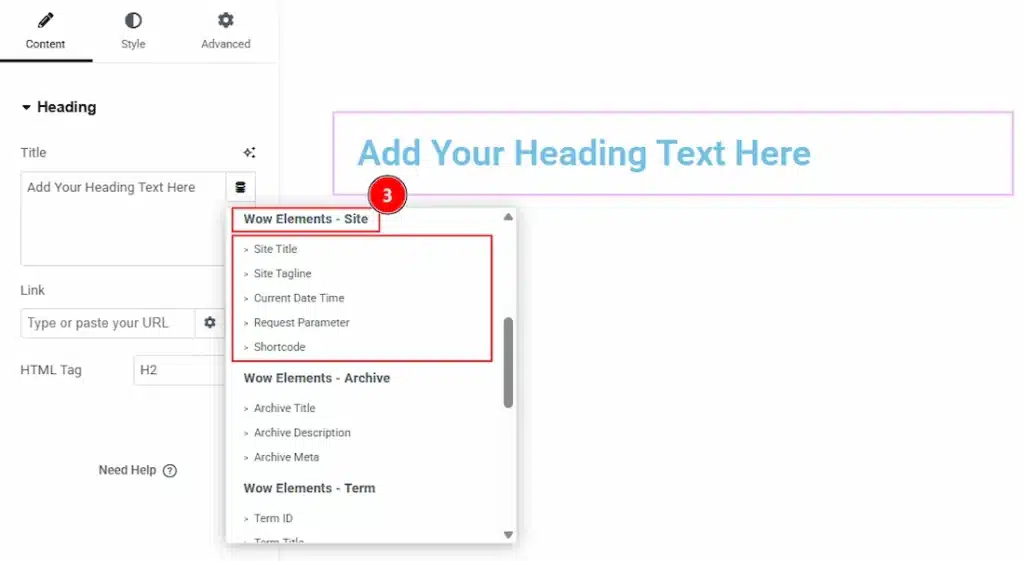
The Wow Elements – Site dynamic option allows you to display site-wide dynamic information such as Site Title, Site Tagline, Current Date & Time, Request Parameter, or Shortcode in the heading, so the content automatically updates based on your website settings or real-time data instead of using static text.
- Site Title: Displays the name of your website as set in the WordPress General Settings.
- Site Tagline: Shows the website’s tagline or short description configured in WordPress settings.
- Current Date & Time: Dynamically displays the current date and/or time based on your site’s timezone.
- Request Parameter: Retrieves and displays a value from the URL query string.
- Shortcode: Executes and displays the output of a WordPress shortcode within the heading.
Dynamic Tags of Wow Elements – Archive #
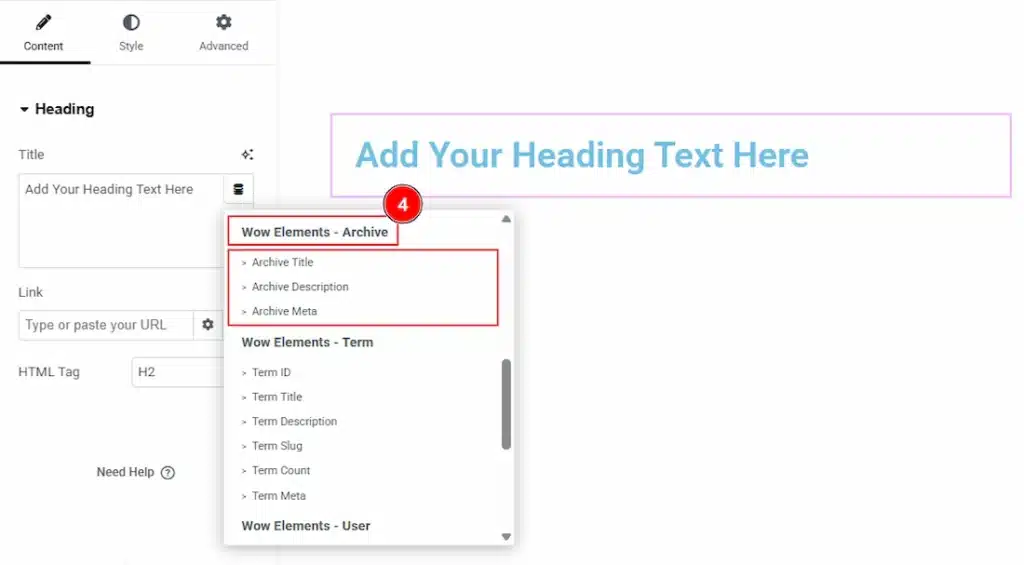
The Wow Elements – Archive dynamic option allows you to automatically display archive-related information—such as Archive Title, Archive Description, or Archive Meta so the heading updates dynamically based on the current category, tag, author, or date archive page being viewed.
- Archive Title: You can display the dynamic title of the current archive page (e.g., category name, tag name, author, or date).
- Archive Description: You can display the description assigned to the current archive, such as a category or tag description.
- Archive Meta: You can display additional metadata related to the archive, such as post count or other archive-specific information.
Dynamic Tags of Wow Elements – Term #
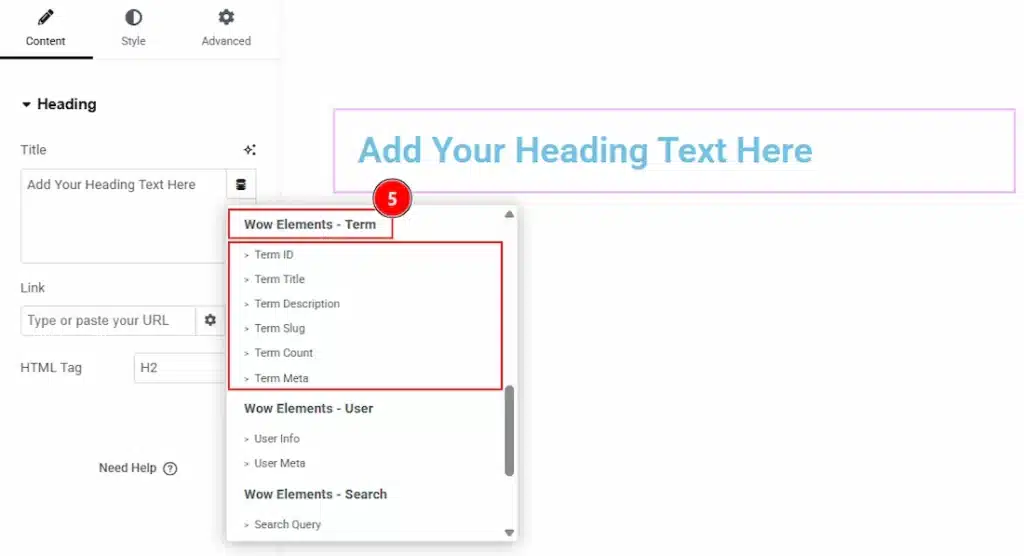
The Wow Elements – Term dynamic option allows you to display taxonomy term data such as Term ID, Term Title, Term Description, Term Slug, Term Count, or Term Meta so the heading automatically updates based on the currently viewed category, tag, or custom taxonomy term.
- Term ID – This dynamic tag allows you to display the unique ID of the current term.
- Term Title – This dynamic tag allows you to display the title or name of the current term.
- Term Description – This dynamic tag allows you to display the description assigned to the current term.
- Term Slug – This dynamic tag allows you to display the URL-friendly slug of the current term.
- Term Count – This dynamic tag allows you to display the number of posts or items associated with the current term.
- Term Meta – This dynamic tag allows you to display custom metadata associated with the current term.
Dynamic Tags of Wow Elements – User #
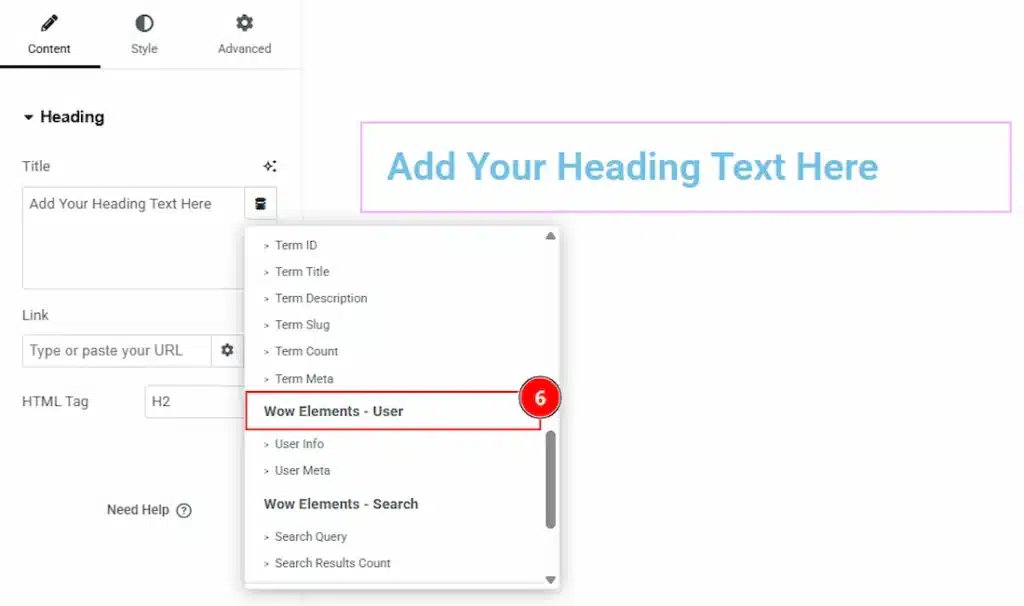
The Wow Elements – User dynamic option allows you to display user-related information such as User Info or User Meta so the heading automatically shows data from the current logged-in user or post author, depending on the context.
- User Info – This dynamic tag allows you to display information about the current user, such as their name, username, email, or other available profile details.
- User Meta – This dynamic tag allows you to display custom metadata associated with the current user.
Dynamic Tags of Wow Elements – Search #
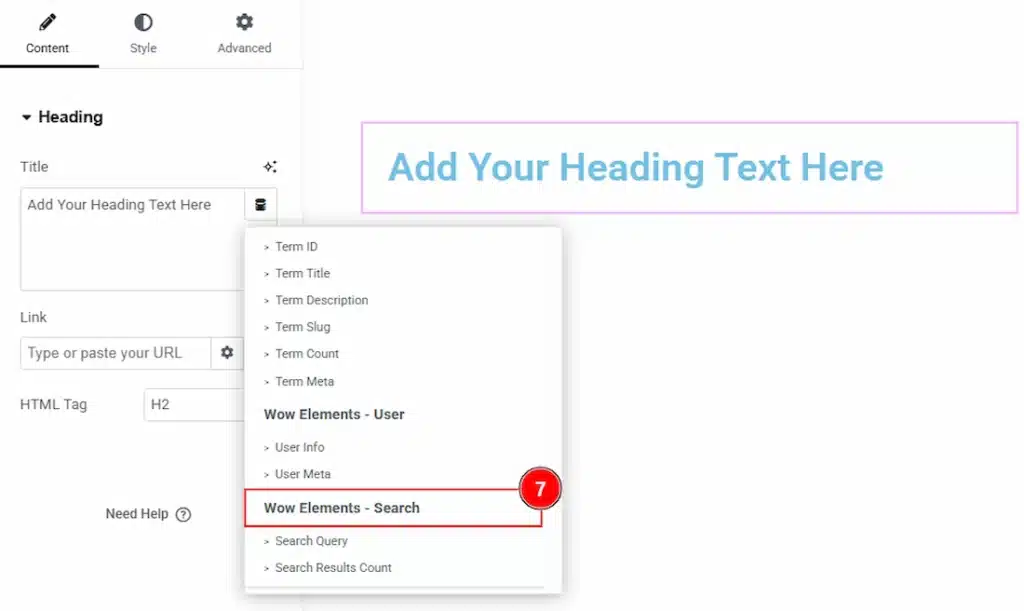
The Wow Elements – Search dynamic option allows you to display search-related data such as the Search Query or Search Results Count so the heading automatically updates based on what users are searching for and the number of results found.
- Search Query – This dynamic tag allows you to display the search term entered by the user on your website.
- Search Results Count – This dynamic tag allows you to display the total number of results found for the current search query.
Creating Dynamic Post Using the Dynamic Tags #
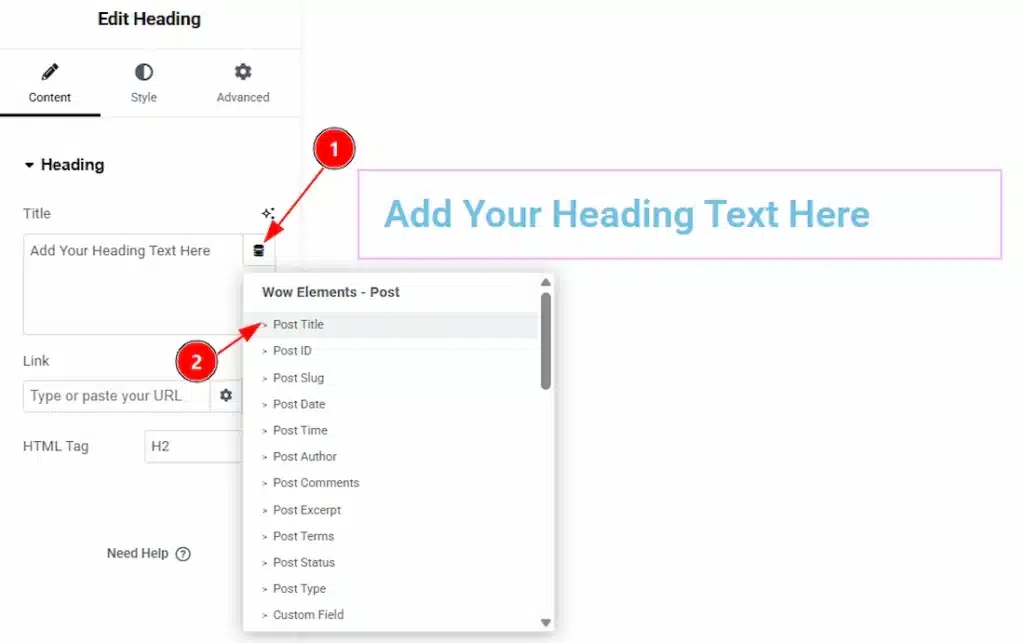
1. Drag & drop the Heading widget and then click on the Dynamic Tags icon from the left of the title text adding box.
2. After that you can see the popup where all the dynamic tags of wow elements will appear. Select the Post Title from that.
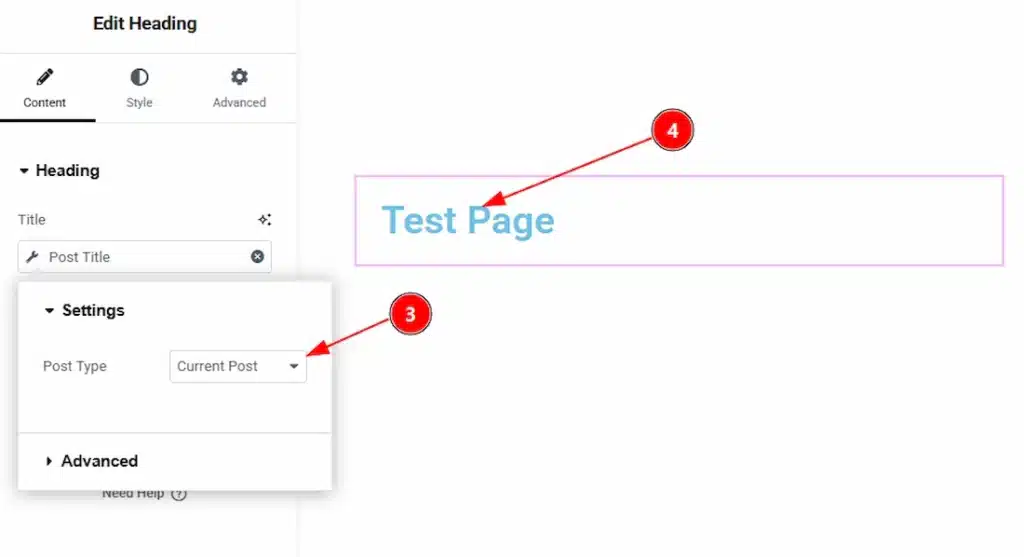
3. The dynamic tag will automatically contain the current post.
4. You can see the latest/current post title name here.
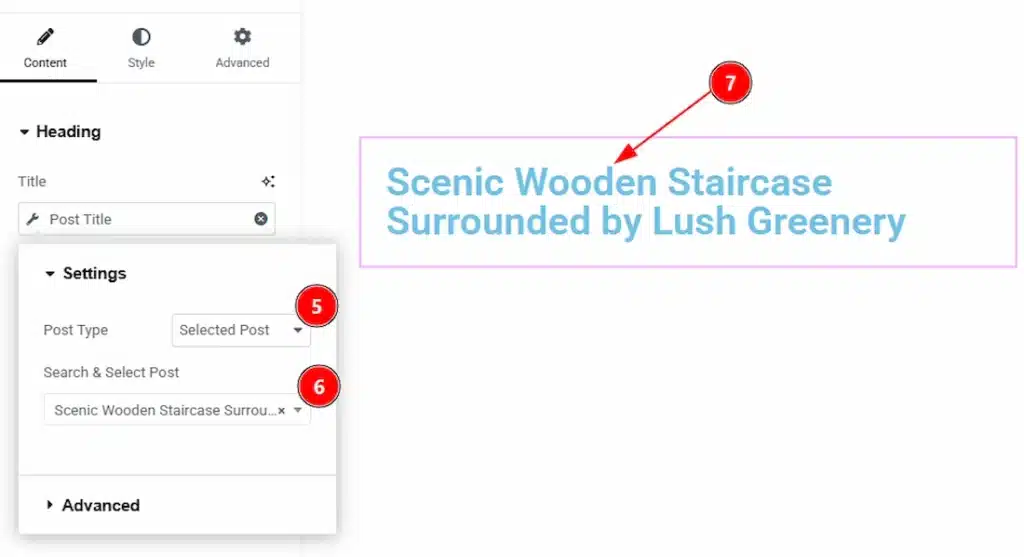
5. You can change the post type from current post to selected post to select the post that you want to show to your audience.
6. Here, you can search by the post name and add that you want to show to your audience.
7. After selecting you can see the selected post title here.
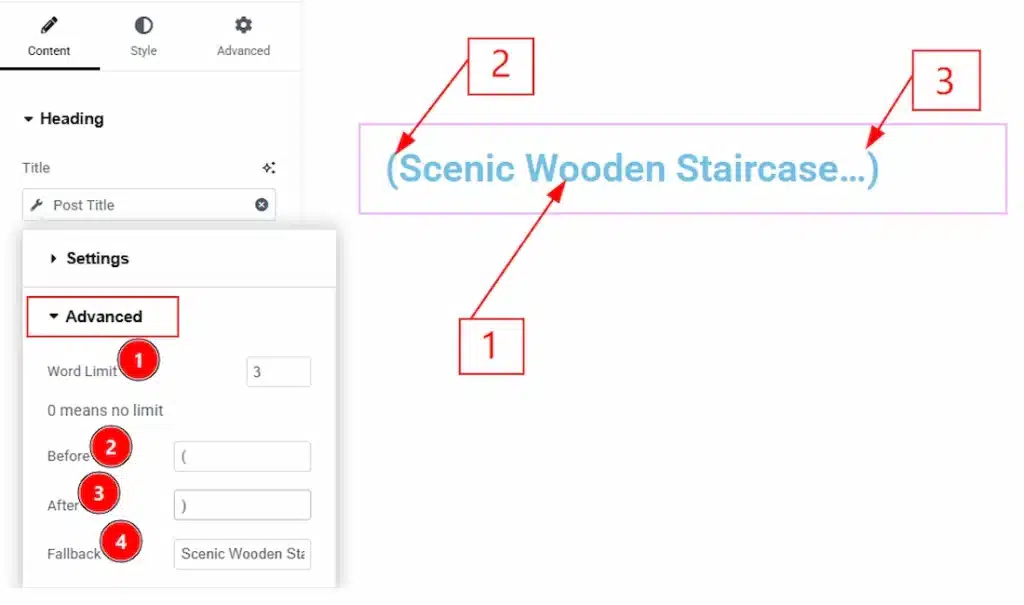
Now, let’s move to Advanced Tab and let’s see what we have here to customize –
1. Word Limit: You can set the limit of the words of title to show to your audience with this option. Please take a note that 0 means no limit.
2. Before: You can add anything before the title with this option.
3. After: You can add anything after the title with this option.
4. Fallback: You can set a fallback title which will show when the real title is not available with this option.
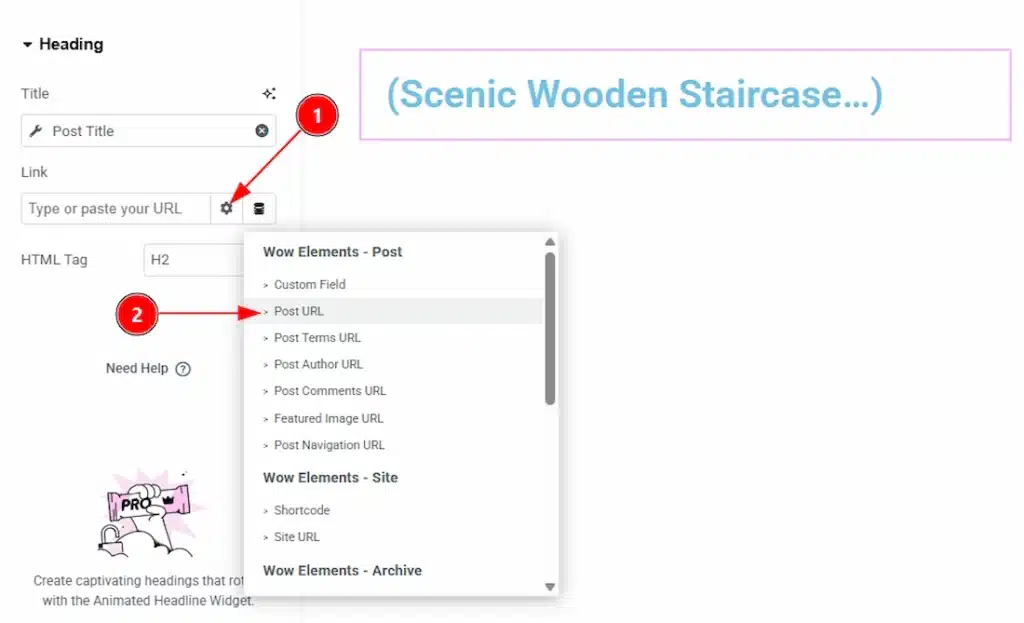
Now, let’s add a dynamic tag of Post URL to the title –
1. Click on the dynamic tag icon to open the dynamic tags of Wow Elements.
2. Now click on the Post URL dynamic tags.
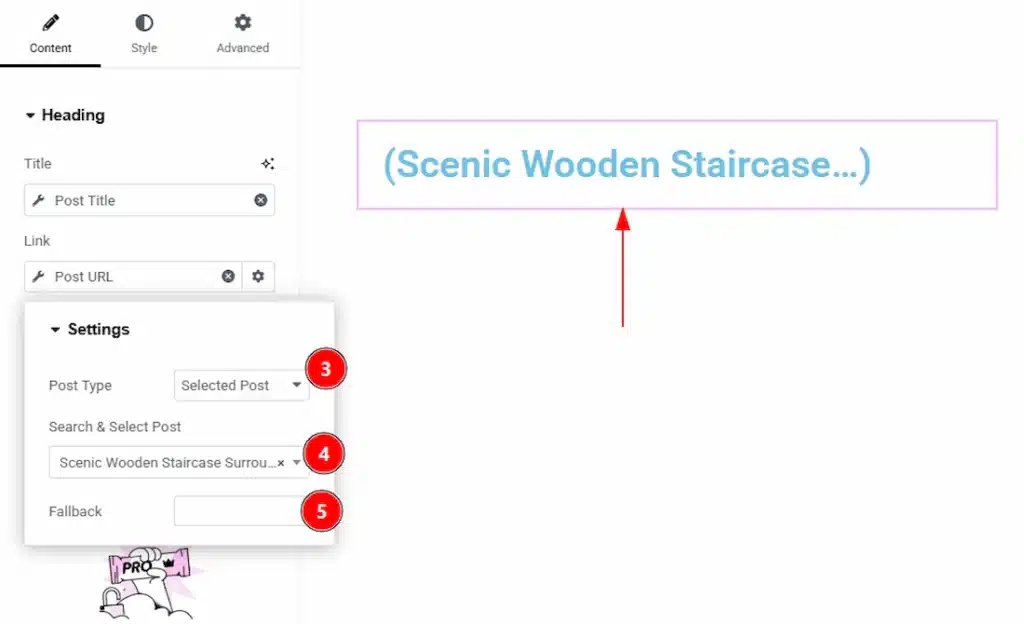
3. Post Type: You can select the post type to be current or selected with this option.
4. Search & Select Post: You can search the post as per the title name with this option.
5. Fallback: You can add a fallback so that it appears when the real post is unavailable.
Now, let’s add the image widget and use the Dynamic Tags on it.
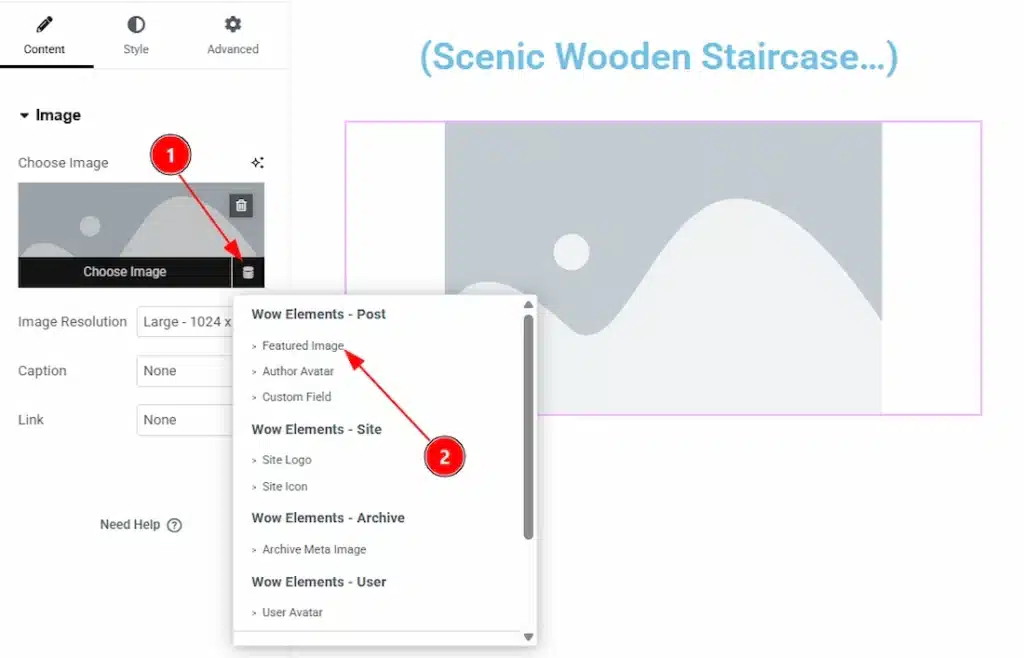
1. Drag & Drop the image and then select the image and instead of upload any image click on the Dynamic Tags icon.
2. After the Dynamic tags appears select the featured image tags from the list.
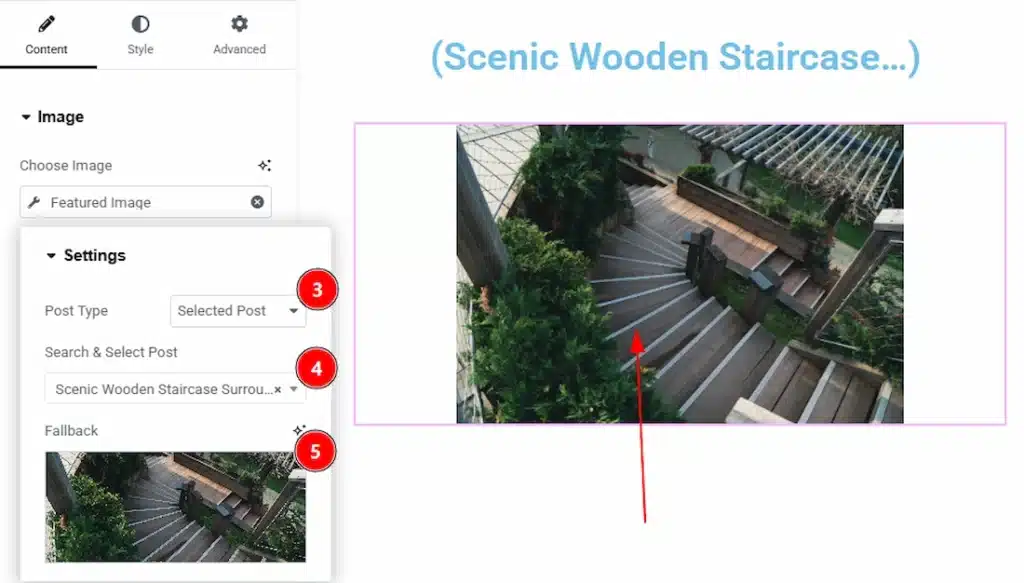
3. Post Type: You can select the post type to be current or selected with this option. Here we have selected the option as selected. The current option will be automatically select when you will click on the featured image tag.
4. Search & Select Post: You can search the post as per the title name with this option.
5. Fallback: You can add a fallback image so that it appears when the real post is unavailable.
Now, let’s add the other options to the post like, post author, post date & post time dynamically. Let’s start with the Post Author tag –
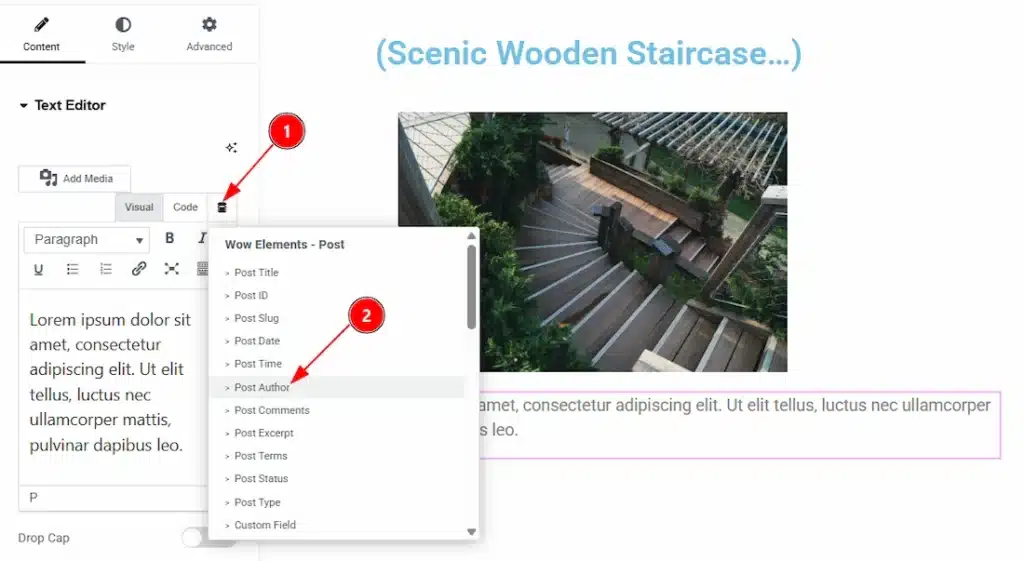
1. Drag & drop the text editor widget, and then click on the dynamic tags icon.
2. After the dynamic tags list appear select the post author option from that.
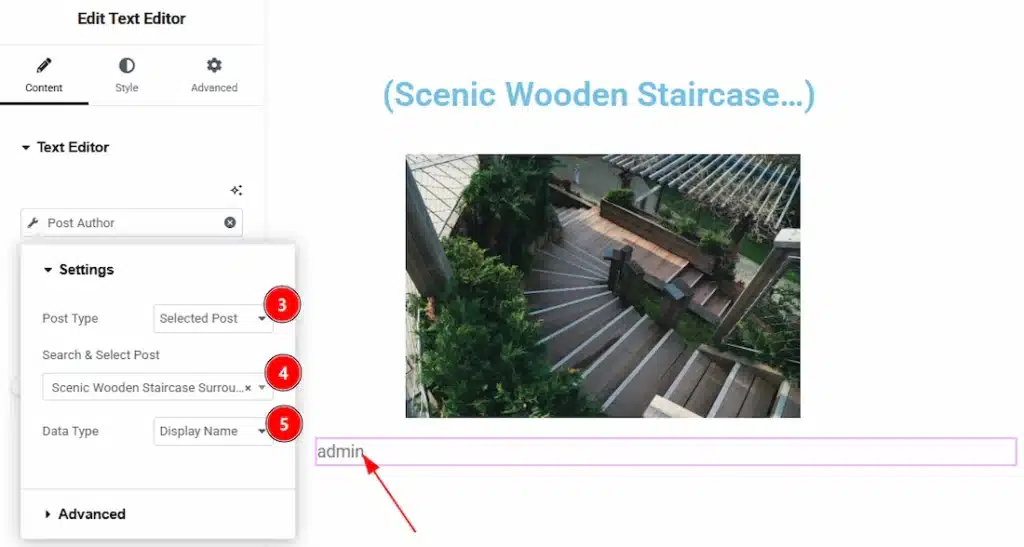
3. Post Type: You can select the post type to be current or selected with this option. Here we have selected the option as selected. The current option will be automatically select when you will click on the Post Author tag.
4. Search & Select Post: You can search the post as per the title name with this option and from the dynamic tag will visible the post author name.
5. Data Type: You can select the data type between the id, display name, bio, email, first name, last name and username with this option.
Now, let’s proceed to adding the Post Date dynamic tags –
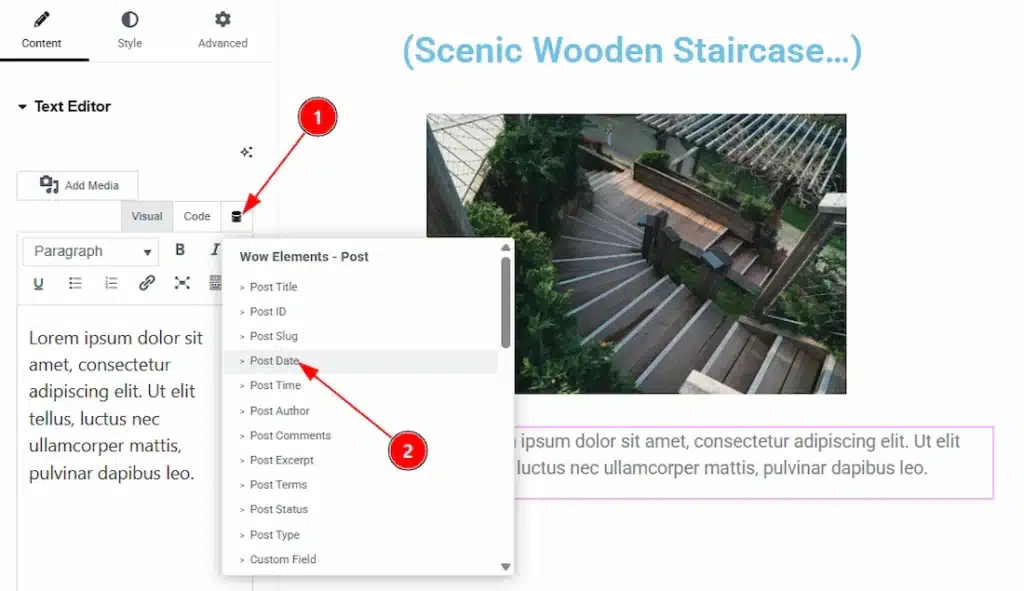
1. Again, drag drop the text editor and click on the dynamic tags icon.
2. When the tags are appear select the Post Date dynamic tag from the list.
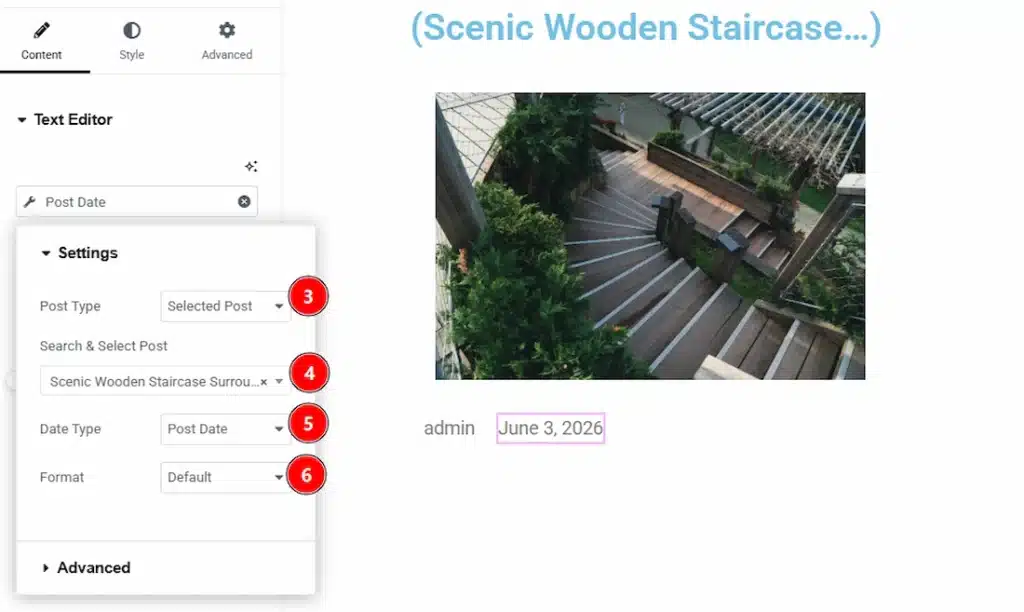
3. Post Type: You can select the post type to be current or selected with this option. Here we have selected the option as selected. The current option will be automatically select when you will click on the dynamic tag.
4. Search & Select Post: You can search the post as per the title name with this option and from the dynamic tag, the field will visible the post date.
5. Date Type: You can select the date type as post date or post modified date by this option.
6. Format: You can select the date format how you want to show the time to your audience with this option.
The below Advanced option are same to the Advanced option we have shown you on the Post Title. Navigate to that section and you can learn more about that. Now, let’s proceed to adding the Post Time dynamic tag –
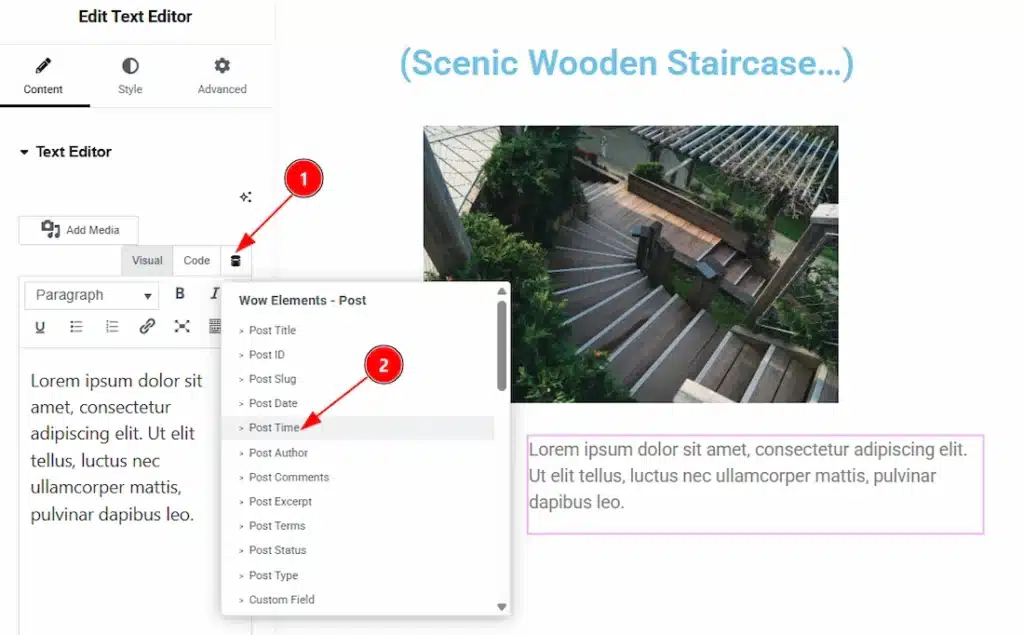
1. Again, drag drop the text editor and click on the dynamic tags icon.
2. When the tags are appear select the Post Time dynamic tag from the list.
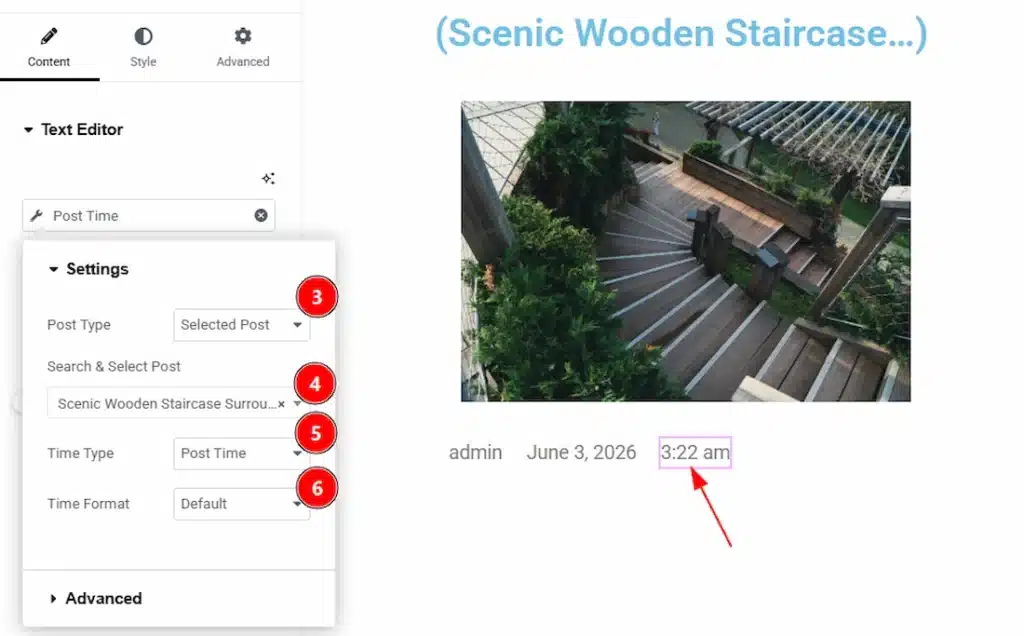
3. Post Type: You can select the post type to be current or selected with this option. Here we have selected the option as selected.
4. Search & Select Post: You can search the post as per the title name with this option and from the dynamic tag, the field will visible the post date.
5. Time Type: You can select the time type as post time or post modified time by this option.
6. Time Format: You can select the date format how you want to show the time to your audience with this option.
The below Advanced option are same to the Advanced option we have shown you on the Post Title. Navigate to that section and you can learn more about that. Now, let’s proceed to adding the Post Excerpt tag –
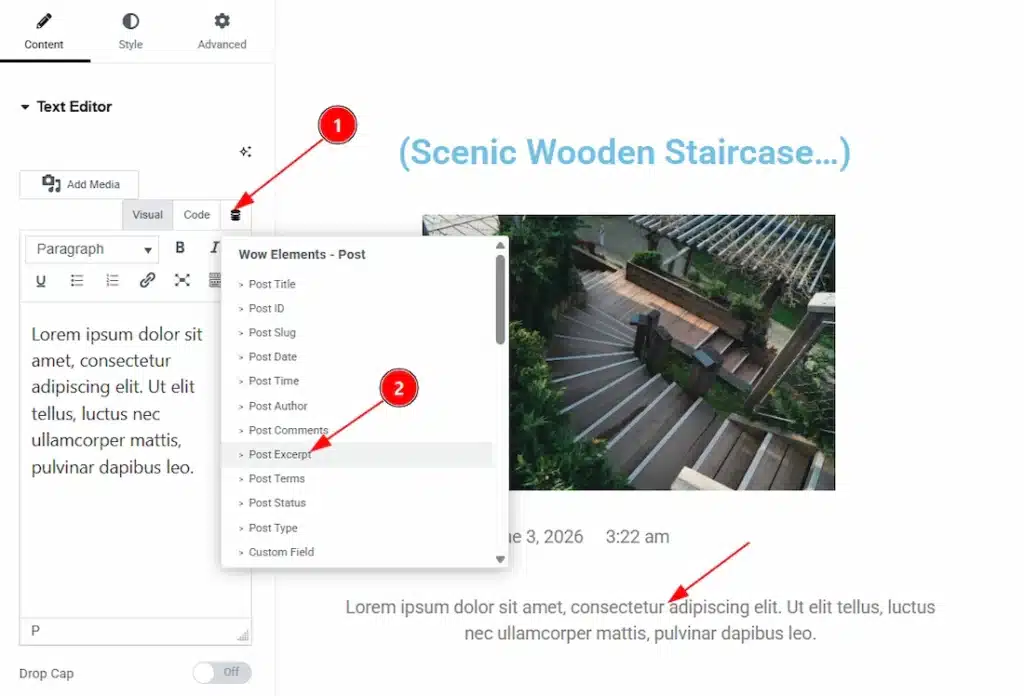
1. Again, drag drop the text editor and click on the dynamic tags icon.
2. When the tags are appear select the Post Excerpt dynamic tag from the list.
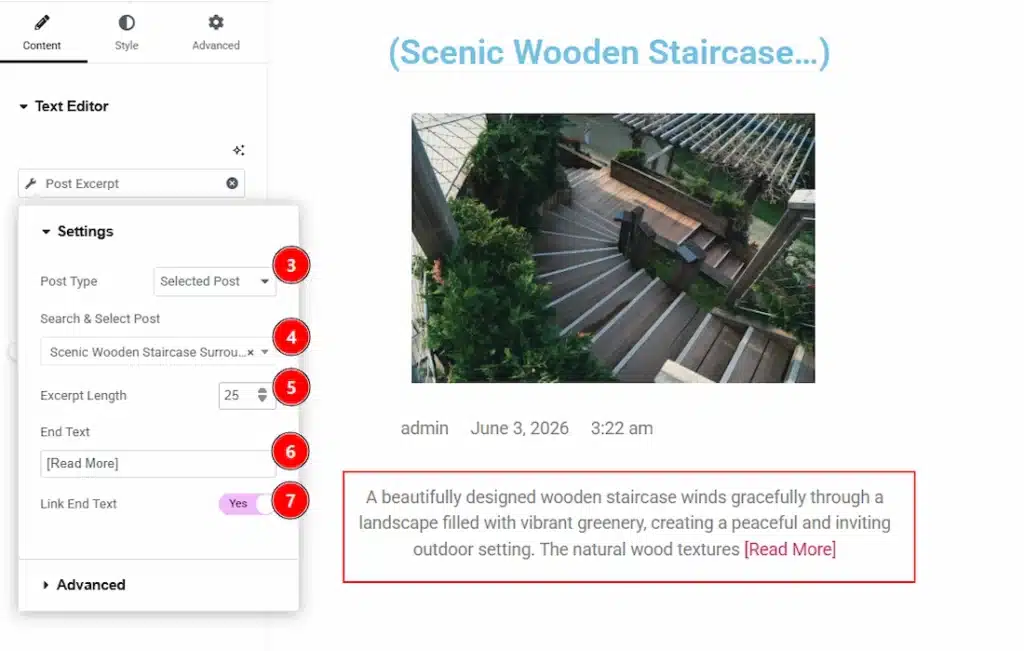
3. Post Type: You can select the post type to be current or selected with this option. Here we have selected the option as selected.
4. Search & Select Post: You can search the post as per the title name with this option and for the dynamic tag it will show the post content.
5. Excerpt Length: You can adjust the number of the words that will be visible on the frontend with this option.
6. End Text: You can add an end text to the excerpt with this option.
7. Link End Text: Enable the switcher to make the end text linked with the post.
Final Preview of The Post Created By Dynamic Tags #
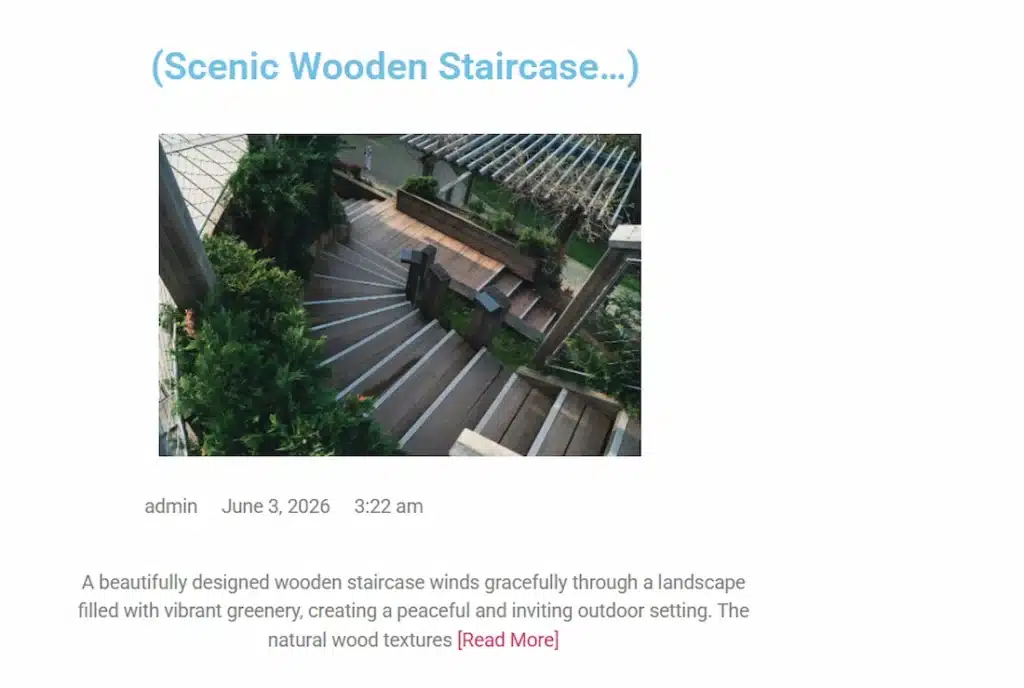
Once the necessary Dynamic Tags have been set up, the content is automatically filled in by using the data available on the current post, term, user, or other dynamic source. As illustrated above through the preview, items like the title of the post, feature image, author’s name, publish date, excerpt, and post URL are dynamically created without having to type in the content. This makes it easier to create reusable templates that automatically display relevant information across different posts and pages, saving time while ensuring consistency throughout your website.
Video Assist #
You can also watch the video tutorial to learn more about the Dynamic Tags. Please visit the demo page for examples.