



The Post List widget from Wow Elements is a versatile tool for displaying your blog posts in a clean and organized list layout on your website. It allows you to showcase posts with flexible options for layout, content, and styling, helping you present your articles in a clear and user-friendly way. With responsive controls and customization features, you can easily tailor the post list to match your website’s design and improve content visibility. In this documentation, we will guide you through how to use and customize the Post List widget in Wow Elements.
Enable the Post List Widget #
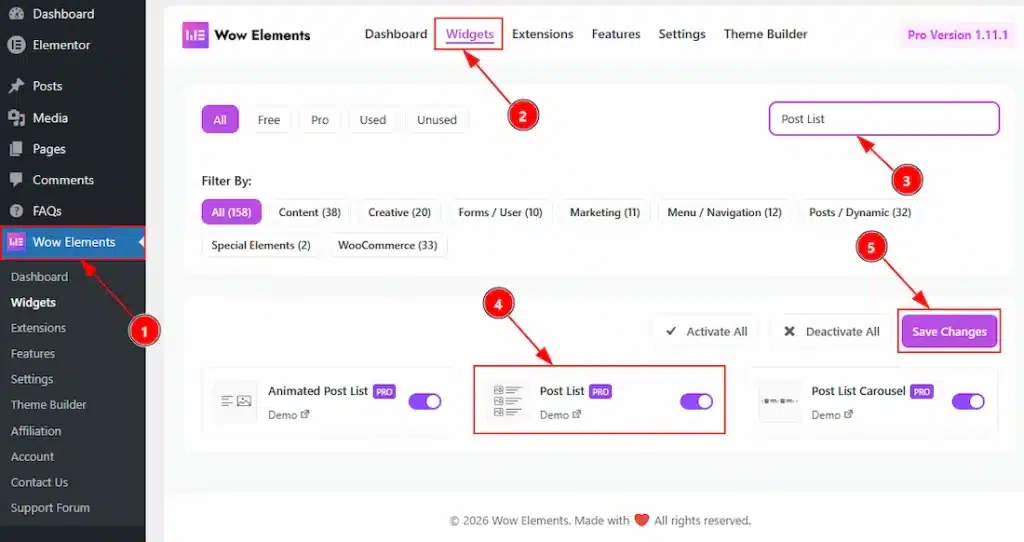
To use the Post List by Wow Elements Pro, first, you have to enable the widget.
- Go to WordPress Dashboard → Wow Elements Pro Plugin dashboard.
- Then Click the Widgets Tab.
- Search the Post List Widget Name.
- Enable the Post List Widget.
- Hit the Save Settings Button.
Inserting the Post List widget #
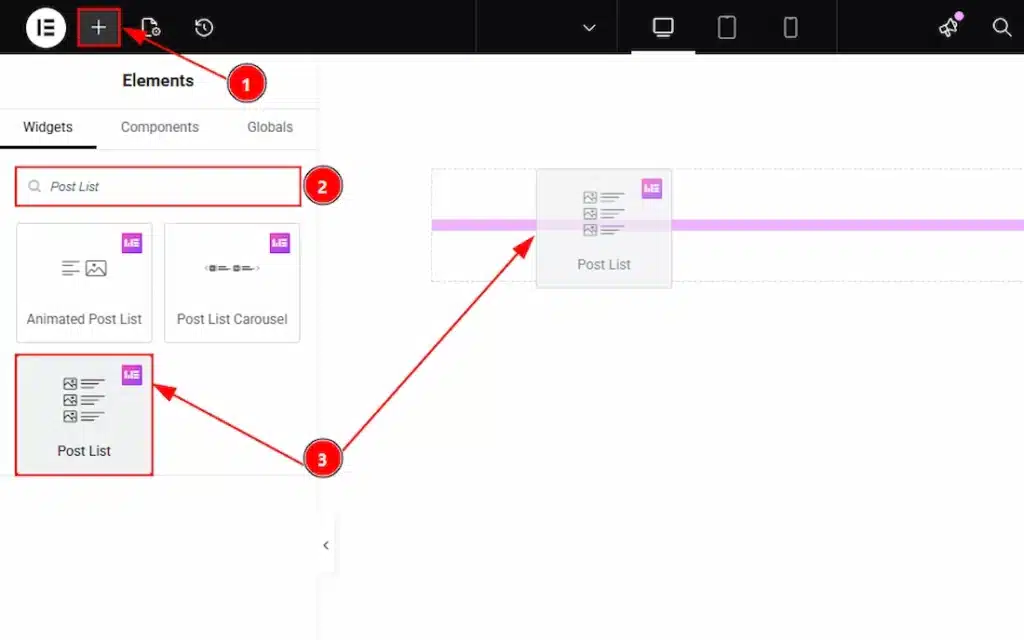
1. Go to the Elementor Editor Page and Hit the “+” icon Button.
2. Search the Post List widget.
3. Drag the widget and drop it on the editor page
Content Tab Overview #
Layout Section #
Go to Content → Layout
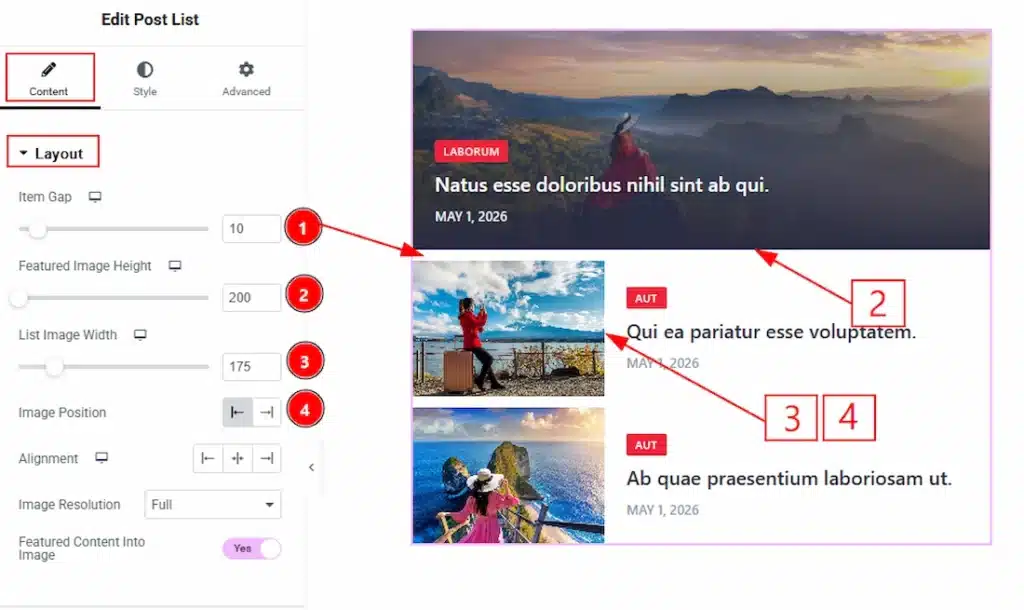
1. Item Gap: You can adjust the space between items using this option.
2. Featured Image Height: You can adjust the height of the featured image with this option.
3. List Image Width: You can adjust the width of the list images with this option.
4. Image Position: You can set the position of the image to left or right with this option.
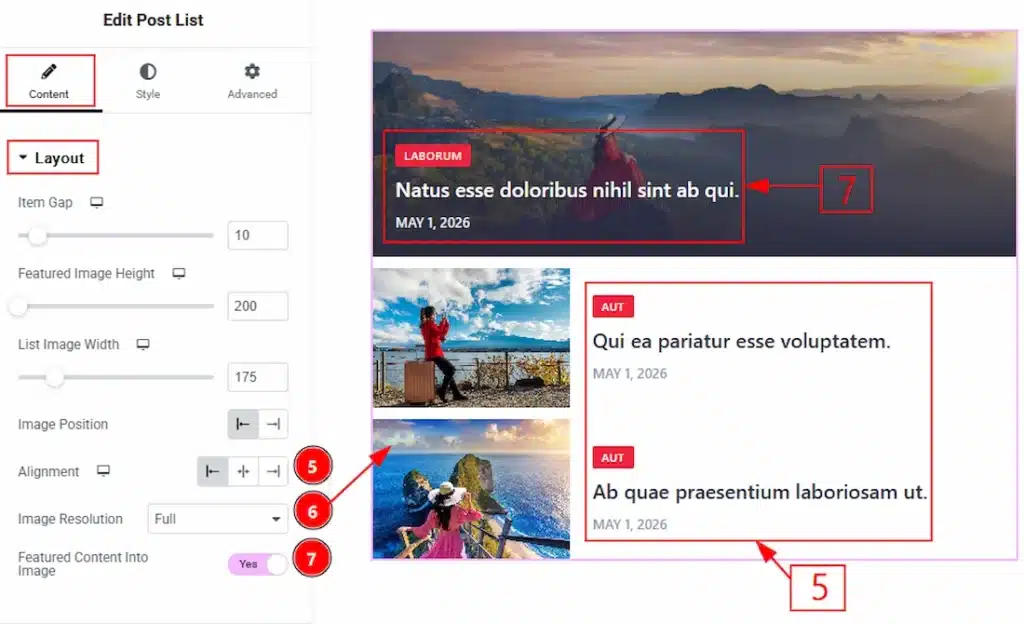
5. Alignment: You can set the content position to left, center or right with this option.
6. Image Resolution: You can adjust the resolution of the image with this option.
7. Featured Content Into Image: Enable the switcher to show the content inside the featured image area with this option.
Query Section #
Go to Content → Query
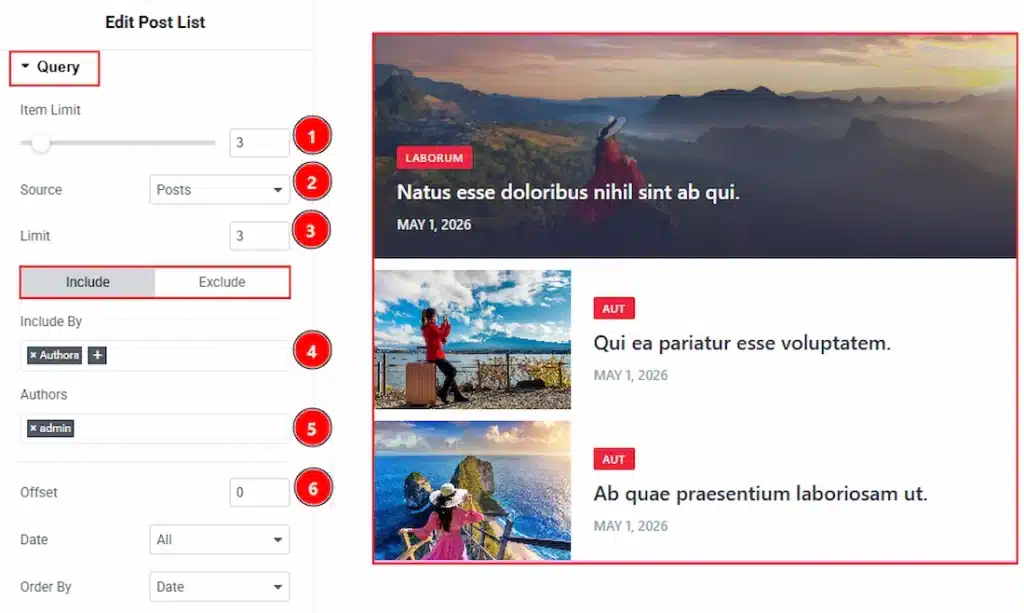
1. Item Limit: You can adjust the limit of the posts to show to your audience with this option.
2. Source: Select the source for the list from here. The types of sources are – Posts, Pages, Floating Elements, FAQs, Mega Menu Items, Template Items, Manual Selection, Current Query, and Related. Here, we selected the type as Posts.
3. Limit: You can adjust the limit here of how many posts you want to show in the Post List.
4. Include/Exclude Selection: Select the Include / Exclude filter to show/hide specific posts by Terms (Tags/Categories) or Authors. Here, we selected the include field as Author.
5. Author: This option lets you select the author’s name whose post you want to add to the list.
6. Offset: The Offset option lets you skip a certain number of posts from the start, so the display begins from the next post instead. Keeping it 0 means post without any exclusion.
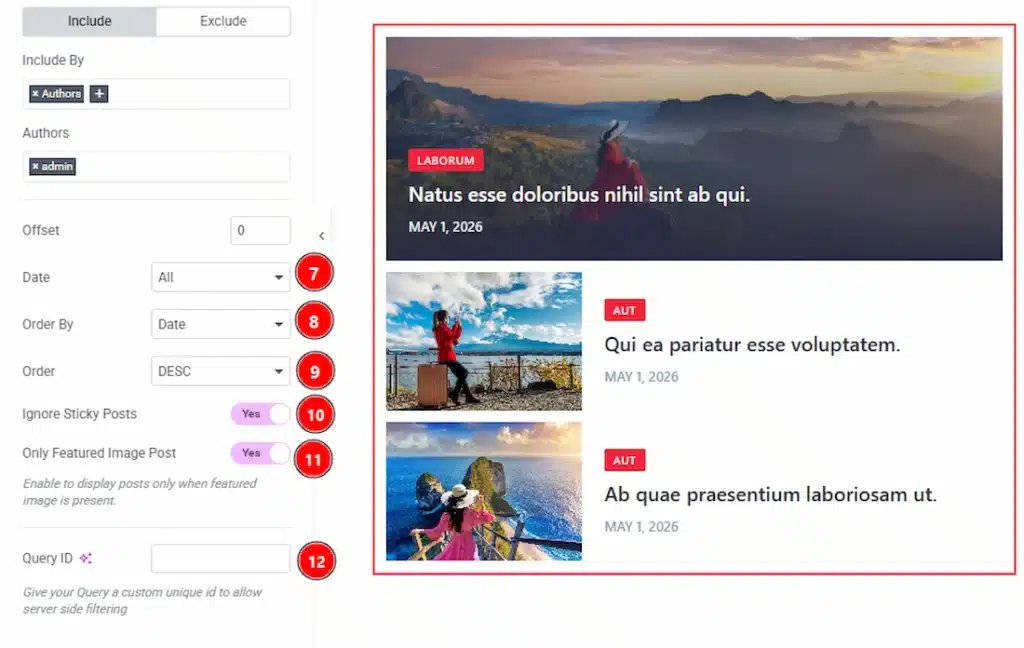
7. Date: You can select the post as per the date of creation with this option.
8. Order By: It controls the data you want to display through title, id, date, author, comment count, menu order & random. Here we selected the order as date.
9. Order: This option controls the order by which data is arranged. There are two types of order. Ascending Order (Starts from the smallest or lowest value and goes to the largest or highest.) & Descending Order (Starts from the largest or highest value and goes to the smallest or lowest.)
10. Ignore Sticky Posts: Enable the switcher to ignore the posts that are kept sticky.
11. Only Featured Image Post: Enable or disable the switcher to show or hide the featured image post.
12. Query ID: Give your query a custom, unique ID to allow server-side filtering.
Additional Settings Section #
Go to Style → Additional Settings
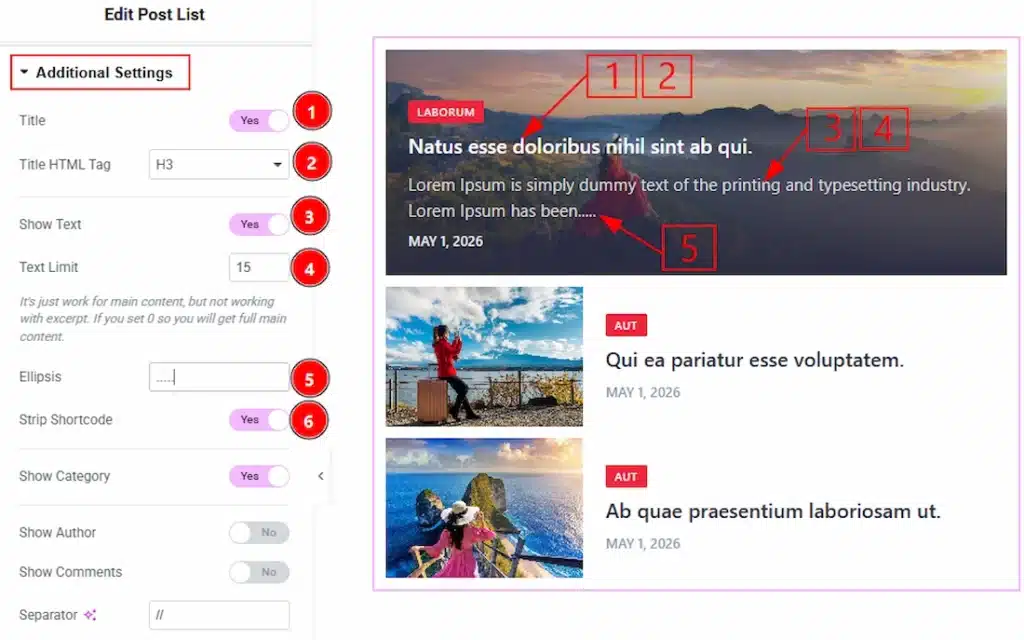
1. Title: Enable the switcher to show the title of your posts to your audience with this option.
2. Title HTML Tag: You can set the HTML Tag for the title with this option.
3. Show Text: Enable the switcher to show the text of the posts to your audience.
4. Text Limit: You can set the limit of the post text to show to your audience.
5. Ellipsis: You can add truncation dots (…) at the end of limited testimonial text with this option.
6. Strip Shortcode: Removes any shortcodes from the testimonial content before displaying it.
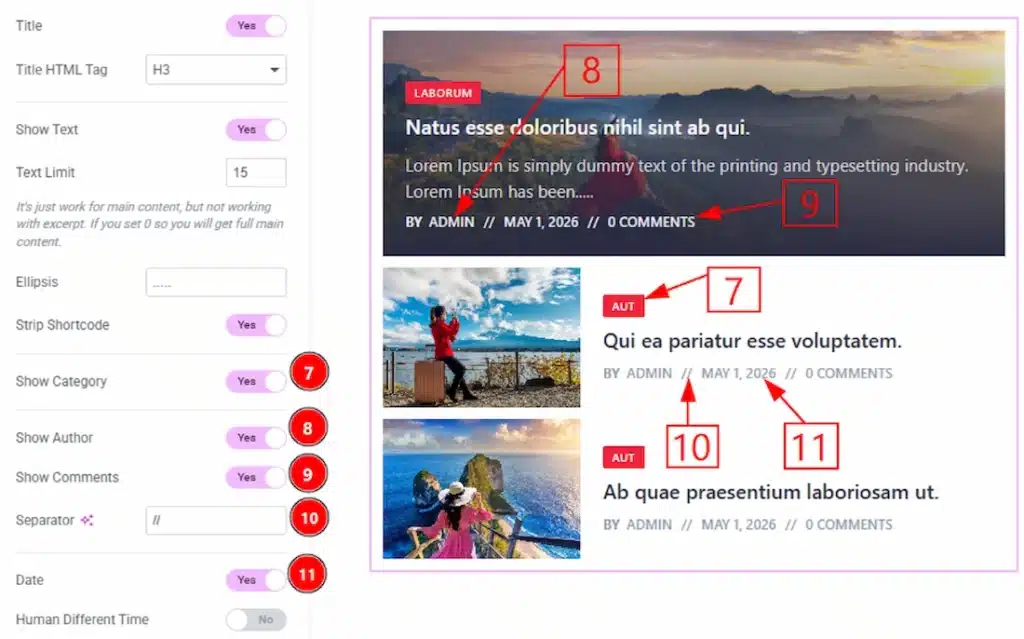
7. Show Category: Enable the switcher to show the category of your posts with this option.
8. Show Author: Enable the switcher to show the Author of the posts to show to your audience.
9. Show Comments: Enable the switcher to show the comments to your audience.
10. Separator: You can add a separator in this field to add that between meta data.
11. Date: Enable the switcher to show the date of the creation of the post to your audience.
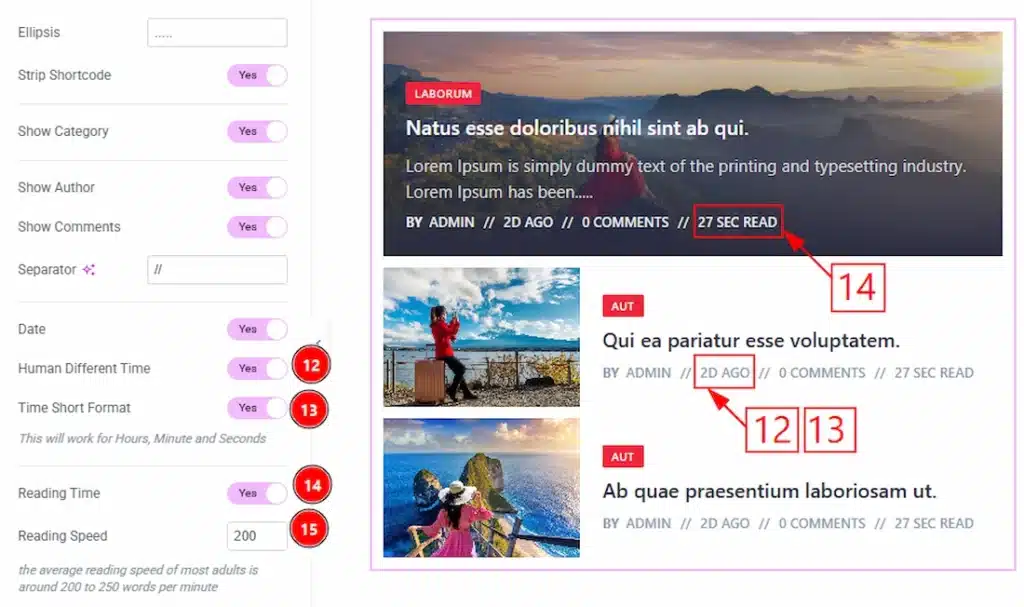
12. Human Different Time: Enable the switcher to show the post creation date in a different way with this option.
13. Time Short Format: Enable the switcher to show the time of creation in hours, minutes and seconds.
14. Reading Time: Enable the switcher to show the posts estimate time to read with this option.
15. Reading Speed: You can set the reading speed for the readers with this option.
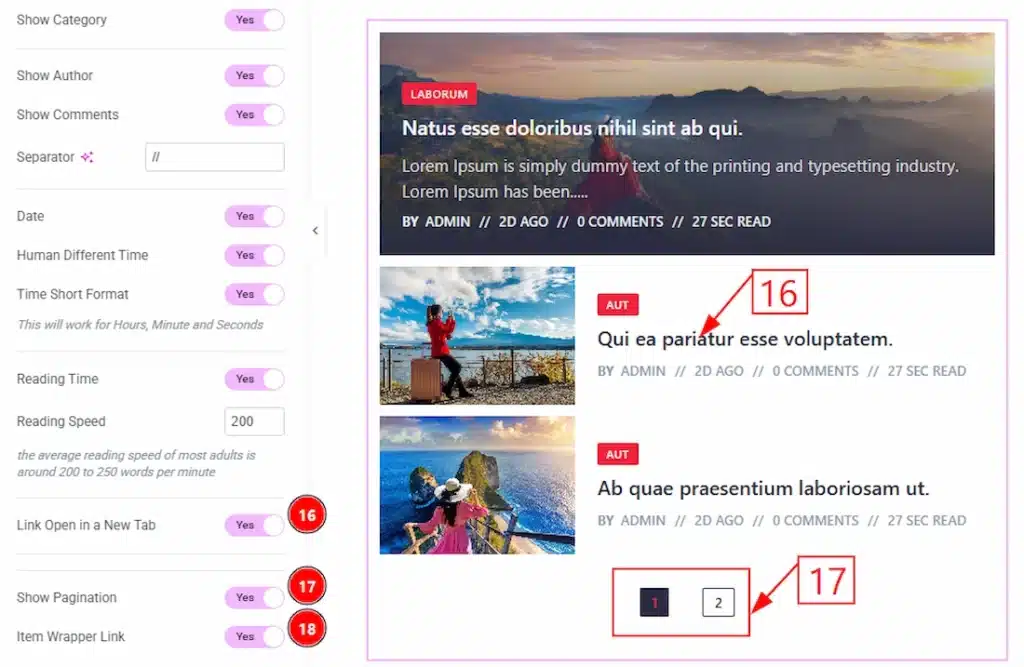
16. Link Open in a New Window: Enable the switcher to open the post in a new tab when clicked on it.
17. Show Pagination: Enable the switcher to show the pagination to your audience.
18. Item Wrapper Link: Enable the switcher to activate the wrapper link within the items with this option.
Style Tab Overview #
Item Section #
Go to Style → Item
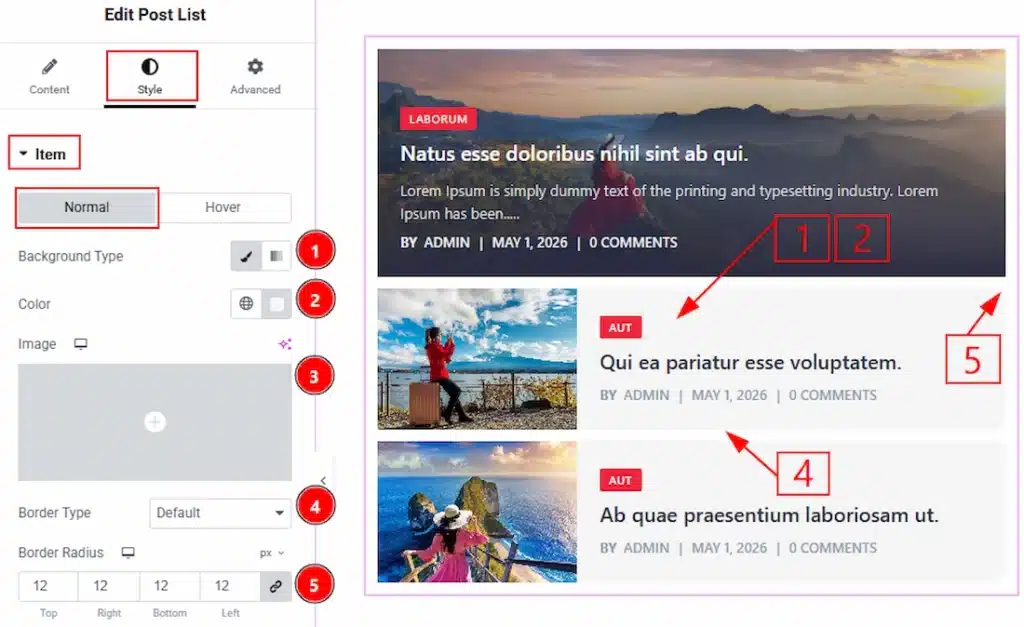
In this section, we have two tabs. One is Normal and the other is Hover. Let’s start with the Normal tab –
1. Background Type: You can change the background type to be classic or gradient with this option.
2. Color: You can change the item background color with this option.
3. Image: You can change the background image with this option
4. Border Type: This option allows you to add borders to your items. You can select various border types from this option. Such as Solid, Double, Dotted, Dashed, Groove.
5. Border Radius: The Border Radius controls the roundness of the border.
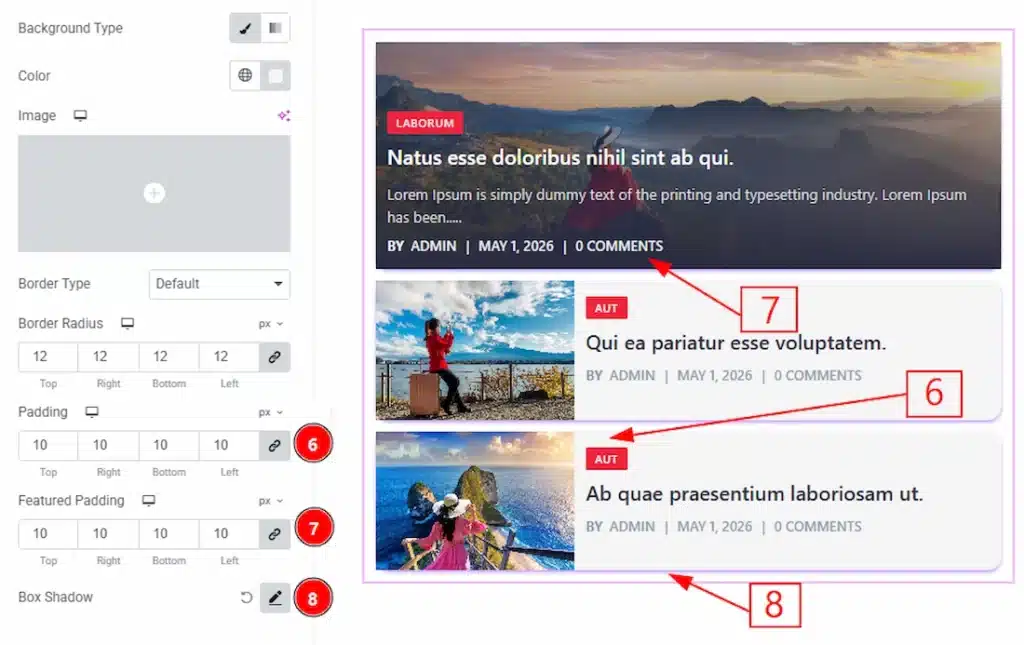
6. Padding: Add spaces around an object to increase the inner area. Padding allows you to control the internal space within an element.
7. Featured Padding: You can adjust the inner space of the featured post with this option.
8. Box Shadow: While working with this option, you will get three more options (Blur, Horizontal & Vertical). Blur Controls how sharp or soft the shadow will appear. By using the horizontal option, you can move the shadow left or right and by using the vertical option, you can move the shadow up or down.
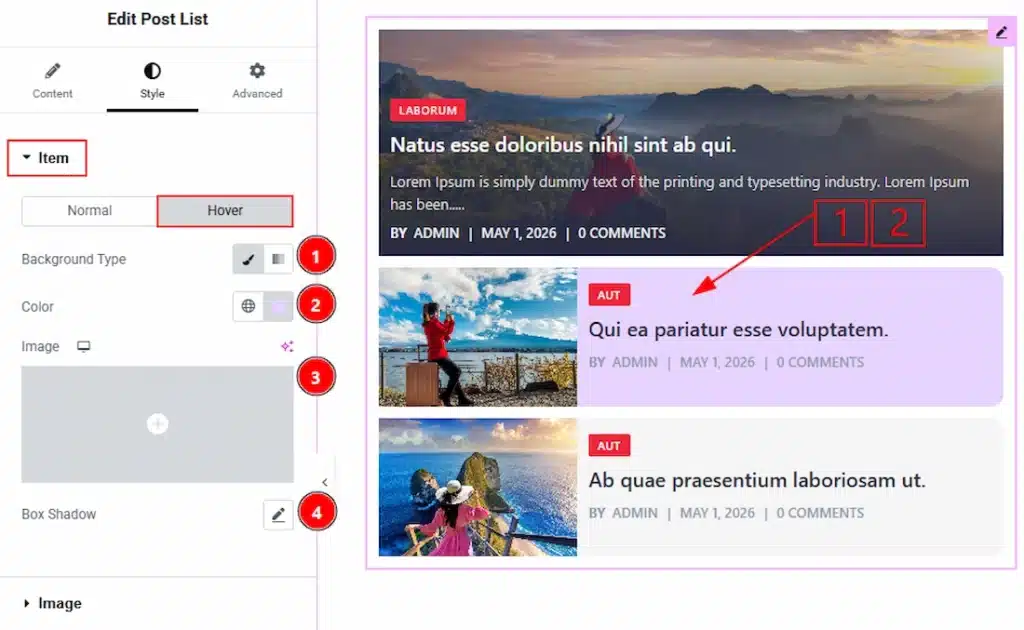
Now, let’s proceed to the Hover tab –
1. Background Type: You can change the background type to be classic or gradient with this option.
2. Color: You can change the background hover color with this option.
3. Image: You can change the background image with this option.
4. Box Shadow: You can add a hover shadow effect to the items with this option.
Image Section #
Go to Style → Image
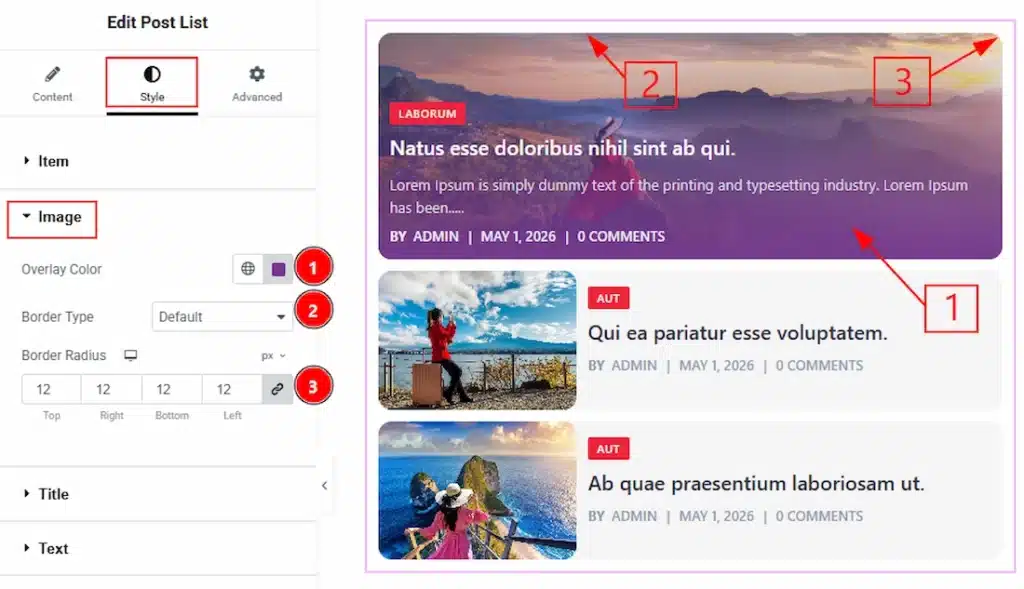
1. Overlay Color: You can change the image overlay color with this option.
2. Border Type: You can add and change the border types with this option.
3. Border Radius: You can control the roundness of the border with this option.
Title Section #
Go to Style → Title
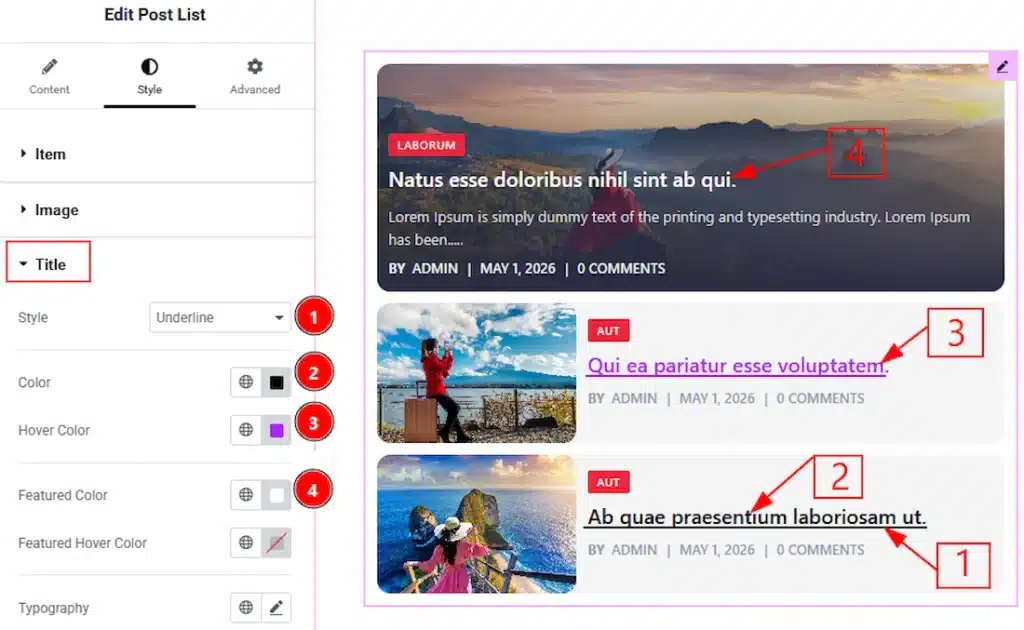
1. Style: You can choose the style that will apply to the title with this option. The available styles are Underline, Middle Underline, Overline & Middle Overline.
2. Color: You can make changes to the post list title color with this option.
3. Hover Color: You can make changes to the post list title hover color with this option.
4. Featured Color: You can make changes to the featured post title color with this option.
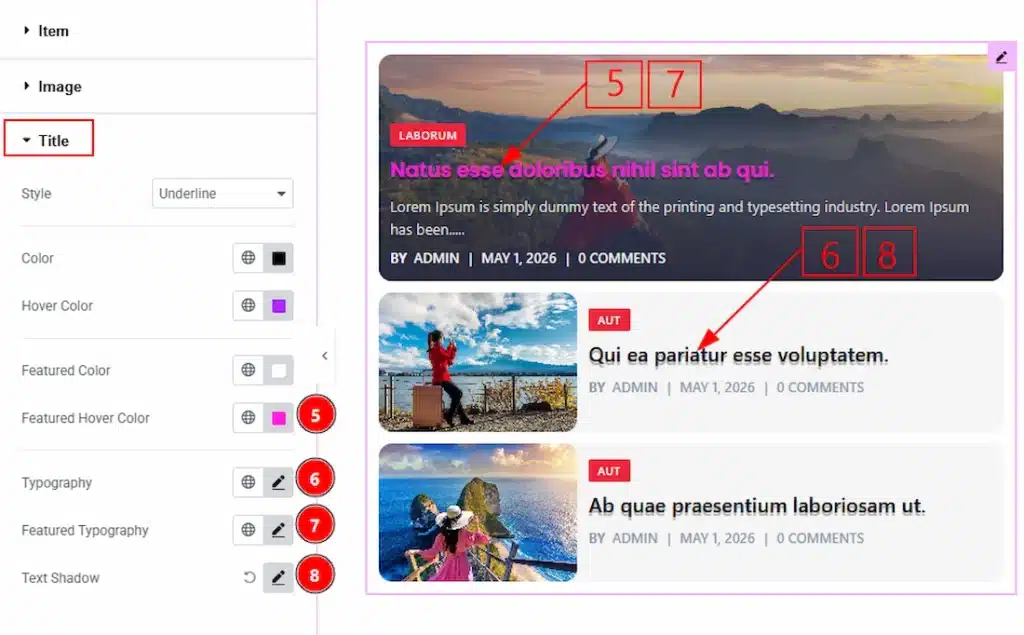
5. Featured Hover Color: You can make changes to the featured title hover color with this option.
6. Typography: Change the font family, size, weight, transform, style, decoration, line height, letter spacing, and word spacing from here.
7. Featured Typography: Change the typography font family, size, weight, transform, style, decoration, line height, letter spacing, and word spacing from here.
8. Text Shadow: You can add a text shadow effect to the title with this option.
Text Section #
Go to Style → Text
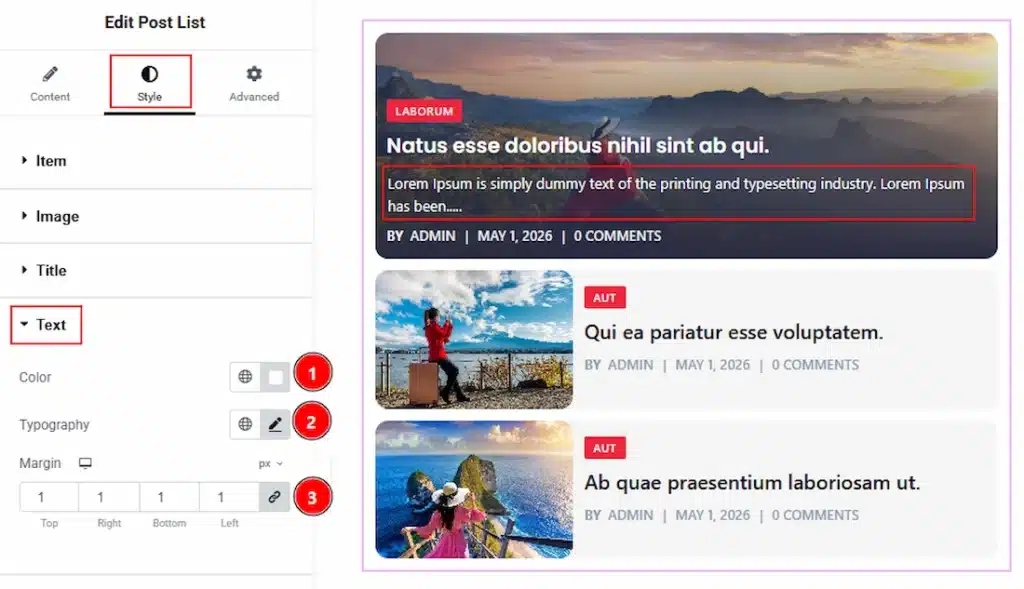
1. Text Color: You can change the text color with this option.
2.Typography: Change the title’s font family, size, weight, transform, style, decoration, line height, letter spacing, and word spacing from here.
3. Margin: You can adjust the space around the text with this option.
Meta Section #
Go to Style → Meta
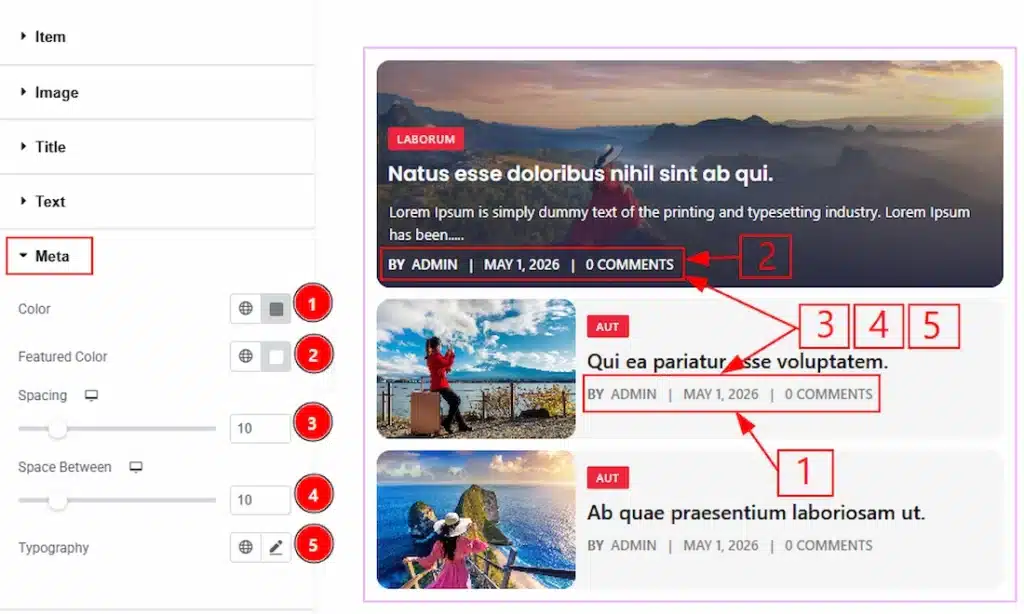
1. Color: You can change the meta text color with this option.
2. Featured Color: You can change the featured post meta text color with this option.
3. Spacing: You can adjust the space between the title and the meta with this option.
4. Space Between: You can adjust the space between the meta data with this option.
5. Typography: Change the font family, size, weight, transform, style, decoration, line height, letter spacing, and word spacing from here.
Category Section #
Go to Style → Category
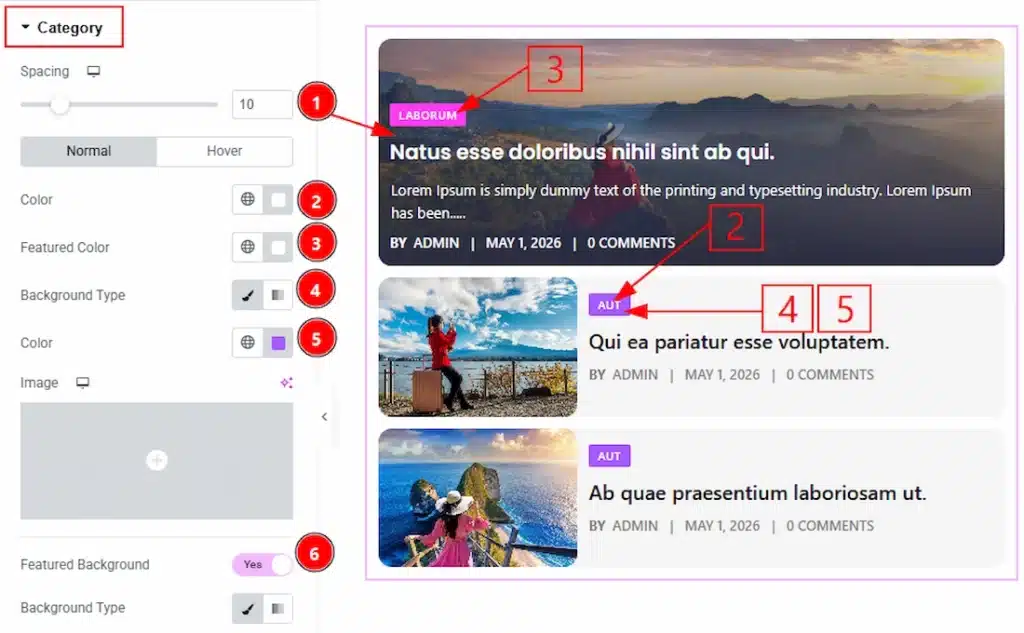
In this section, we have two more tabs. These are Normal & Hover. Let’s start with the Normal Tab first –
1. Spacing: You can adjust the space between the category and the title with this option.
2. Color: You can make changes to the category text color with this option.
3. Featured Color: You can make changes to the featured post category text’s color with this option.
4. Background Type: You can choose the background type to be classic or gradient with this option.
5. Color: You can change the post list categories background color with this option.
6. Featured Background: Enable the switcher to get option to make changes to the featured category background color with this option.
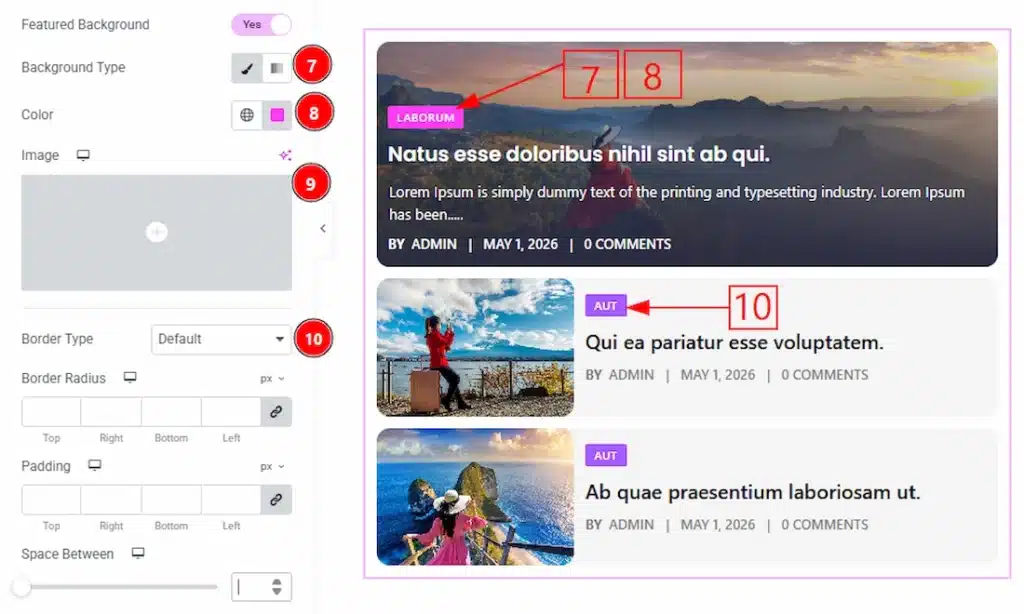
7. Background Type: You can change the background type to be classic or gradient with this option. Here we have selected the background type as classic.
8. Color: You can change the background color with this option.
9. Image: You can change the background image with this option.
10. Border Type: You can add and change the border type with this option.
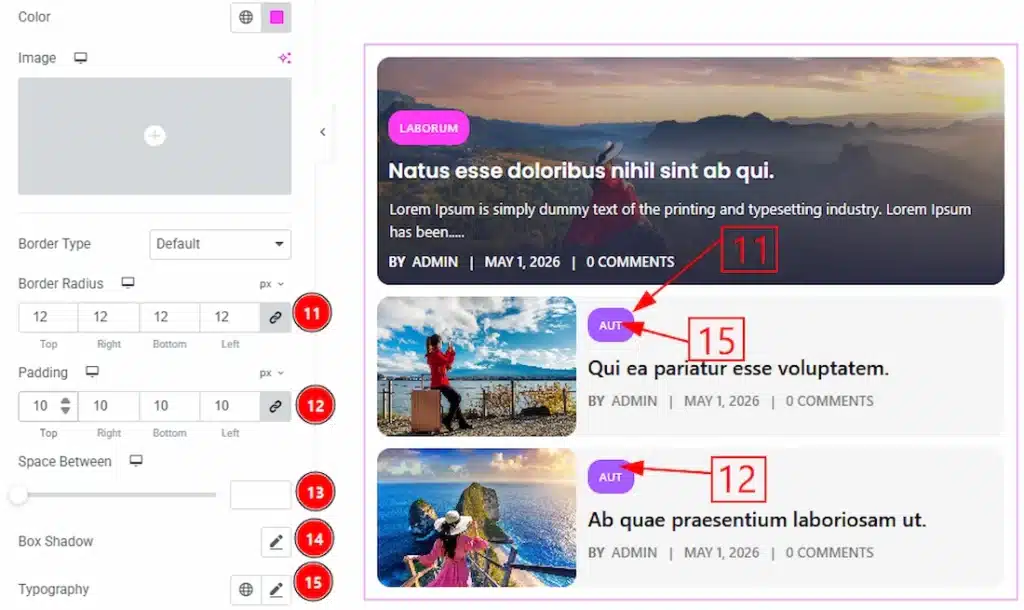
11. Border Radius: You can control the roundness of the border with this option.
12. Padding: You can adjust the inner space of the category field with this option.
13. Space Between: You can adjust the space between two categories with this option. This option will work only when a post has more than one category.
14. Box Shadow: You can add a shadow effect to the category field with this option.
15. Typography: Change the font family, size, weight, transform, style, decoration, line height, letter spacing, and word spacing from here.
All done! You have successfully customized the Post List widget on your website.
Video Assist #
You can also watch the video tutorial to learn more about the Post List Widget. Please visit the demo page for examples.
Thanks for being with us.