



The Reveal Effects extension in Wow Elements Pro allows you to add smooth and interactive reveal animations to your website elements without any coding. It helps create engaging user experiences by revealing images, or widgets with stylish animation effects during scrolling or interaction. With flexible customization controls and modern animation styles, you can easily enhance the visual appeal and interactivity of your Elementor website. In this documentation, we will guide you through how to use and customize the Reveal Effects extension in Wow Elements Pro.
Enable the Reveal Effects Extension #
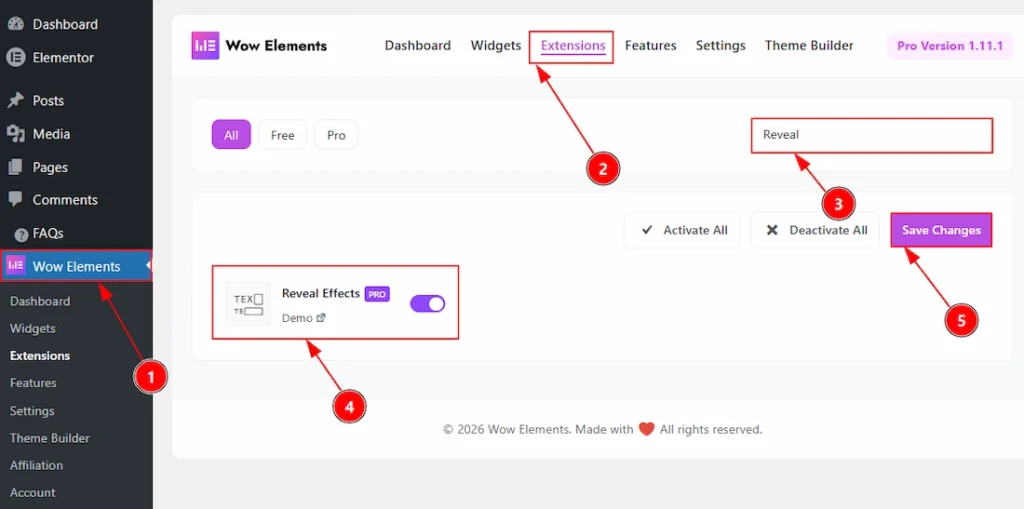
To use the Reveal Effects Extension from Wow Elements Pro, first, you have to enable the extension.
- Go to WordPress dashboard → Wow Elements Plugin dashboard.
- Then, Click the Extension Tab.
- Search the Reveal Effects Extension Name.
- Enable the Reveal Effects Extension.
- Hit the Save Settings Button.
Where To Find The Reveal Extension Extension #
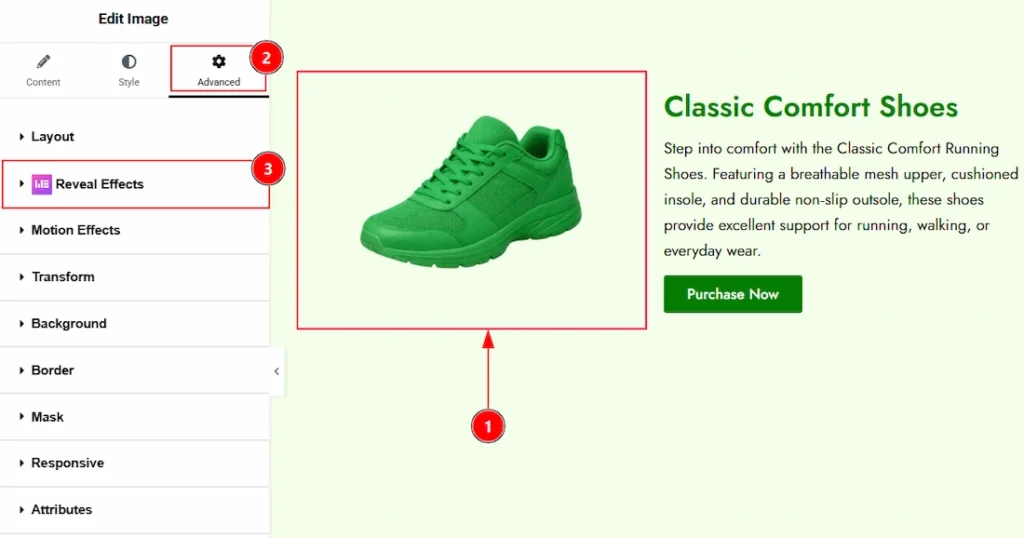
To find the Reveal Effects Extension, you must need to select the element where you want to use the extension. Let’s see the steps below –
1. Click to any elements which you want to configure by the Reveal Effects extension.
2. Now move to the Advanced tab.
3. You will find the Reveal Effects extension here along with the Wow Elements logo.
Configuring the Reveal Effects Extension #
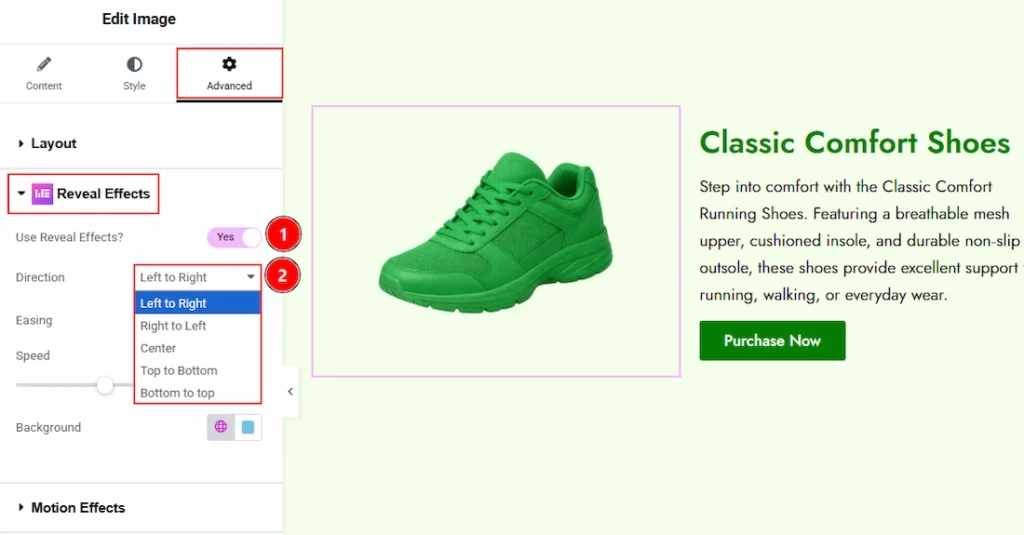
1. Use Reveal Effects: Enable the switcher to make the extension active and show the customisation option of the reveal effects.
2. Direction: You can set the direction of reveal effect to unfold the selected elements with this option. The available directions are –
- Left to Right – This option allows you to set the reveal effect direction move to left to right.
- Right to Left – This option allows you to set the reveal effect direction move to right to left.
- Center – This option allows you to set the reveal effect direction move from the center.
- Top to Bottom – This option allows you to set the reveal effect direction move to top to bottom.
- Bottom to Top – This option allows you to set the reveal effect direction move to bottom to top.
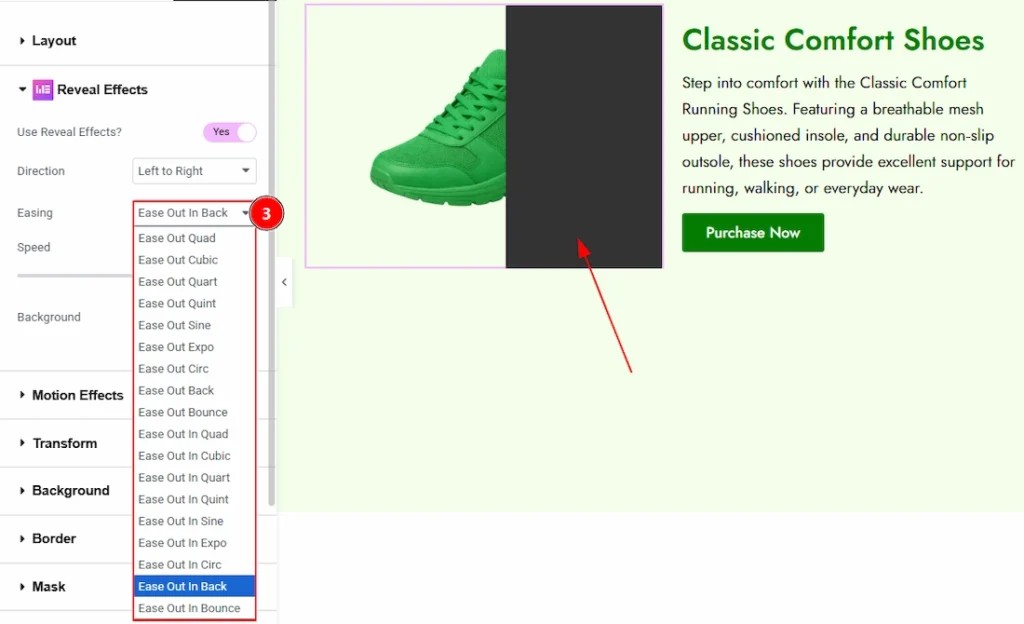
3. Easing: The Easing option controls the motion style of the reveal animation — specifically how the animation starts, moves, and ends. Each easing type creates a different animation feel for smoother and more dynamic interactions. Let’s have a look what we have here –
- Ease Out Quad – Starts quickly and slows down smoothly toward the end.
- Ease Out Cubic – Similar to Quad but with a smoother and more natural slowdown effect.
- Ease Out Quart – Creates a stronger deceleration effect for a more dramatic ending motion.
- Ease Out Quint – Provides an even smoother and softer stop with a more pronounced easing effect.
- Ease Out Sine – Delivers a gentle and natural-looking animation using a sine wave motion.
- Ease Out Expo – Starts very fast and slows down sharply at the end for a powerful reveal effect.
- Ease Out Circ – Creates a circular-style motion with a very smooth and realistic finish.
- Ease Out Back – Slightly overshoots the final position before settling back, creating a stylish bounce-back effect.
- Ease Out Bounce – Adds a bouncing motion at the end of the animation, making the reveal feel playful and dynamic.
- Ease In Out Quad – Starts slowly, speeds up in the middle, and slows down smoothly at the end.
- Ease In Out Cubic – Creates a balanced and fluid acceleration and deceleration effect.
- Ease In Out Quart – Adds a more dramatic smooth transition between start and finish.
- Ease In Out Quint – Produces a very polished and dynamic motion throughout the animation.
- Ease In Out Sine – Uses smooth sine-wave motion for a highly natural animation flow.
- Ease In Out Expo – Combines rapid acceleration and deceleration for a powerful effect.
- Ease In Out Circ – Creates a rounded and realistic motion transition from start to finish.
- Ease In Out Back – Adds slight overshoot effects at both the beginning and end of the animation.
- Ease In Out Bounce – Combines bouncing effects at both the start and end for energetic motion.
You can choose any easing option that meet your needs.
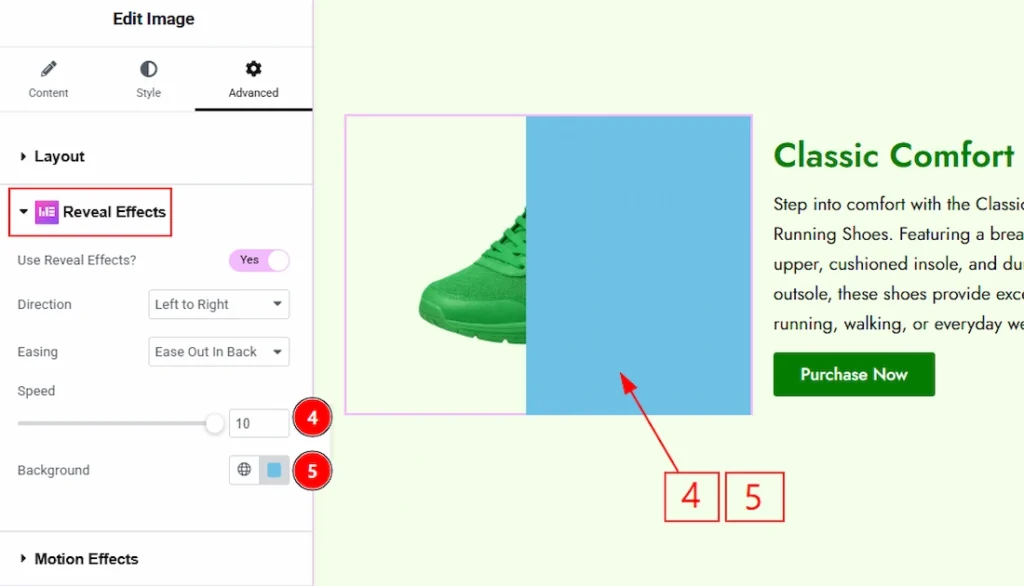
4. Speed: You can control the easing speed of the reveal effects with this option.
5. Background: You can make changes to the background color that will show when revealing the element with this option.
All done, You have successfully customised the Reveal Effects Extension on your website element.
Video Assist #
You can also watch the tutorial video about the Reveal Effects Extension. Please visit the demo page for examples.
Thanks for staying with us.