



The Order Page widget from Wow Elements Pro allows you to create a fully customized WooCommerce Order Received page using Elementor. It is designed to be used with the Theme Builder, where you can build a custom order page template that automatically replaces the default WooCommerce order confirmation page on your live website. With flexible layout, styling, and typography controls, you can easily customize the order details and confirmation page to match your store’s branding and provide a seamless post-purchase experience. In this documentation, we will guide you through how to use and customize the Order Page widget in Wow Elements Pro.
Enable the Order Page Widget #
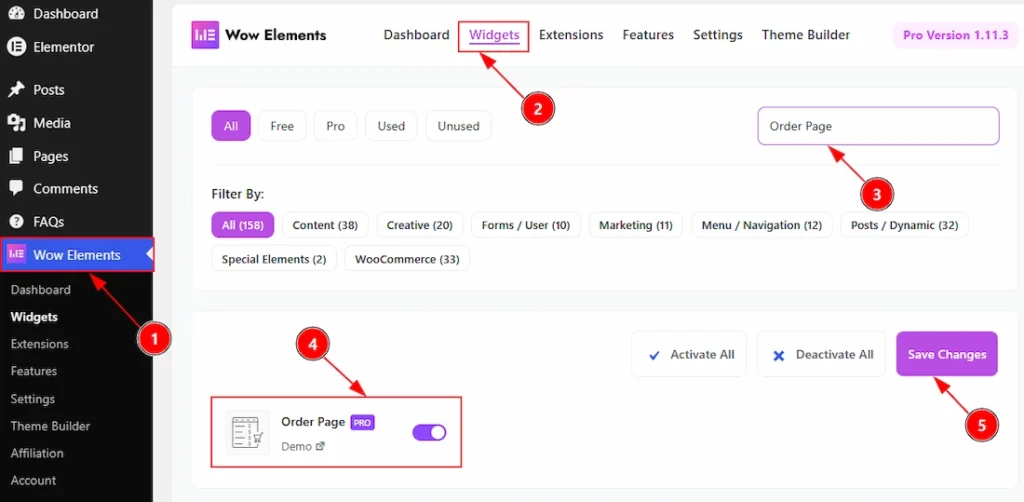
To use the Order Page widget by Wow Elements Pro, first, you have to enable the widget.
- Go to WordPress Dashboard → Wow Elements Pro Plugin dashboard.
- Then Click the Widgets Tab.
- Search the Order Page Widget Name.
- Enable the Order Page Widget.
- Hit the Save Settings Button.
Note: You must need to download the WooCommerce plugin first and activate the plugin to get the option to enable the widget.
Things That Must Need To Do Before Using The Widget #
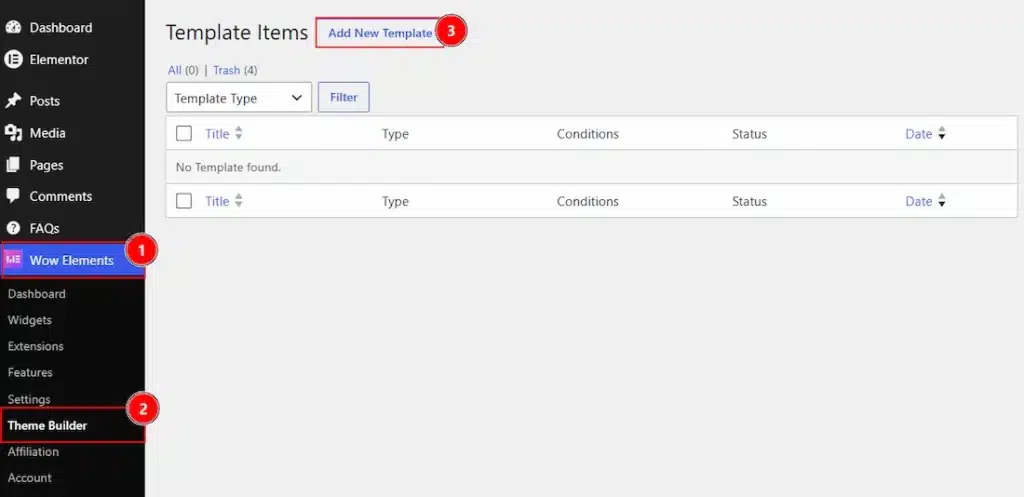
1. Go to WP Dashboard → Wow Elements.
2. Click on the Theme Builder Tab.
3. Now, click on the Add New Template to create new template.
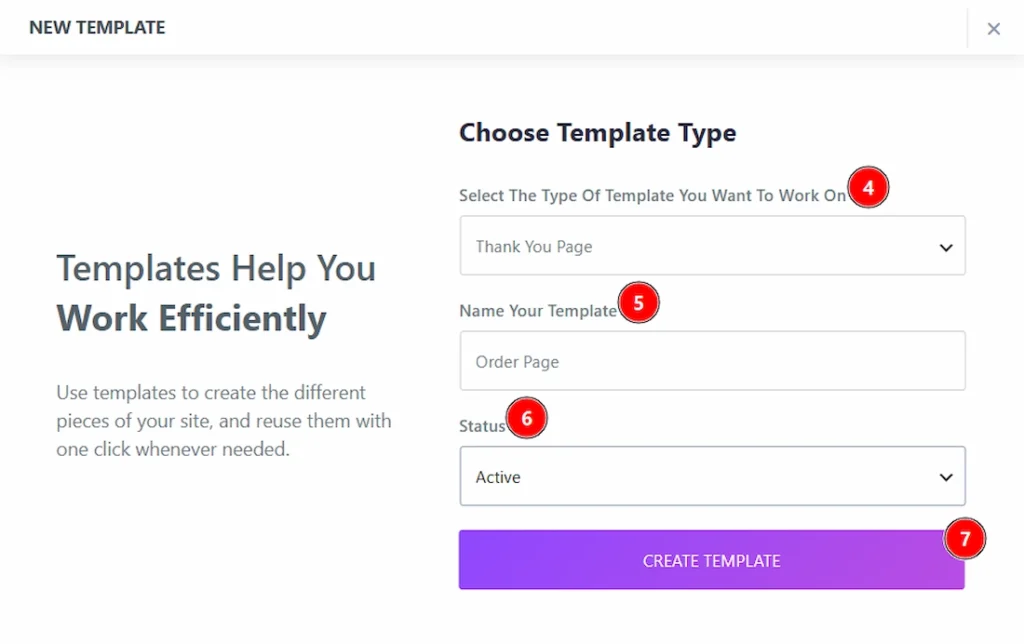
4. Here, in this field you have to select the type of template where you want to work. We have selected the Product Type Cart Page template.
5. You can set a name for your template in this field.
6. You can set the status of the template to active or inactive with this option.
7. You can click on the create template button to complete the creation and once it created it will automatically redirect your to the elementor editor to create your design.
Inserting the Order Page widget #
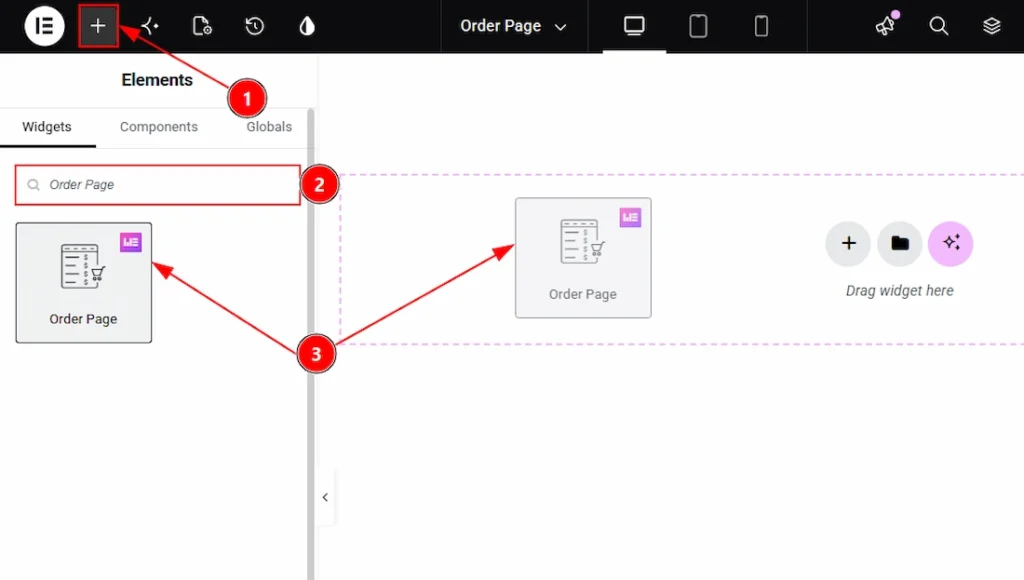
After the editor open within the theme builder, please do the followings to use the Order Page widget –
1. Hit the “+” icon Button.
2. Search the Order Page widget.
3. Drag the widget and drop it on the editor page
Content Tab Overview #
ThankYou Order Section #
Go to Style → ThankYou Order
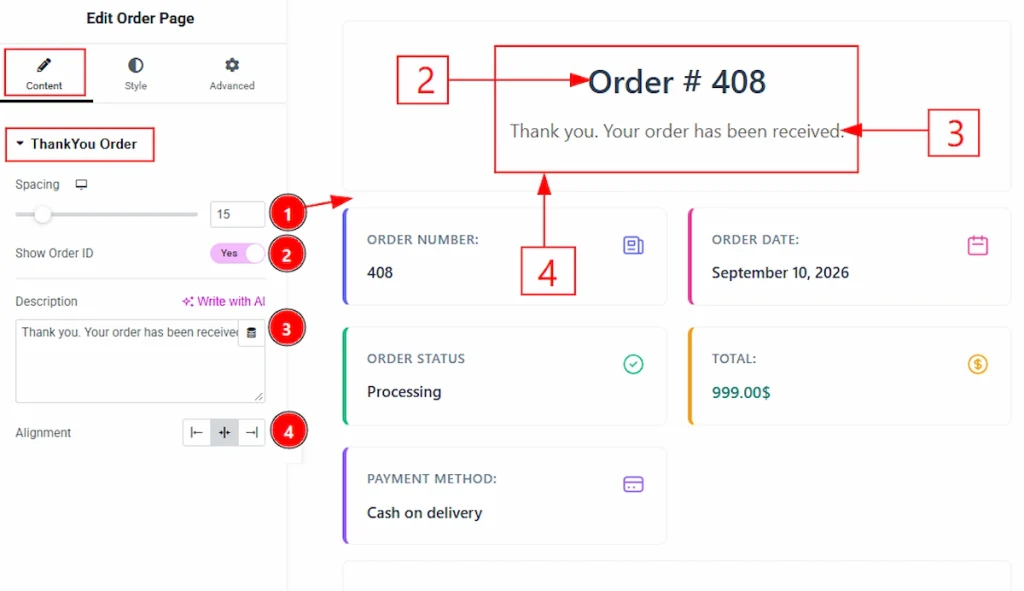
1. Spacing: You can adjust the spacing between the elements with this option.
2. Show Order ID: Enable the switcher to show the Order ID to your audience with this option.
3. Description: You can add the description to the thank you order with this option.
4. Alignment: You can set the order details position to left, center or right with this option.
Style Tab Overview #
Cart Heading Section #
Go to Style → Cart Heading
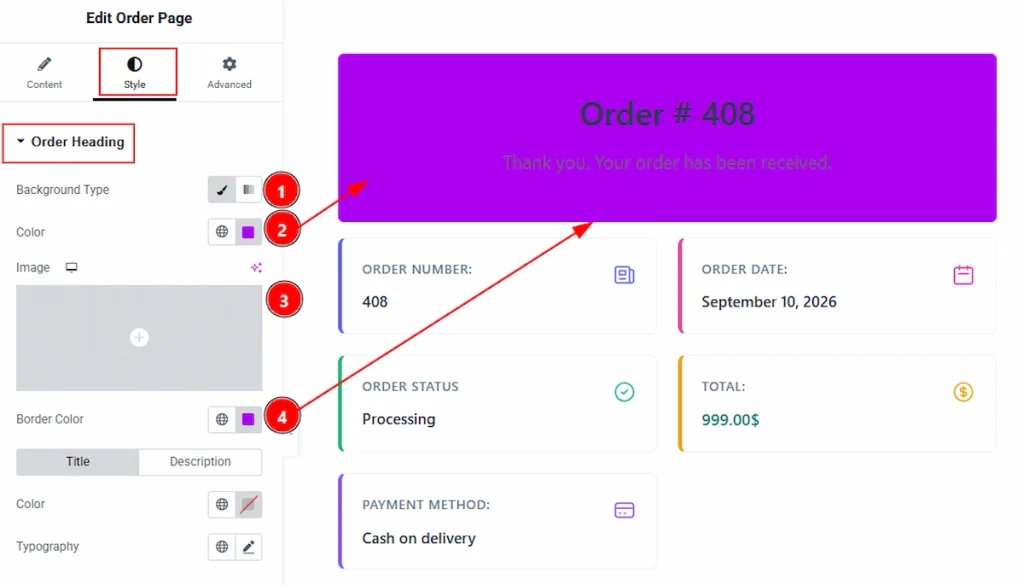
1. Background Type: You can change the background type to be classic or gradient with this option. Here, we have selected the background type as Classic.
2. Color: You can change the background color with this option.
3. Image: You can change the background image with this option.
4. Border Color: You can change the border color with this option.
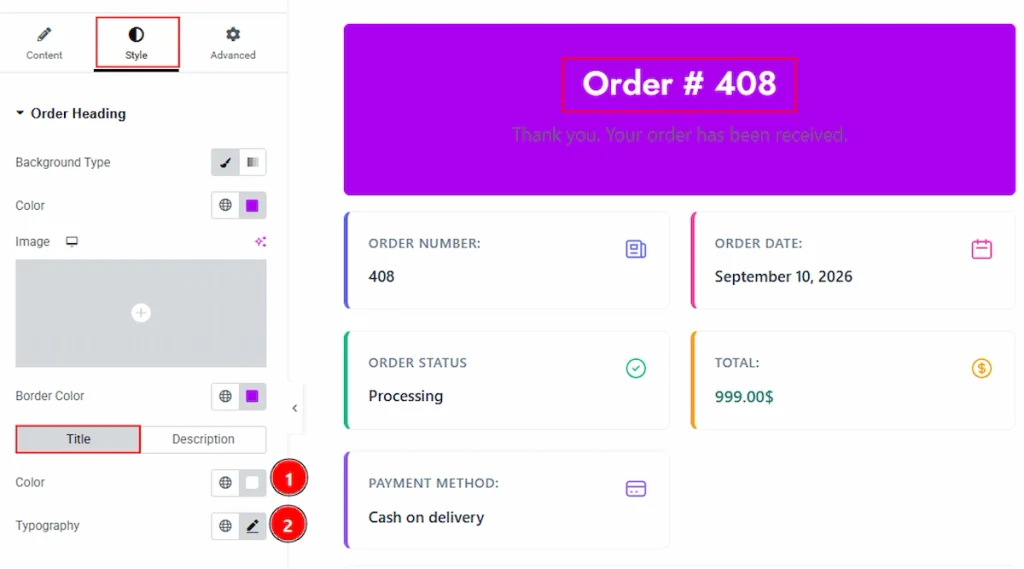
In this section, we have two more tabs. These are Title & Description. Let’s start with the Title tab first –
1. Color: You can change the title text color with this option.
2. Typography: Change the font family, size, weight, transform, style, decoration, line height, letter spacing, and word spacing from here.
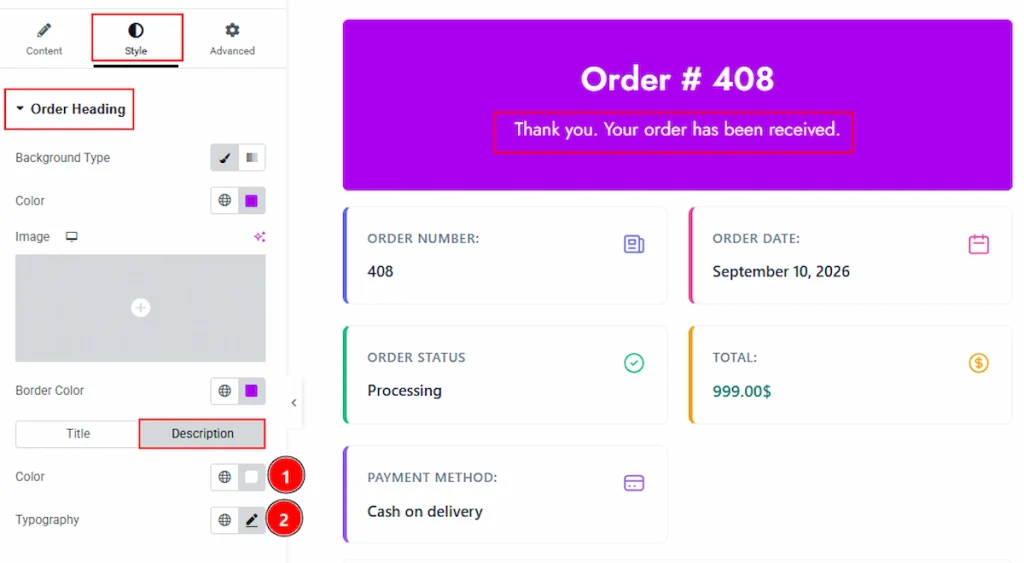
Now let’s proceed to the Description tab –
3. Color: You can make changes to the description text color with this option.
4. Typography: Change the font family, size, weight, transform, style, decoration, line height, letter spacing, and word spacing from here.
Order Card Section #
Go to Style → Order Card
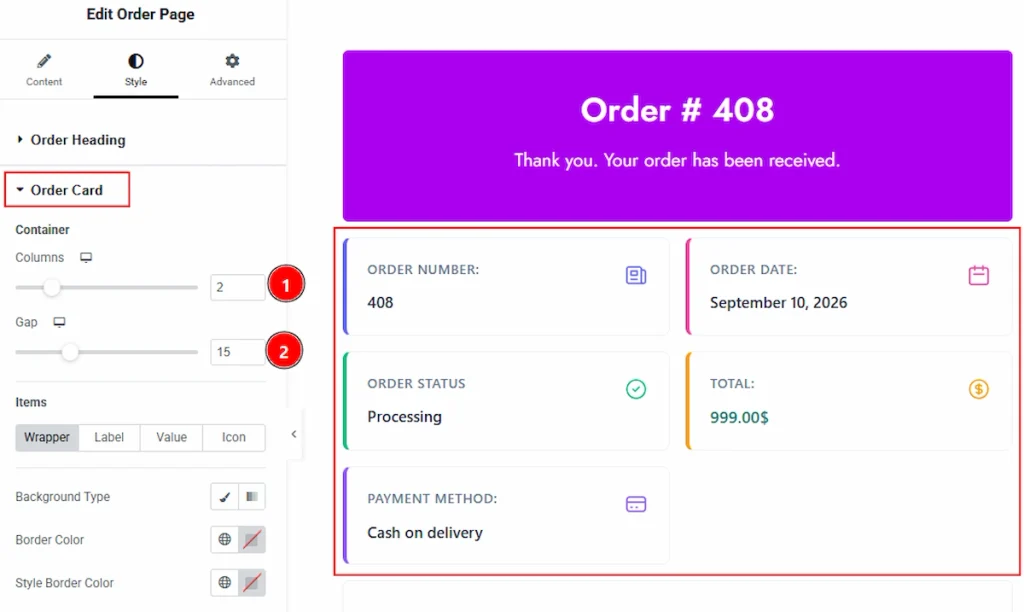
1. Columns: You can set the columns to show to your audience with this option.
2. Gap: You can adjust the space between the order cards with this option.
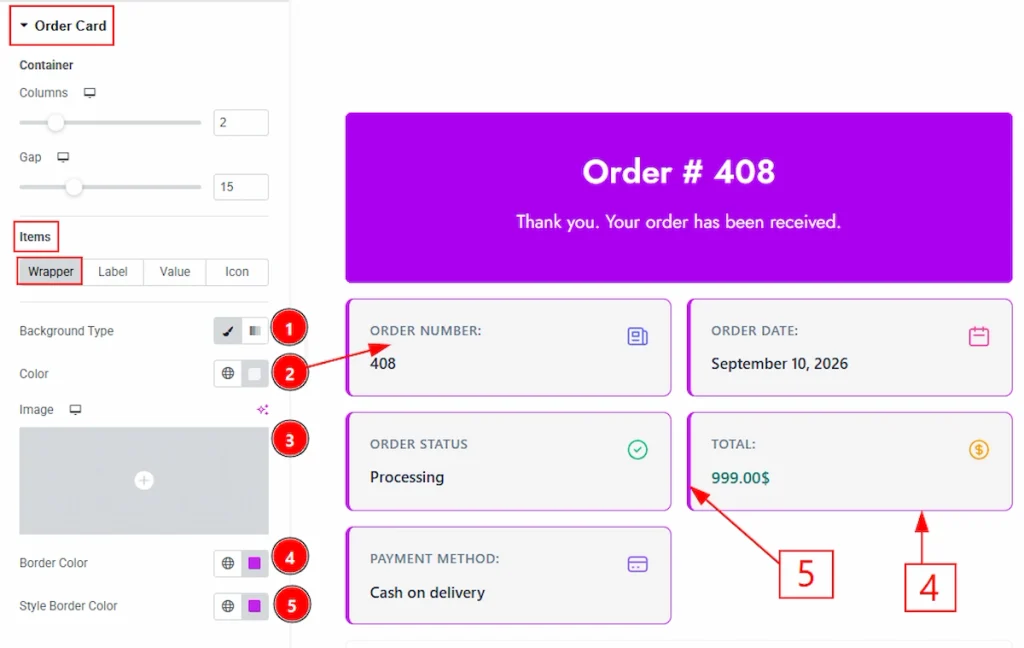
In this section, we have four more tabs. These are Wrapper, Label, Value & Icon. Let’s start describing those one by one and start with Wrapper tab –
1. Background Type: You can change the background type to be classic or gradient with this option. Here, we have selected the background type as Classic.
2. Color: You can make changes to the background color with this option.
3. Image: You can change the background image with this option.
4. Border Color: You can make changes to the border color with this option.
5. Style Border Color: You can make changes to the style border color with this option.
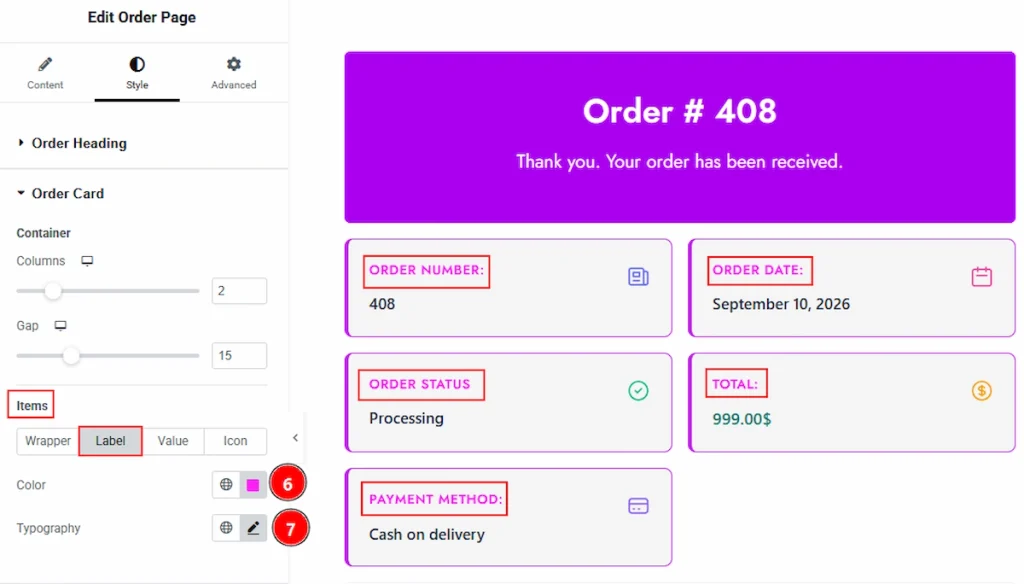
Now, let’s describe the Label tab –
6. Color: You can make changes to the label color with this option.
7. Typography: Change the font family, size, weight, transform, style, decoration, line height, letter spacing, and word spacing from here.
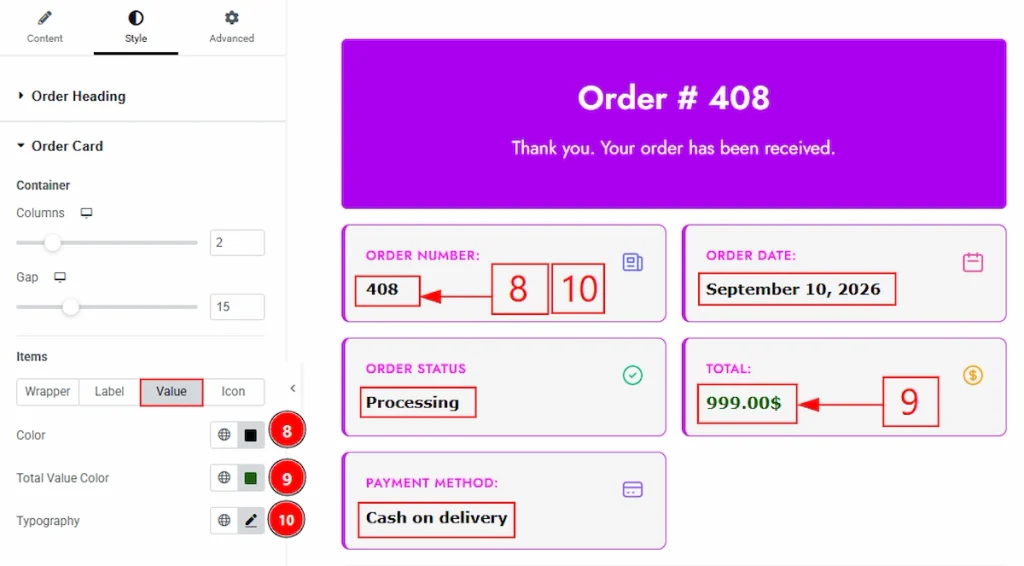
Now, let’s start with Value tab –
8. Color: You can make changes to the value color with this option.
9. Total Value Color: You can make changes to the total value color with this option.
10. Typography: Change the font family, size, weight, transform, style, decoration, line height, letter spacing, and word spacing from here.
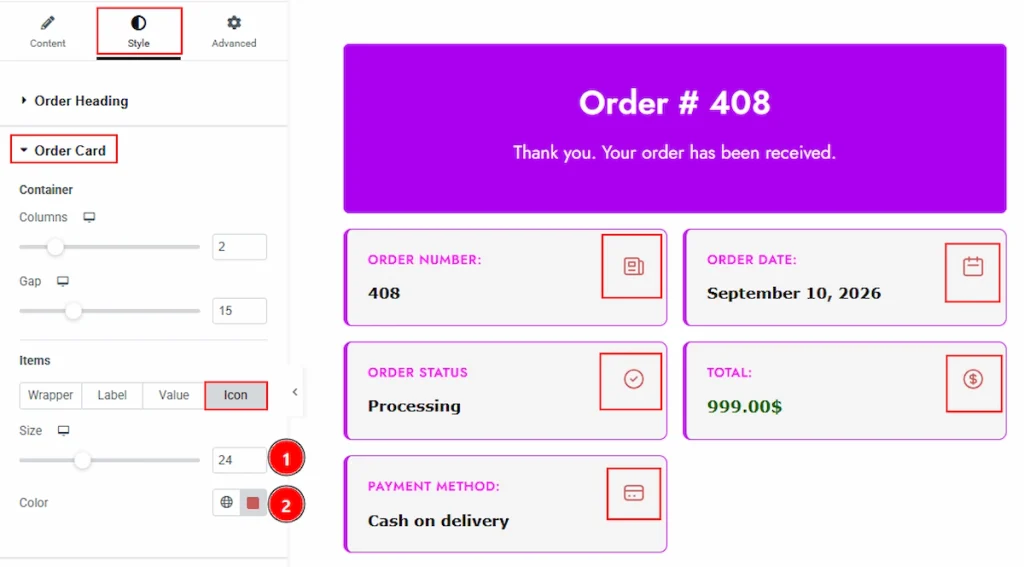
Now, let’s continue to the Icon tab –
1. Size: You can make changes to the icon size with this option.
2. Color: You can make changes to the icon size with this optin.
Order Details Section #
Go to Style → Order Details
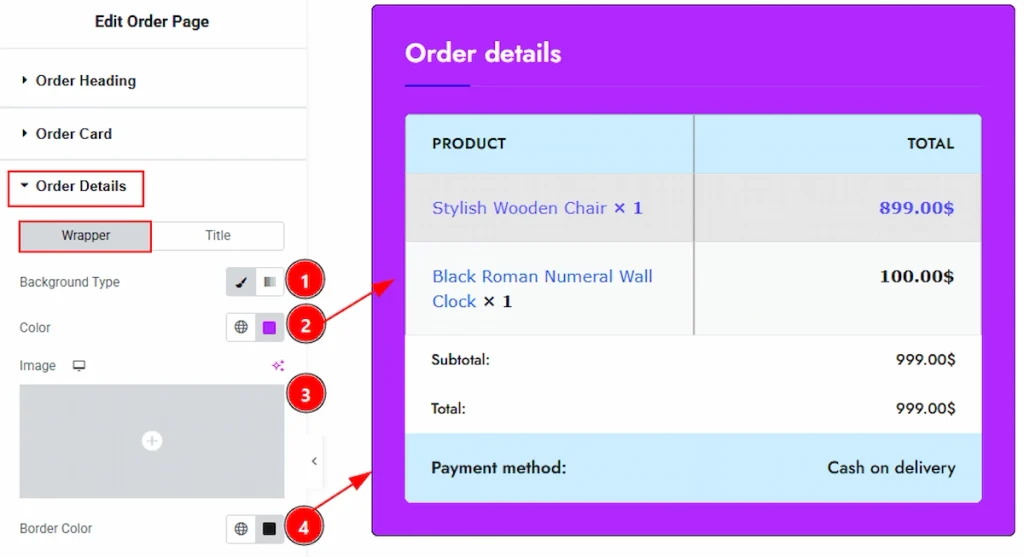
In this section, we have two more tabs. These are Wrapper & Title. Let’s start with the Wrapper tab first –
1. Background Type: You can change the background type to be classic or gradient with this option. Here, we have selected the background type as Classic.
2. Color: You can make changes to the background color with this option.
3. Image: You can make changes to the background image with this option.
4. Border Color: You can make changes to the border color with this option.
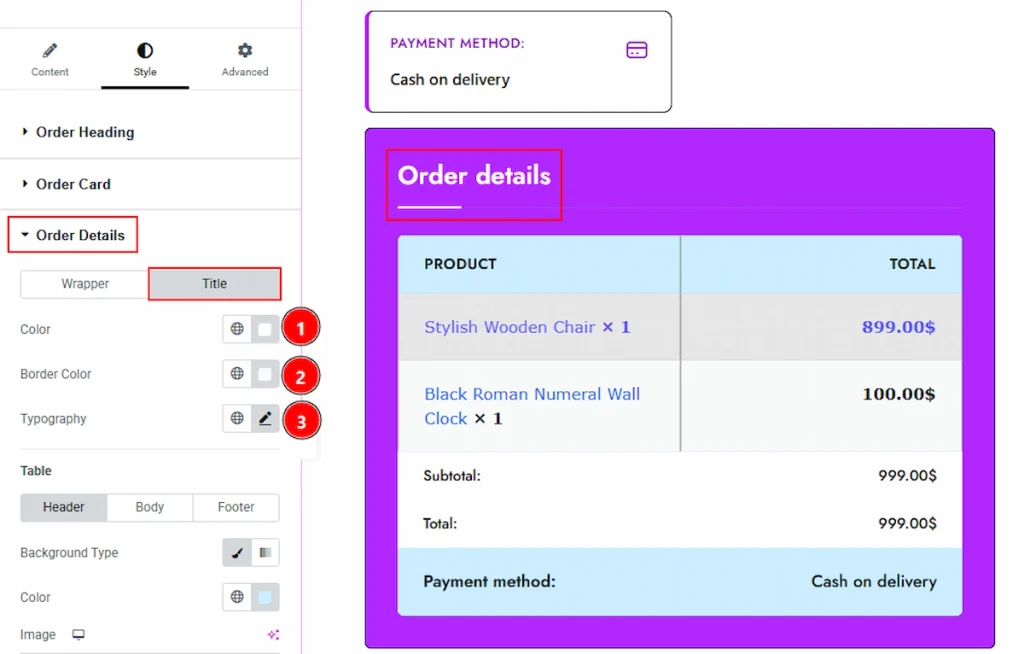
Now, let’s proceed to the Title tab –
1. Color: You can make changes to the title text color with this option.
2. Border Color: You can make changes to the border color with this option.
3. Typography: Change the font family, size, weight, transform, style, decoration, line height, letter spacing, and word spacing from here.
Table Sub-section #
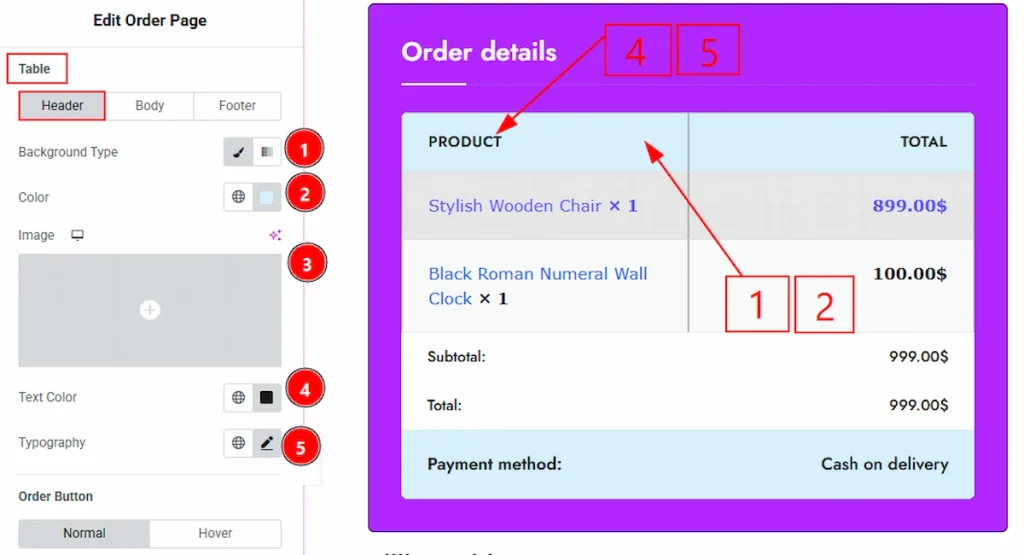
In this sub-section, we have three more tabs. These are Header, Body & Footer. Let’s start with the Header tab now –
1. Background Type: You can change the background type to be classic or gradient with this option. Here, we have selected the background type as Classic.
2. Color: You can make changes to the background color with this option.
3. Image: You can make changes to the background image with this option.
4. Text Color: You can make changes to the text color with this option.
5. Typography: Change the font family, size, weight, transform, style, decoration, line height, letter spacing, and word spacing from here.
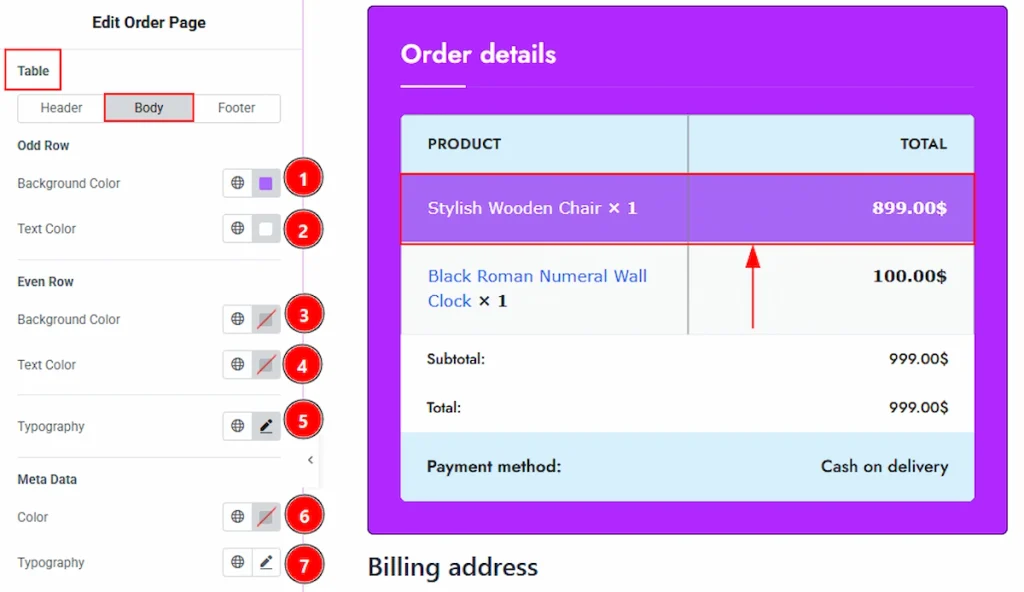
Now, let’s proceed to the Body tab –
1. Background Color: You can make changes to the odd row background color with this option.
2. Text Color: You can make changes to the table text color with this option.
3. Background Color: You can make changes to the even row background color with this option.
4. Text Color: You can make changes to the table text color with this option.
5. Typography: Change the font family, size, weight, transform, style, decoration, line height, letter spacing, and word spacing from here.
6. Color: You can make changes to the meta data text color with this option.
7. Typography: Change the font family, size, weight, transform, style, decoration, line height, letter spacing, and word spacing from here.
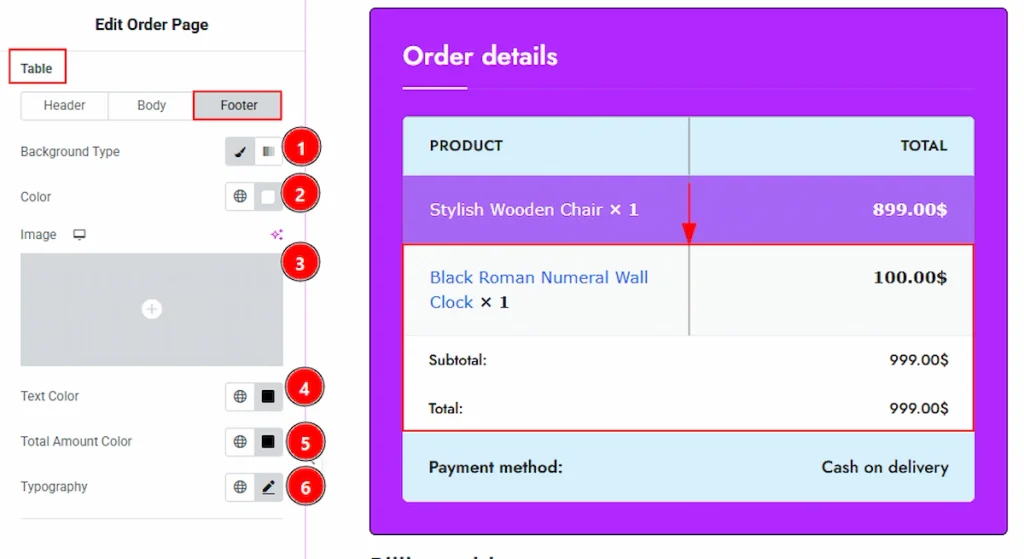
Now, let’s proceed to the Footer tab –
1. Background Type: You can change the background type to be classic or gradient with this option. Here, we have selected the background type as Classic.
2. Color: You can make changes to the border color with this option.
3. Image: You can change the image with this option.
4. Text Color: You can make changes to the table text color with this option.
5. Total Amount Color: You can make changes to the total amount color with this option.
6. Typography: Change the font family, size, weight, transform, style, decoration, line height, letter spacing, and word spacing from here.
Address Details Section #
Go to Style → Address Details
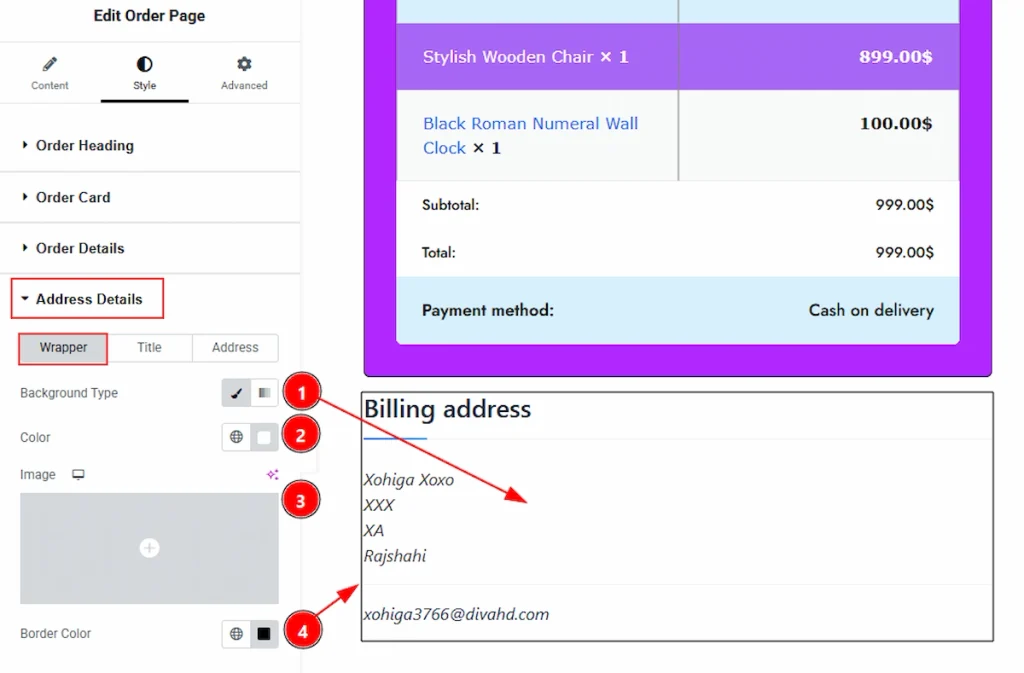
In this section, we have three more tabs. These are Wrapper, Title & Address. Let’s start with the Wrapper tab –
1. Background Type: You can change the background type to be classic or gradient with this option. Here, we have selected the background type as Classic.
2. Color: You can change the background color with this option.
3. Image: You can change the image with this option.
4. Border Color: You can change the color with this option.
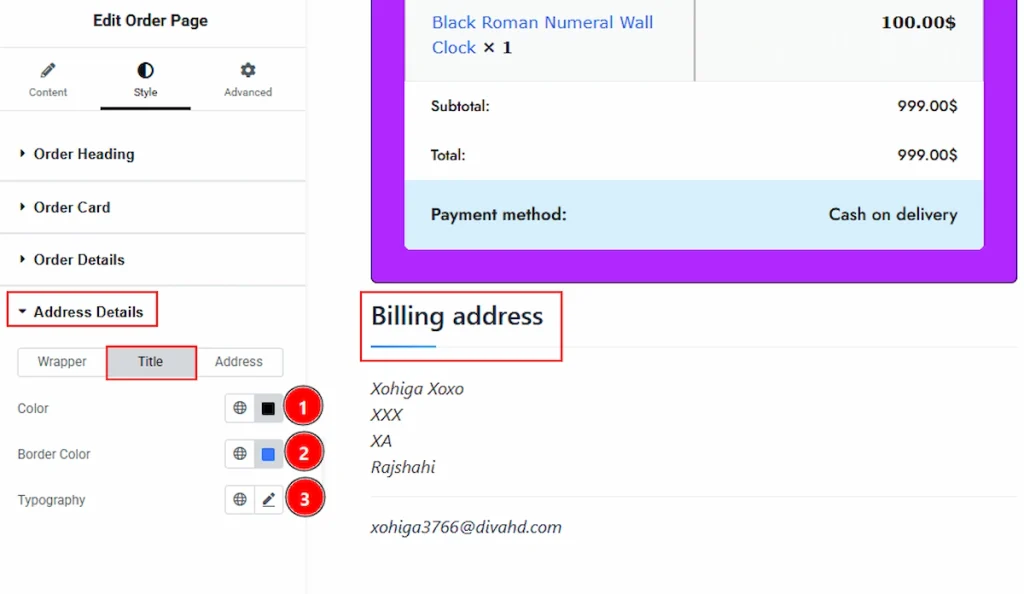
Now, let’s proceed to the Title tab –
1. Color: You can change the title text color with this option.
2. Border Color: You can change the border color with this option.
3. Typography: Change the font family, size, weight, transform, style, decoration, line height, letter spacing, and word spacing from here.
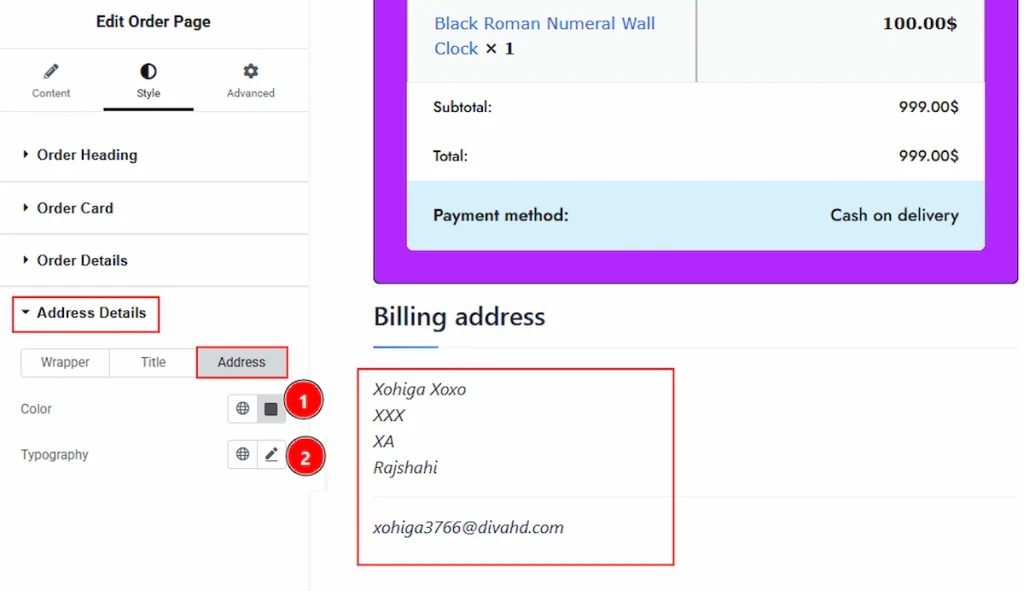
1. Color: You can change the adress text color with this option.
2. Typography: Change the font family, size, weight, transform, style, decoration, line height, letter spacing, and word spacing from here.
All done! You have successfully customized the Order Page widget on your website.
Video Assist #
You can also watch the video tutorial to learn more about the Order page Widget. Please visit the demo page for examples.
Thanks for being with us.