



The Business Hours widget from Wow Elements helps you display your business operating hours in a clear and organized format, making it easy for visitors to know when your business is open or closed. You can showcase daily opening and closing times, highlight closed days, and display the current business status to keep customers informed. With customizable layout and styling options, you can easily match the business hours section with your website’s design. This documentation will guide you on how to set up and personalize the Business Hours widget in Wow Elements.
Enable The Business Hours Widget #
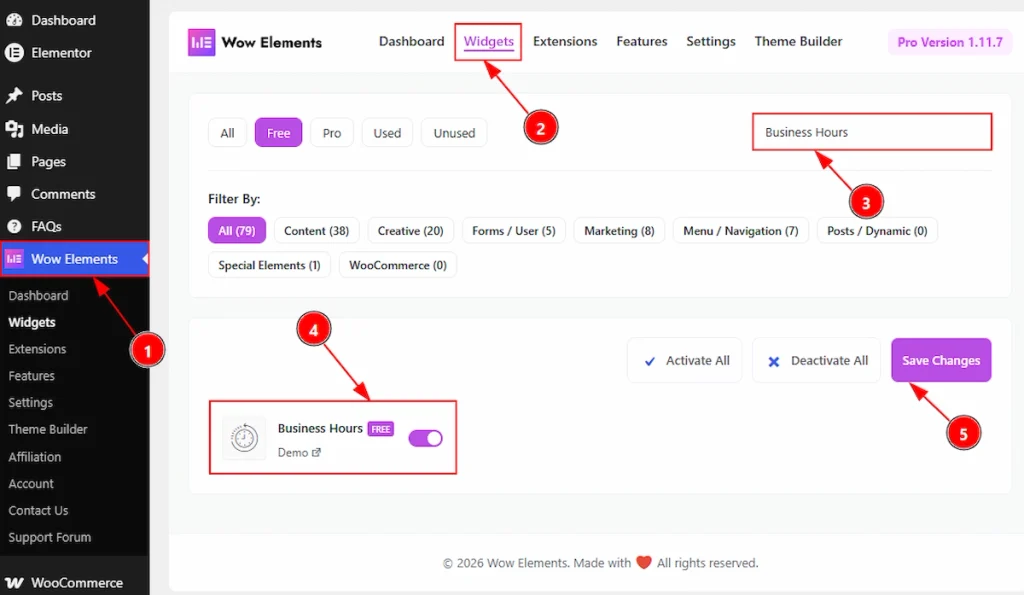
To use the Business Hours widget from Wow Elements, first, you have to enable the widget.
- Go to WordPress dashboard → Wow Elements Plugin dashboard.
- Then, Click the Core Widgets Tab.
- Search the Business Hours Widget Name.
- Enable the Business Hours Widget.
- Hit the Save Settings Button.
Inserting The Logo Carousel Widget #
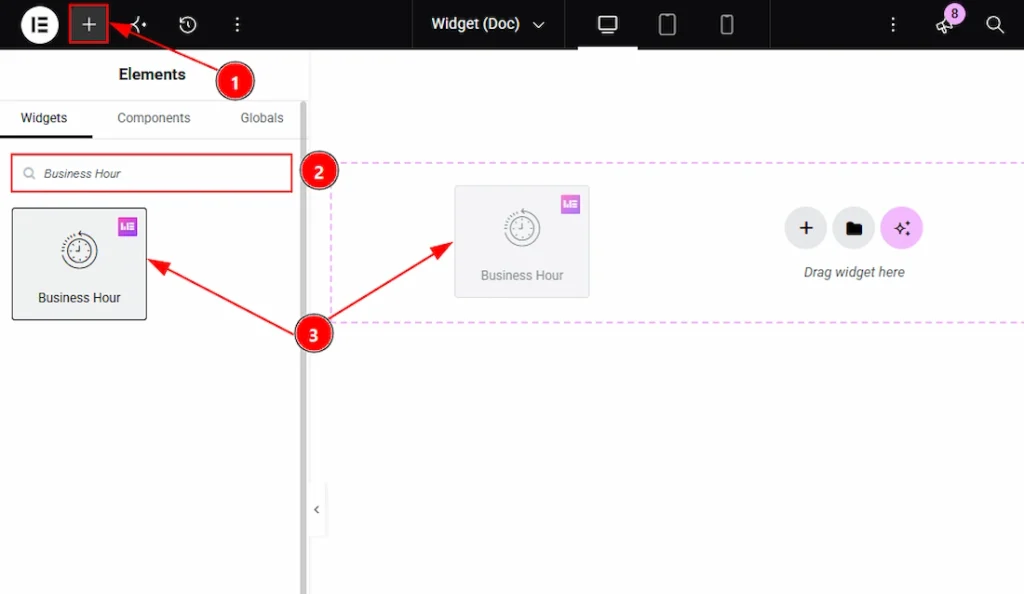
1. Go to the Elementor Editor Page and hit the “+” icon Button.
2. Search the Business Hours name.
3. Drag the widget and drop it on the editor page.
Work With The Content Tab #
Layout Section #
Go to Content → Layout
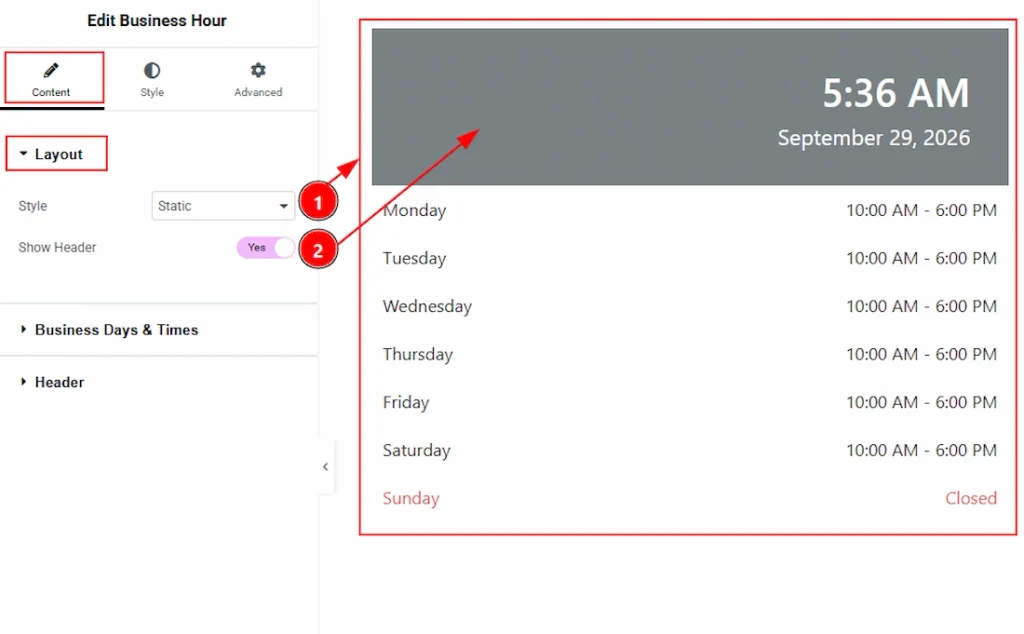
1. Style: You can select the business hours layout style between static or dynamic with this option. Here, we have selected the static style and you will get to see this visual.
2. Show Header: Enable the switcher to show the header to the business hours with this option.
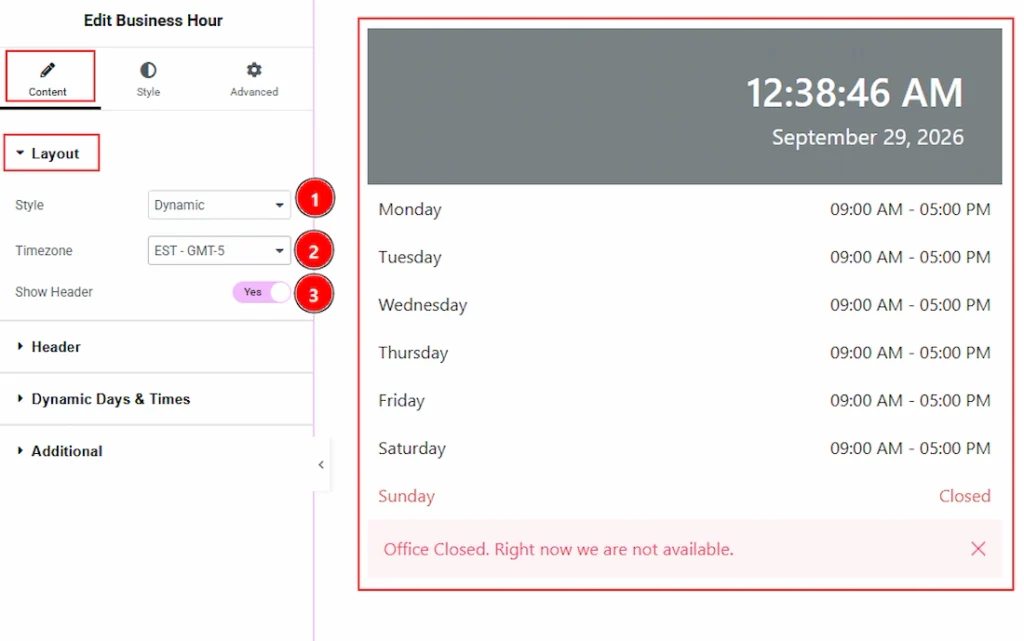
Now, we will show you how will be the visual when you select the style as Dynamic.
1. Style: Here, we have selected the layout style as Dynamic.
2. Timezone: You can select the dynamic timezone for your business hours with this option.
3. Show Header: Enable the switcher to show the header of your business header with this option.
Header Section #
Go to Content → Header
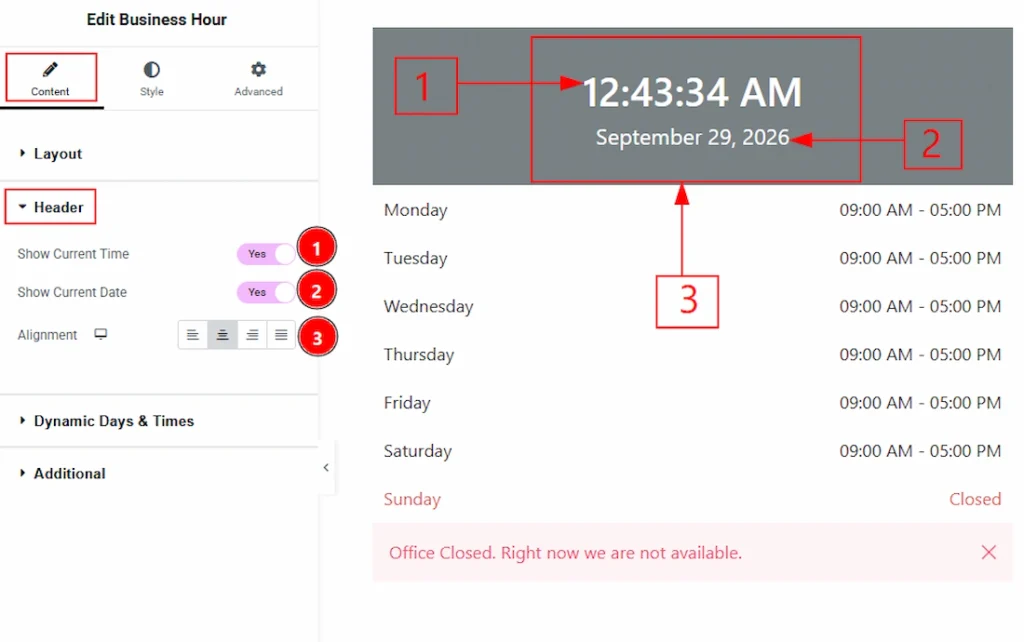
1. Show Current Time: Enable the switcher to show the current time with this option.
2. Show Current Date: Enable the switcher to show the current date with this option.
3. Alignment: You can adjust the position of the header content to left, center, right or justify with this option.
Dynamic Days & Times Section #
Go to Content → Dynamic Days & Times
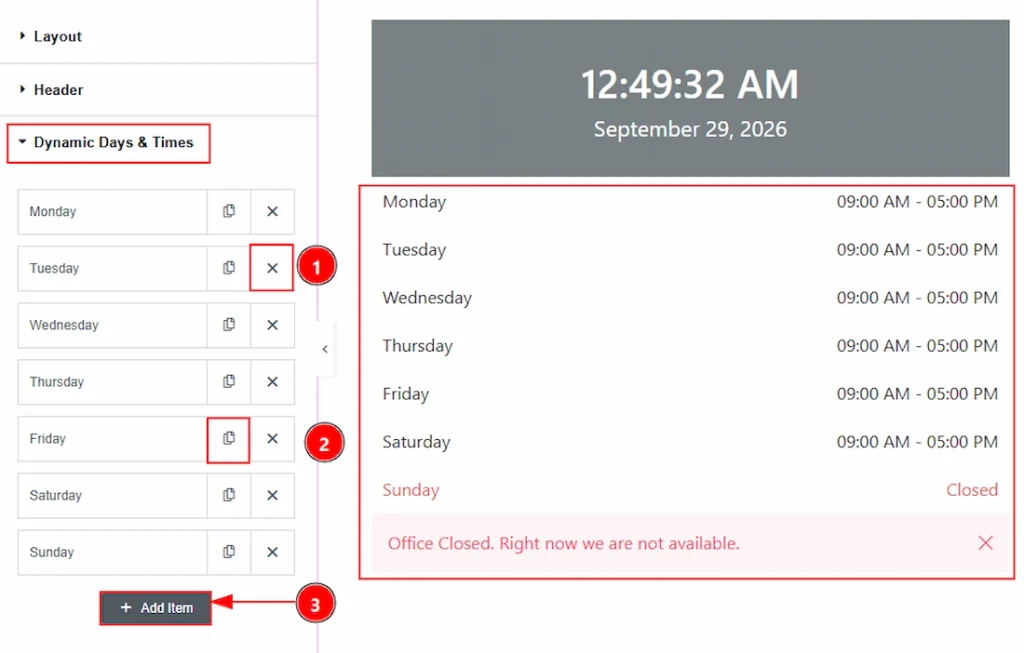
1. Close Button: You can click on the close button to close the item with this option.
2. Copy Item: You can click on the copy item to duplicate the item with this option.
3. Add Item: You can click on the item to add more item with this option.
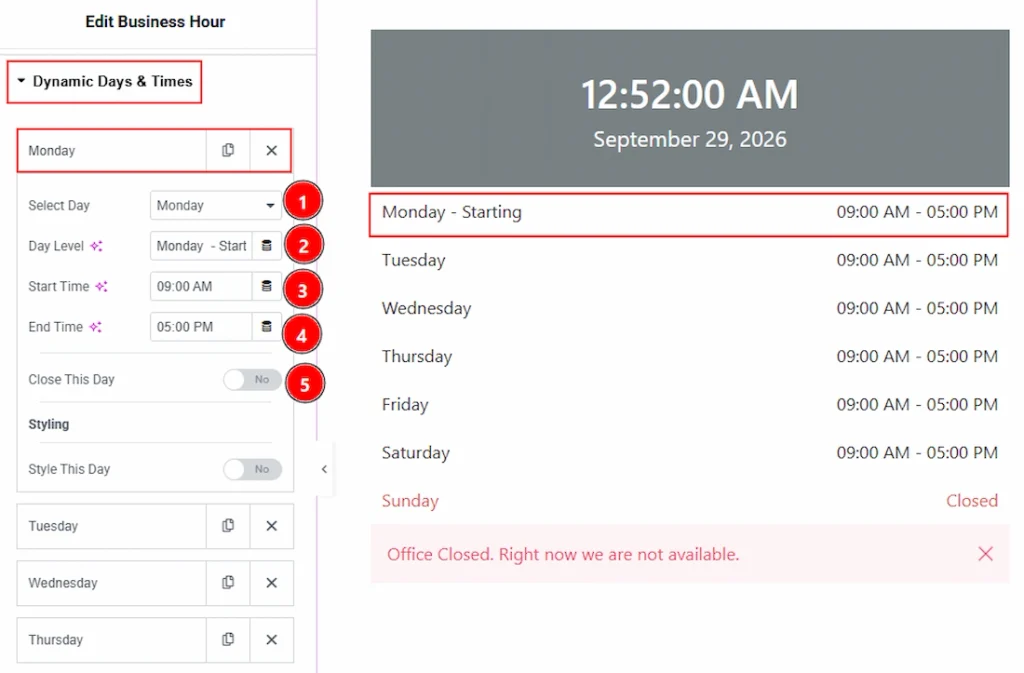
Now, let’s proceed to the inner options of the items.
1. Select Day: You can select the day that you want first with this option.
2. Day Label: You can make changes to the day label with this option.
3. Starting Time: You can adjust the shift starting time with this option.
4. End Time: You can adjust the shift end time with this option.
5. Close This Day: Enable the switcher to make the day off with this option.
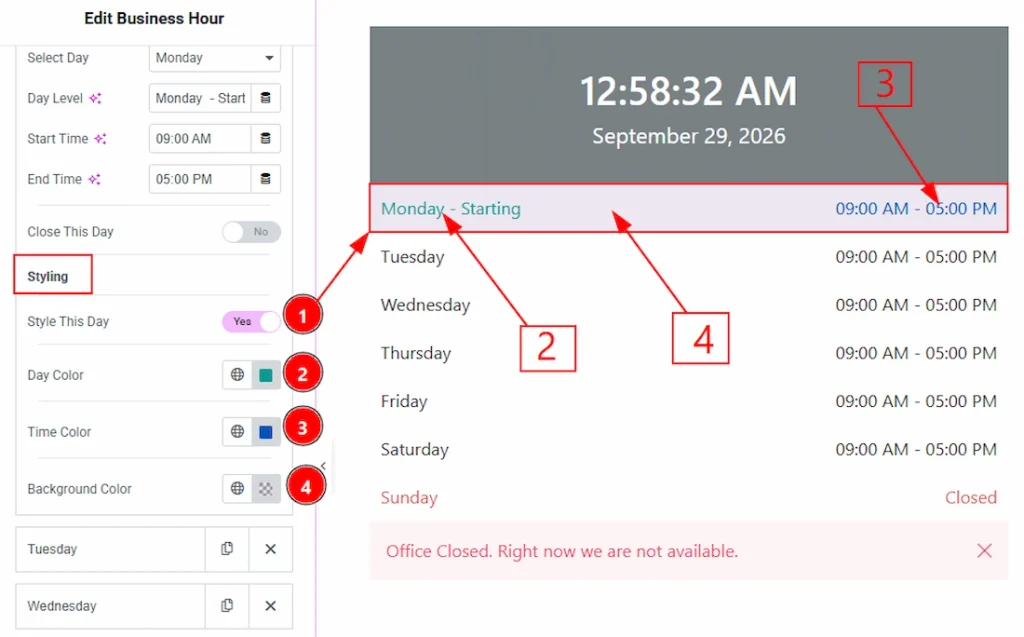
1. Style This Day: Enable the switcher to style this item’s day with this option.
2. Day Color: You can make changes to the day label color with this option.
3. Time Color: You can make changes to the time text color with this option.
4. Background Color: You can make changes to the background color with this option.
Additional Section #
Go to Content → Additional
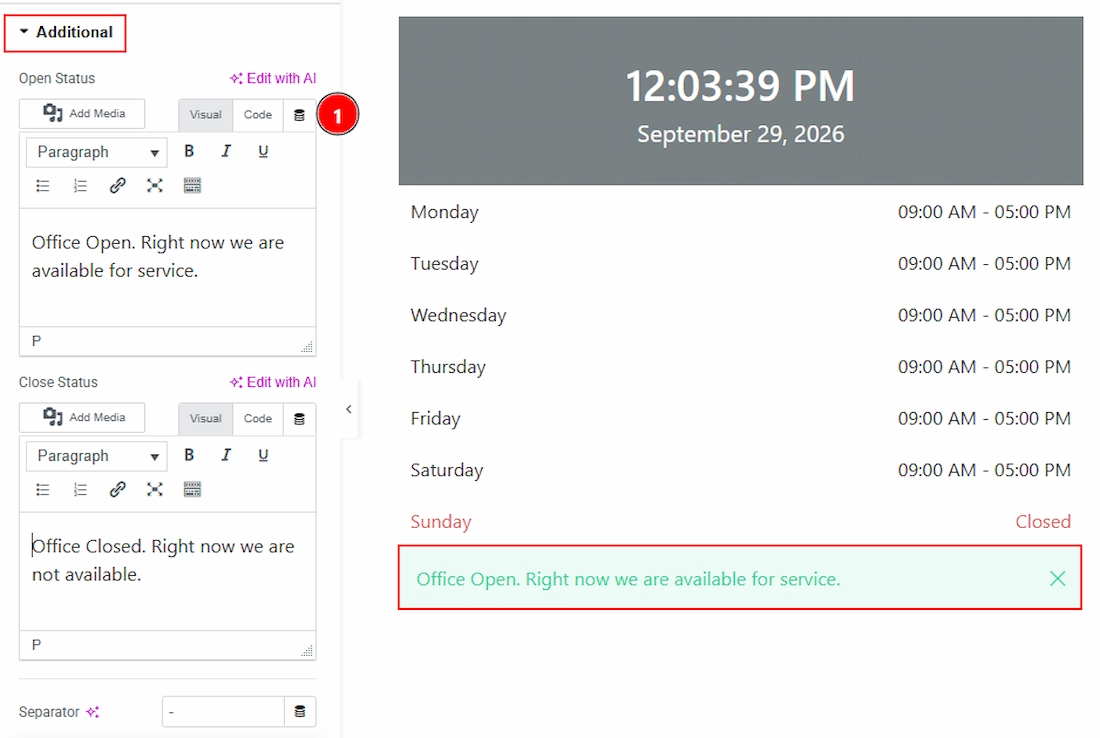
1. Open Status: You can make changes to the open status text with this option.
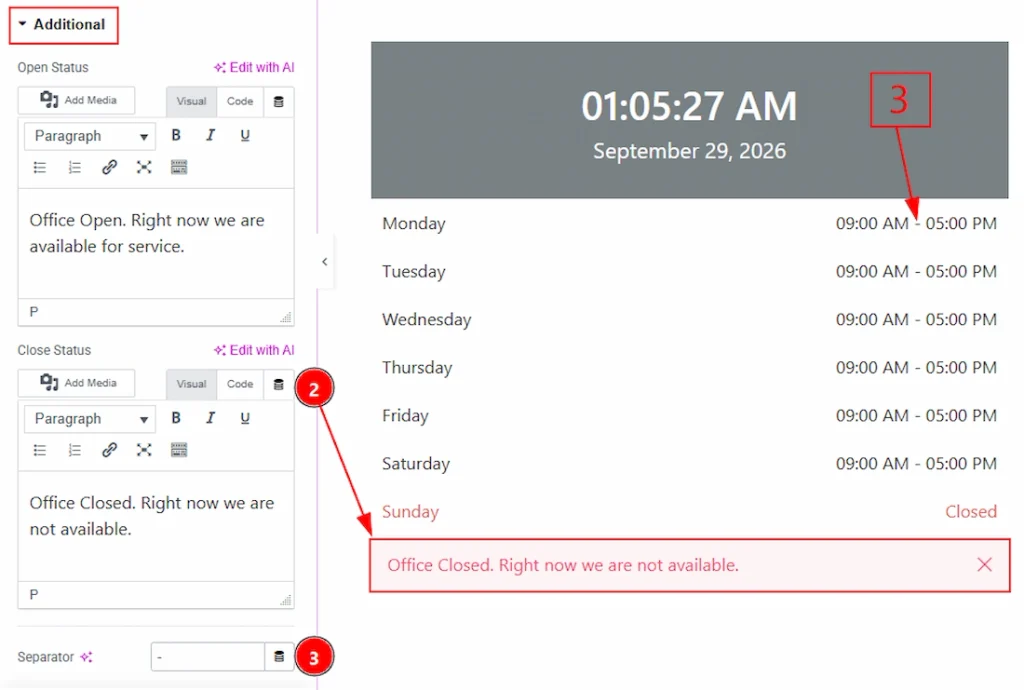
2. Close Status: You can make changes to the close status notice text with this option.
3. Separator: You can make changes to the separator icon with this option.
Work With The Style Tab #
Header Section #
Go to Content → Header
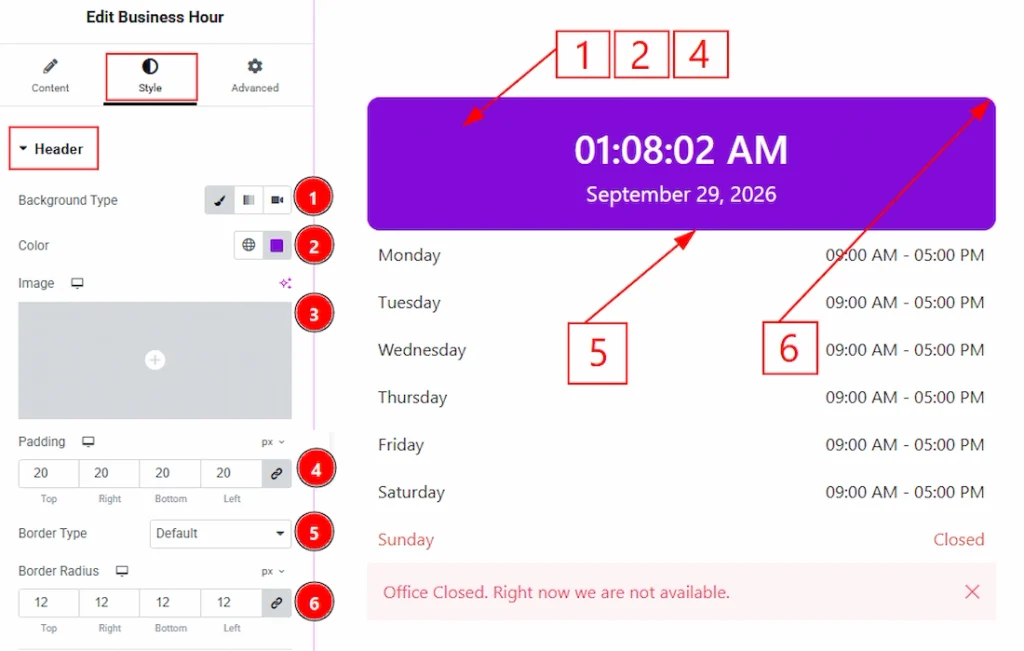
1. Background Type: You can change the background type to be classic or gradient with this option. Here, we have selected the background type as Classic.
2. Color: You can make changes to the background color with this option.
3. Image: You can make changes to the background image with this option.
4. Padding: You can adjust the inner space of the heading field with this option.
5. Border Type: You can add and change the border types with this option.
6. Border Radius: You can control the roundness of the border with this option.
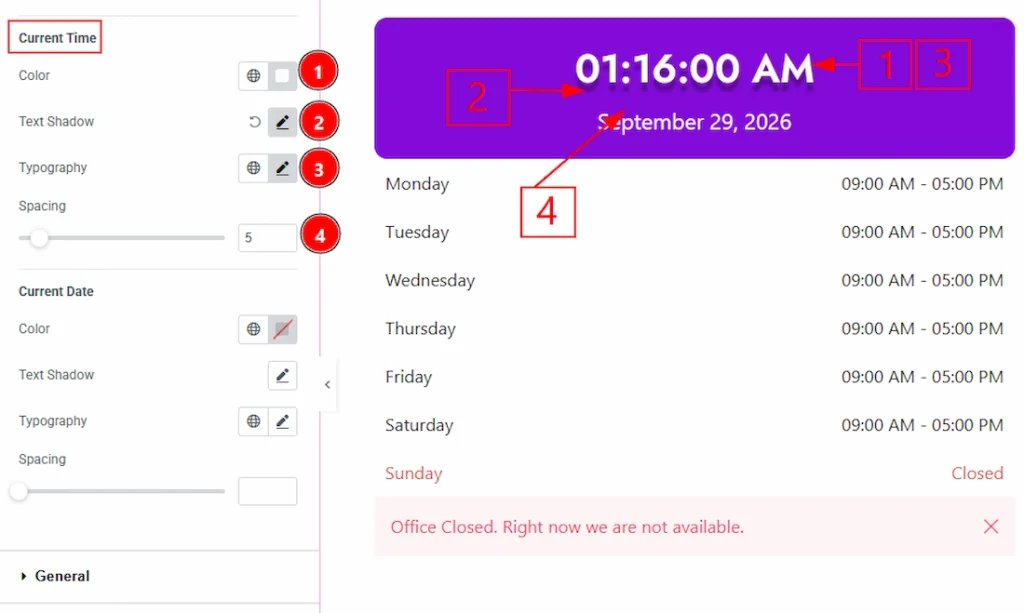
In this section, we have another sub-section and that’s is Current Time. Let’s see what we have here –
1. Color: You can make changes to the current time text color with this option.
2. Text Shadow: You can add a shadow effect tot he text with this option.
3. Typography: Change the font family, size, weight, transform, style, decoration, line height, letter spacing, and word spacing from here.
4. Spacing: You can adjust the space between the time and the date with this option.
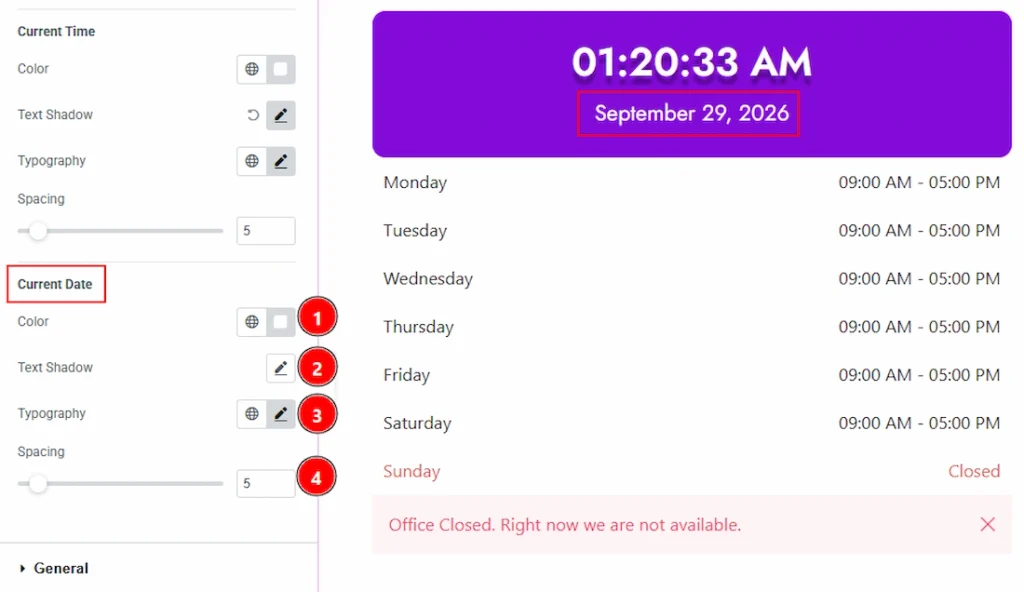
In this section, we have one more sub section named Current Date. Let’s start describing this now –
1. Color: You can make changes to the current date text color with this option.
2. Text Shadow: You can add a shadow effect to the text with this option.
3. Typography: Change the font family, size, weight, transform, style, decoration, line height, letter spacing, and word spacing from here.
4. Spacing: You can adjust the space around the date field with this option.
General Section #
Go to Content → General
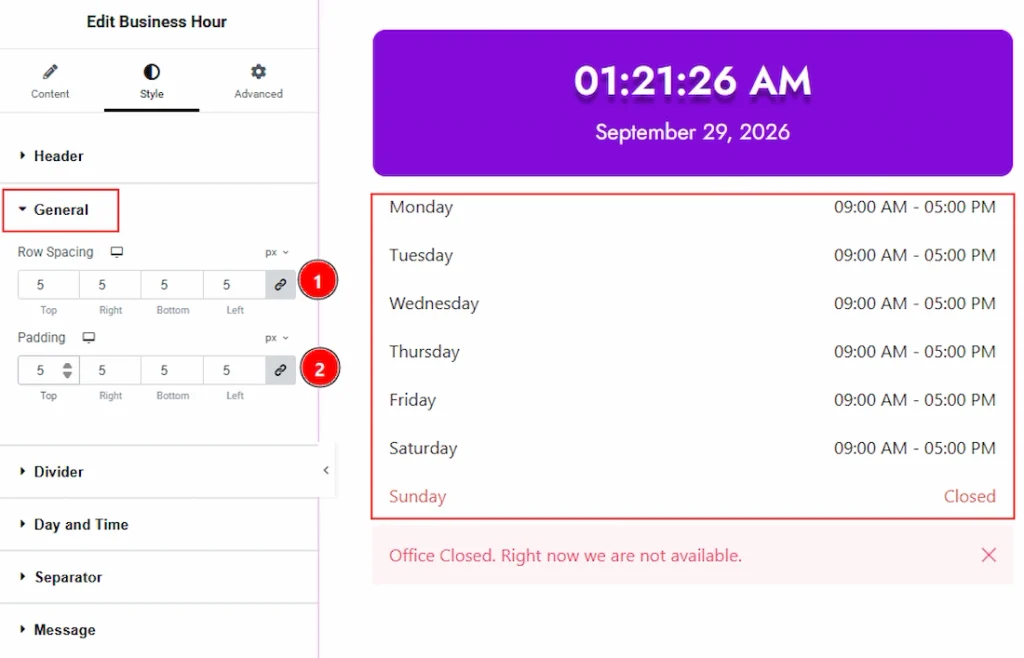
1. Row Spacing: You can adjust the inner space of the raw with this option.
2. Padding: You can adjust the inner space of the business hours layout with this option.
Divider Section #
Go to Content → Divider
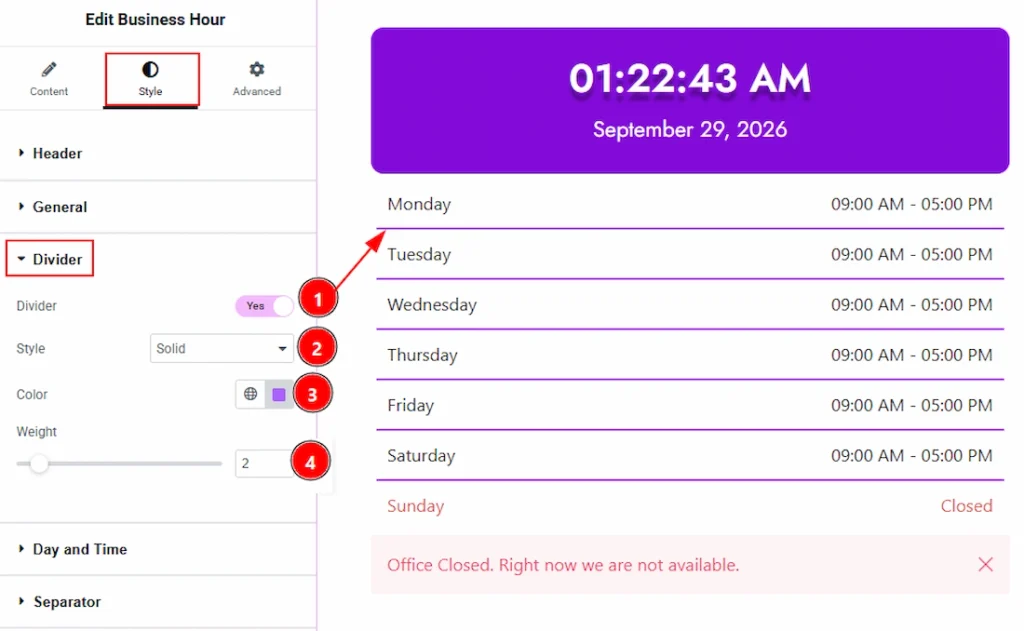
1. Divider: Enable the switcher to show the divider between items with this option.
2. Style: You can add and change the border styles with this option.
3. Color: You can make changes to the divider color with this option.
4. Weight: You can make changes to the divider weight with this option.
Day and Time Section #
Go to Content → Day and Time
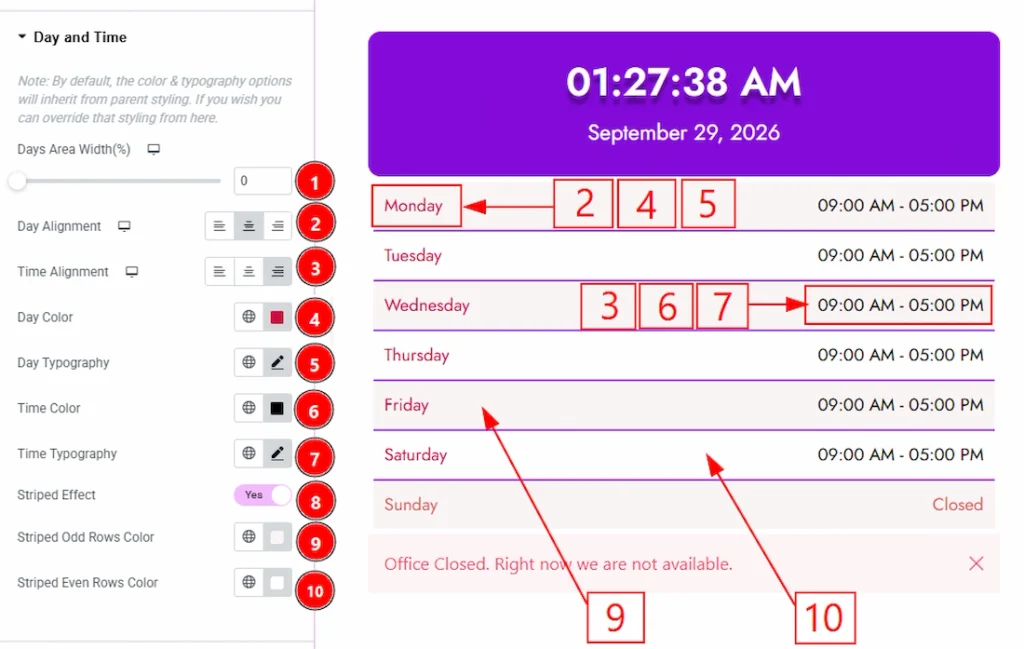
1. Day Area Width: You can adjust the width of the day field with this option.
2. Day Alignment: You can adjust the position of the day to left, center or right with this option.
3. Time Alignment: You can adjust the position of the time to left, center or right with this option.
4. Day Color: You can make changes to the day field color with this option.
5. Day Typography: Change the font family, size, weight, transform, style, decoration, line height, letter spacing, and word spacing from here.
6. Time Color: You can make changes to the time text color with this option
7. Time Typography: Change the font family, size, weight, transform, style, decoration, line height, letter spacing, and word spacing from here.
8. Stripped Effect: Enable the switcher to make the item rows stripped with this option.
9. Stripped Odd Rows Color: You can make changes to the stripped odd rows color with this option.
10. Stripped Even Rows Color: You can make changes to the even rows color with this option.
Separator Section #
Go to Content → Separator
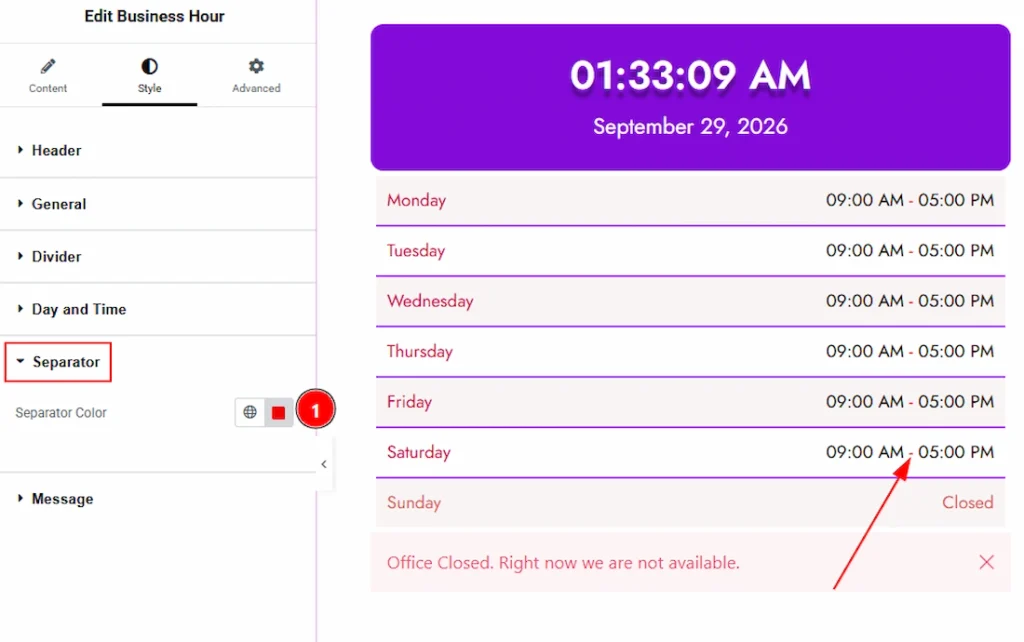
1. Separator Color: You can make changes to the separator color with this option.
Message Section #
Go to Content → Message
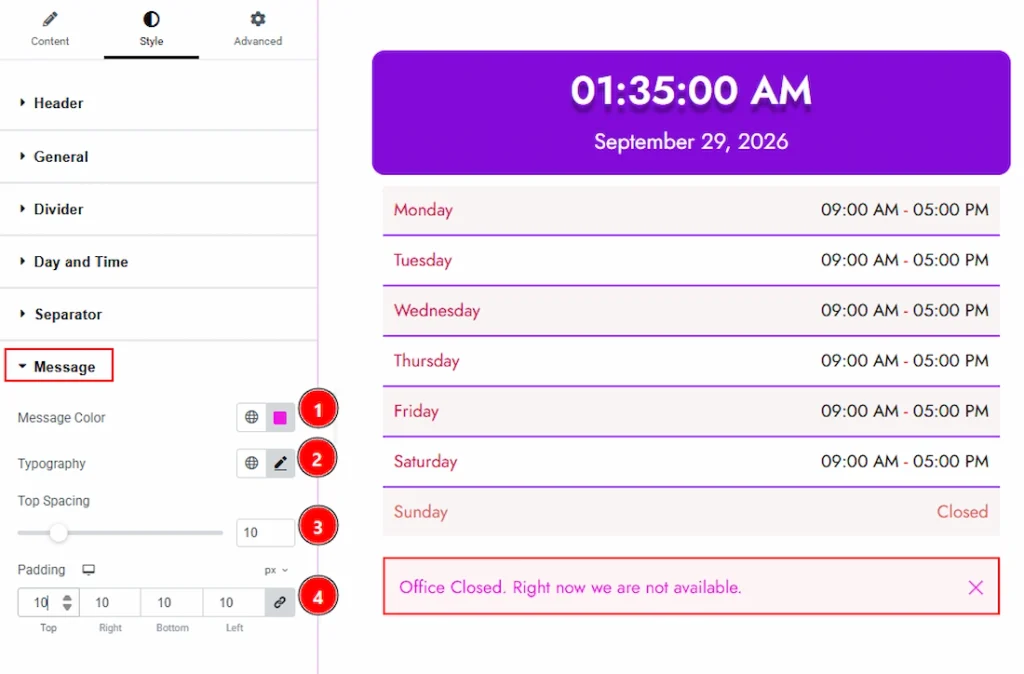
1. Message Color: You can make changes to the message color with this option.
2. Typography: Change the font family, size, weight, transform, style, decoration, line height, letter spacing, and word spacing from here.
3. Top Spacing: You can adjust the spacing from the top with this option.
4. Padding: You can adjust the inner space of the message field with this option.
All done! You have successfully customized the Business Hours widget on your website.
Video Assist #
You can watch this quick video to learn about the Advanced Progress Bar widget. Please visit the demo page for examples.
Thanks for staying with us.