

The Display Conditions feature from Wow Elements allows you to control where and when your content is displayed across your website. It enables you to set specific conditions based on advanced conditions like user role, device, login state, date/time, and more for personalized experiences, ensuring that the right content appears to the right audience at the right time. With flexible rules and easy configuration, you can create more personalized and dynamic user experiences without extra effort. In this documentation, we will guide you through how to use and customize the Display Conditions feature in Wow Elements.
Enable The Display Conditions Feature #
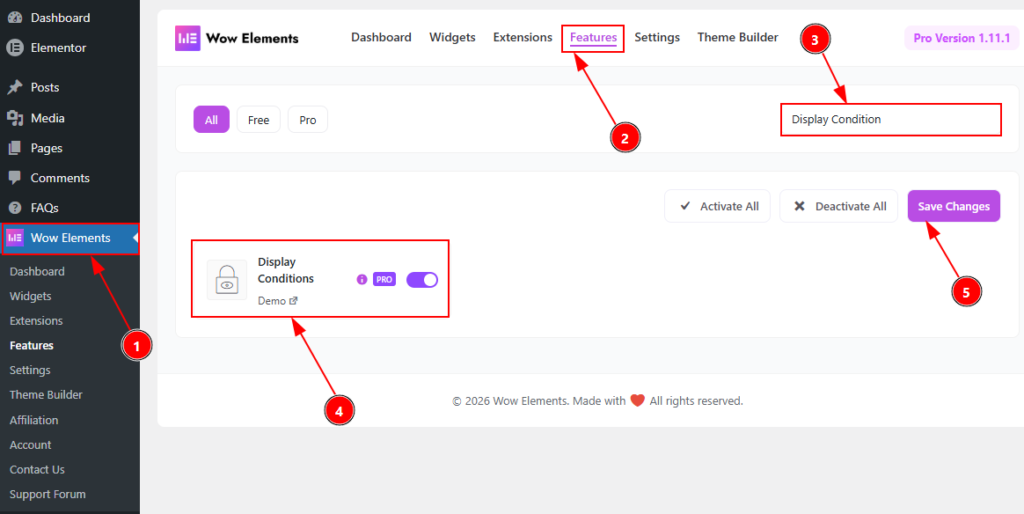
To use the Display Conditions Feature from Wow Elements, first, you have to enable the widget.
- Go to WordPress dashboard → Wow Elements Plugin dashboard.
- Then, Click the Core Widgets Tab.
- Search the Display Conditions Feature Name.
- Enable the Display Conditions Feature.
- Hit the Save Settings Button.
Where to Find the Display Conditions Feature #
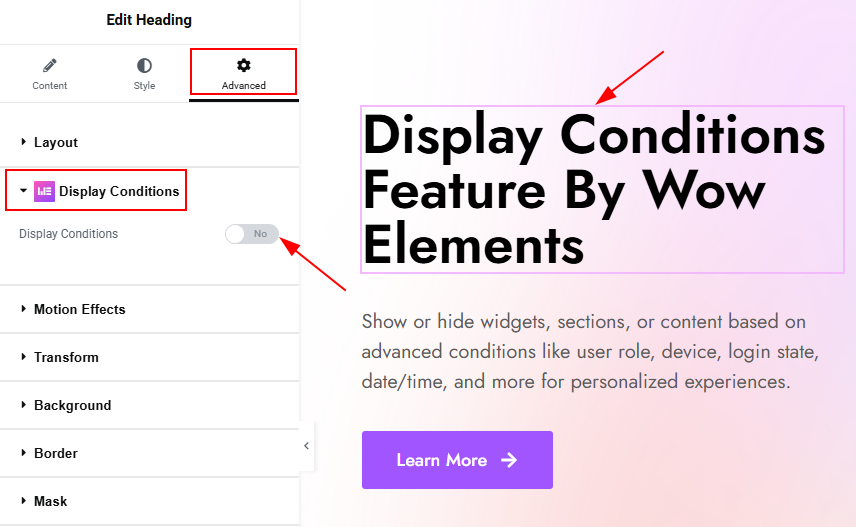
You can apply display conditions to any widget, section, or column within Elementor, including third-party add-ons. This flexibility ensures that you can tailor the visibility of virtually any element on your website.You can select any widget, section or column where you want to apply the display conditions feature and then go to Advanced Tab and there below the Layout tab you will see the Display Conditions Tab. To understand easily, you can see the short navigation – Edit any section → Advanced → Display Conditions.
Customizing the Display Conditions Feature #
Display Conditions Section #
Go to Advanced → Display Conditions
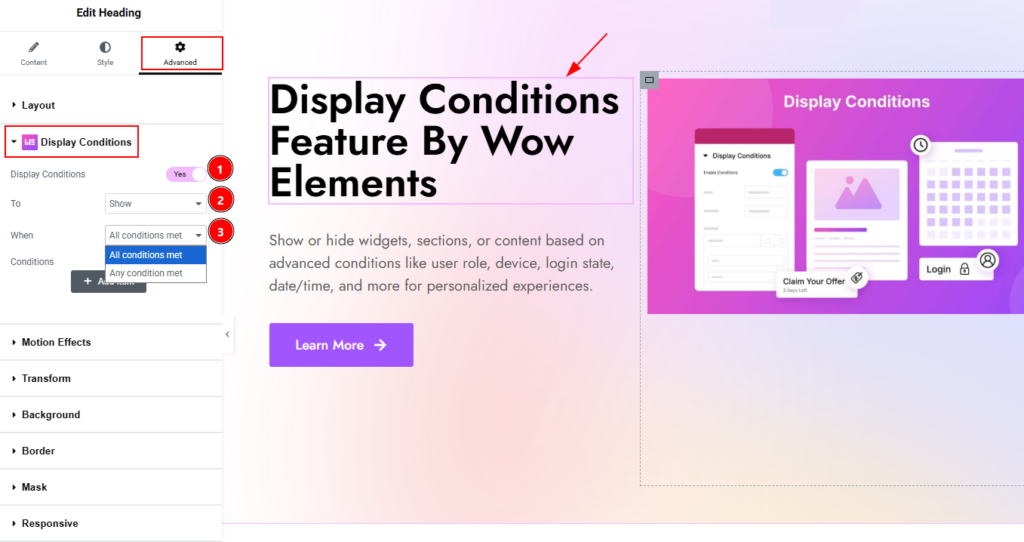
1. Display Conditions: Enable the switcher to get the options to apply the display conditions to the selected widget/section/column with this option.
2. To: You can select the display condition to show or hide with this option. You can choose this setting as per your need. If you want to show the selected area in frontend then select the show option and if you don’t want to show that then select the hide option.
3. When: When configuring the “Show or Hide” action, you can determine how multiple conditions are evaluated. You can choose between All conditions met & Any condition met. These option are –
- All Conditions Met: The element is displayed/hidden only if all specified conditions are satisfied.
- Any Condition Met: The element is displayed/Hidden if at least one of the specified conditions is satisfied.
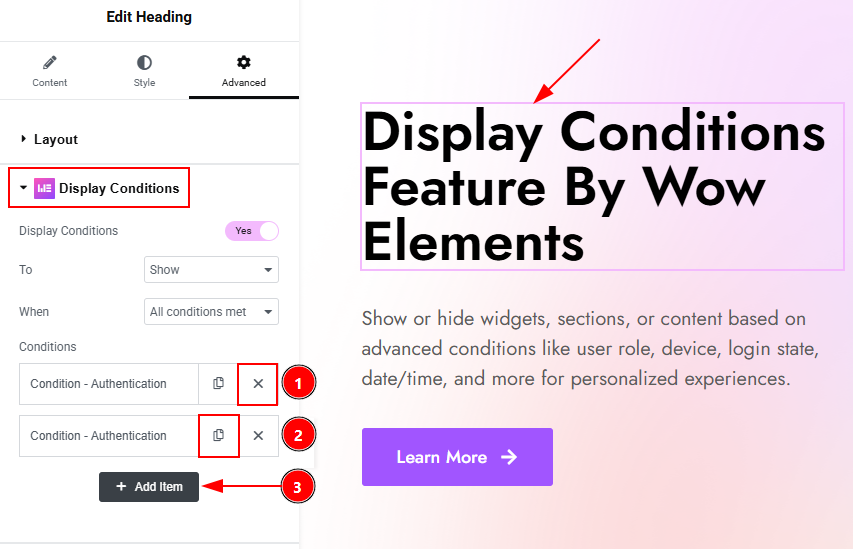
Below after setting up the To & When option now here you can add the conditions to the selected elements. Before describe that let us have a look how you can get more options to add conditions and how you can remove conditions –
1. Close Icon: You can click on this button to remove the condition with this option.
2. Copy Icon: You can click on this button to duplicate the condition that you customized.
3. Add Item: You can add a condition field by clicking on this button to add more condition.
In each condition items you can add the conditions as per different categories. Now, let’s explore those one by one.
User Condition of Display Conditions #
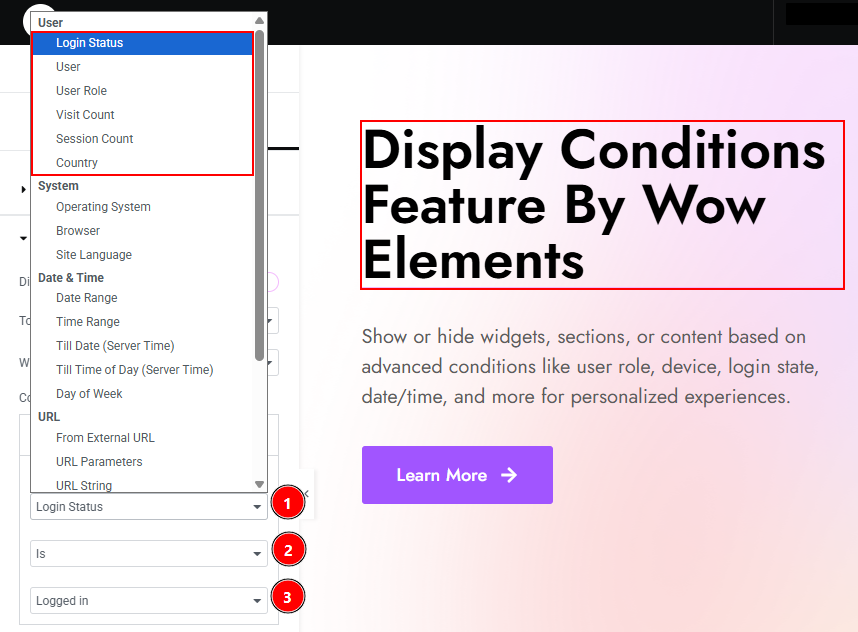
1. Select Condition: You can select the condition type that you want to apply to the element with this option. Here we have selected the condition type as login status which is in User Conditions. Here you will get more conditions such as – User, User Role, Visit Count, Session Count & Country. As we have selected the Login status we will describe what more options we have to add that condition below, Here is a short introduction of the each conditions of User category –
- User: If you select the user condition then you can add the user name to whom the element will visible or not as per your condition apply. Please note that this condition will work only when a user will in logged in status and leave blank for all user.
- User Role: If you select the user role condition then you can select the role as subscriber, administrator, editor, contributor & subscriber to whom you can apply the condition.
- Visit Count: You can apply the condition as per the visit count for the user as well.
- Session Count: You can apply the condition as per the session count for the user as well.
- Country: You can apply the condition as per the country selection for the user as well.
2. Is: You can change the condition to is or is not with this option.
3. Logged In: You can select the status of the user as logged in with this option to apply the condition.
Example of User Condition #
Let’s see by selecting a condition named User Role and how it works –
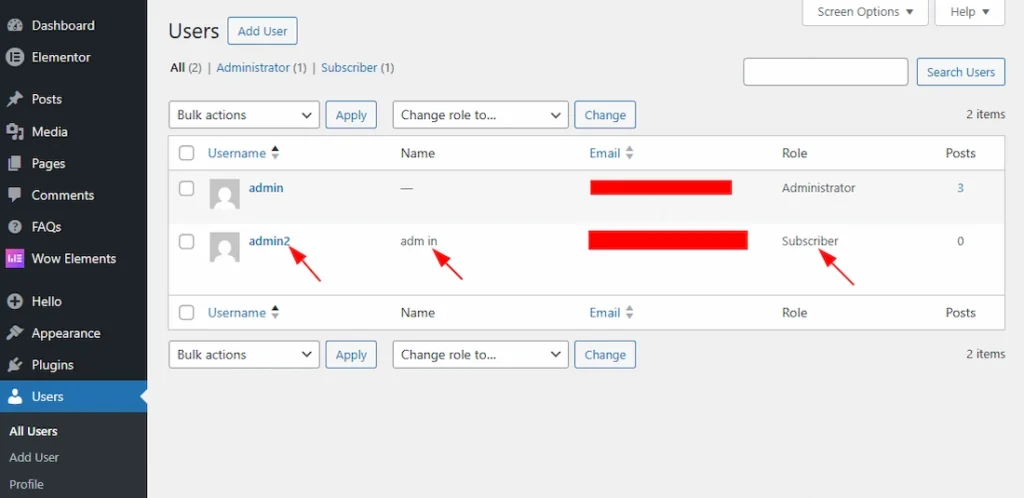
To make the condition valid, you need to confirm that you have user role that you want to use in the condition. As i will use the Subscriber user role in the condition so i have made a user with subscriber role.
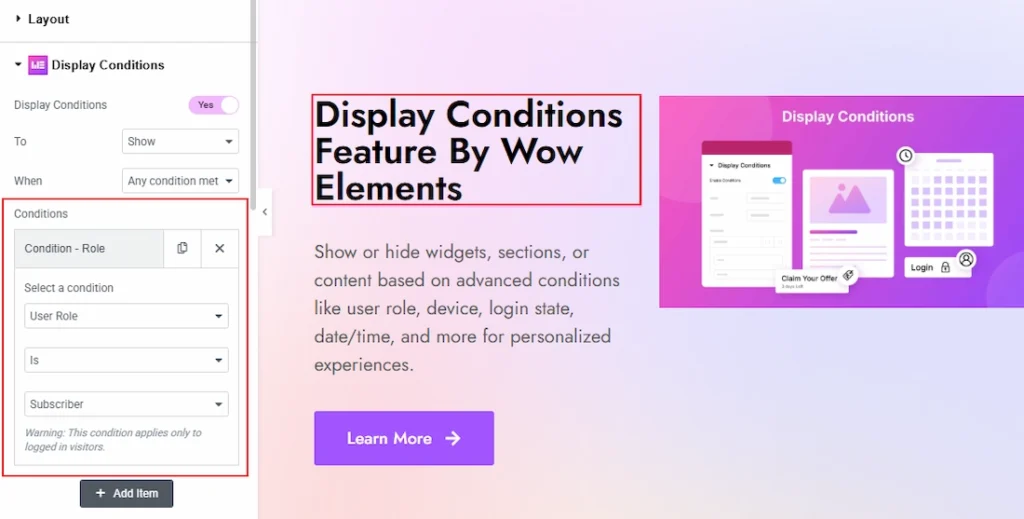
After that, go to the editor page and select the element on which you want to apply the condition. Here i have choose the Heading to apply the condition on it.
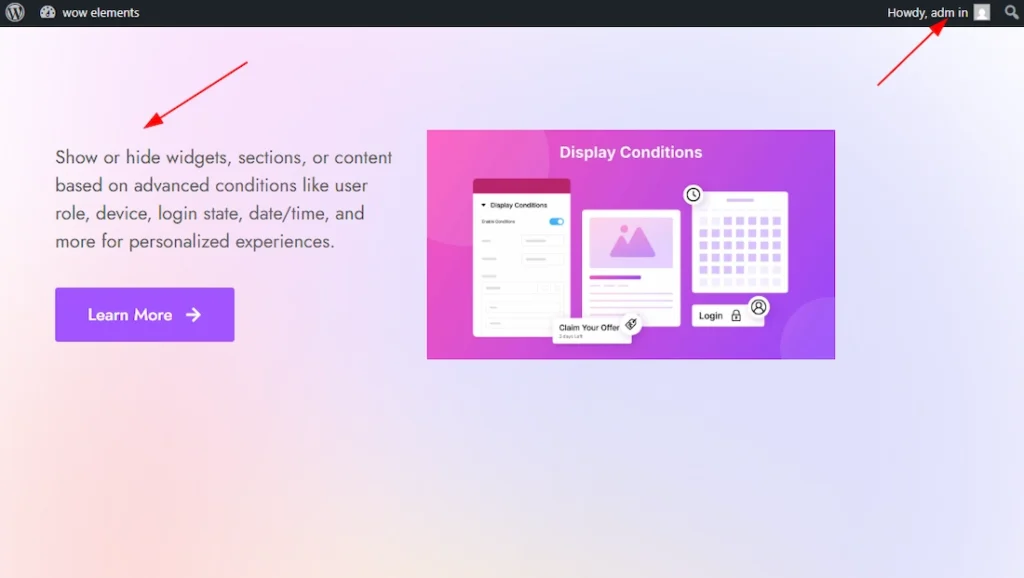
After applied the condition, i have logged in with the Subscriber User ID and have a look to the page. As per the condition applied the heading is not visible to the subscriber role.
System Condition of Display Conditions #
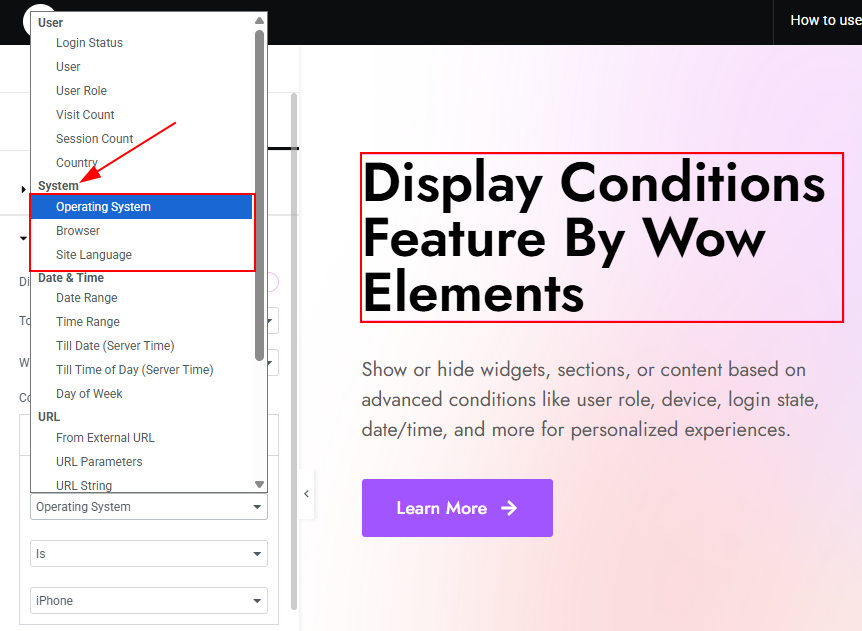
In the System conditions type you will get to see 3 conditions. These are Operating system, Browser & Site Language. Let’s explore those –
- Operating System: By selecting the condition type operating system, you can add condition to operating devices like iPhone, Android, Windows, OpenBSD, SunOs Linux and MacOs where you want to show or hide the element.
- Browser: By selecting the condition type operating system, you can add condition to browser such as Google Chrome, Mozilla Firefox, Internet Explorer, Safari, Opera & Microsoft Edge to show or hide the element for your user.
- Site Language: You can select this condition to set up language where you can show or hide the element.
Example of System Condition #
Let’s see by selecting a condition named Browser and how it works –
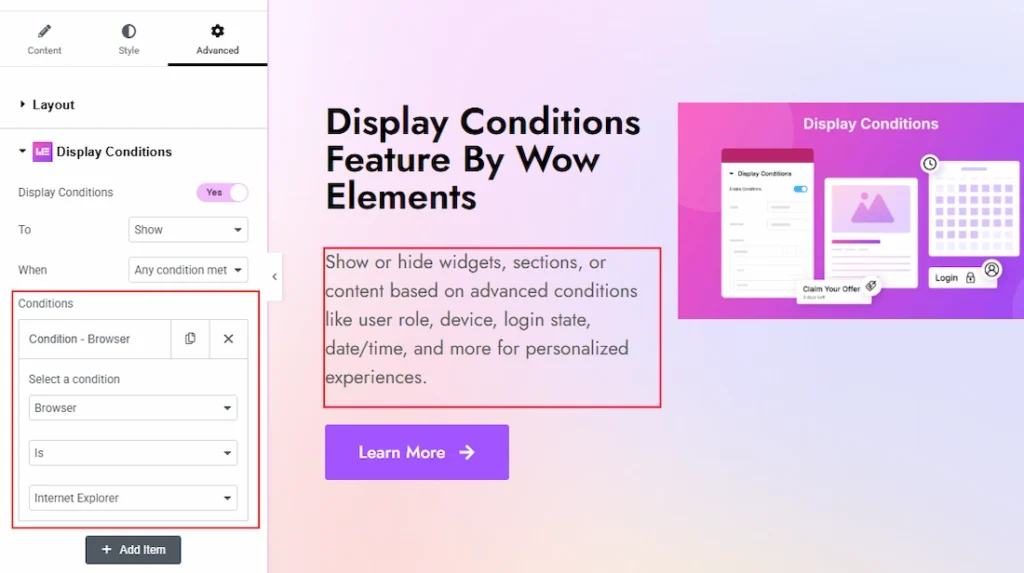
To make the condition, you need to go to the editor page and select the element on which you want to apply the condition. Here i have choose the text editor to apply the condition on it.
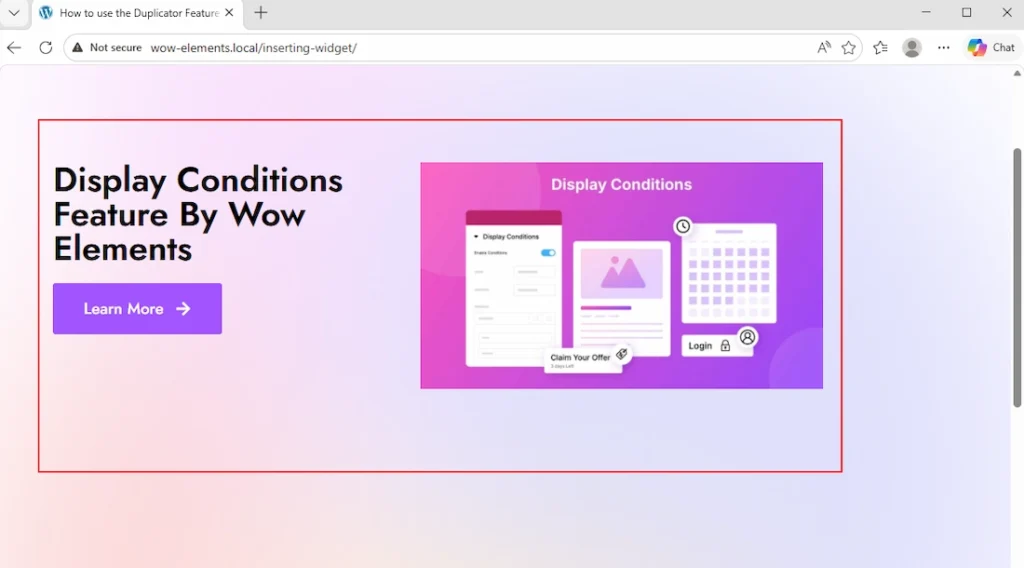
After that, go to the Internet Explorer and open the link. Here you can see the design without the text editor as you have applied the condition on it.
Date & Time Condition of Display Conditions #
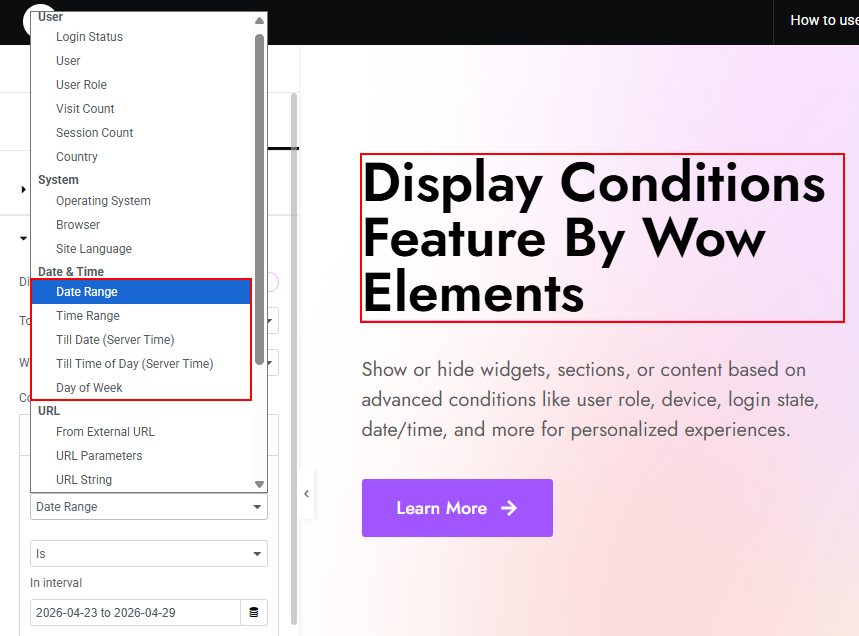
In the Date & Time condition type, you will find multiple conditions available. These include Date Range, Time Range, Till date (Server Time), Till Time of Day (Server Time) & Day of Week. Let’s explore each of them.
- Date Range: You can show/hide the element only when today’s date falls between the selected start and end dates with this option.
- Time Range: You can show/hide the element only when the current time falls within the selected start and end time window (within a day).
- Till Date (Server Time): You can show/hide the element based on whether the server’s current date is before/after the selected cutoff date.
- Till Time of Day (Server Time): You can show/hide the element based on whether the server’s current time is before/after the selected cutoff time of day.
- Day of Week: You can show/hide the element only on the selected weekdays (e.g., Mon–Fri, weekends, etc.).
Example of Date & Time Condition #
Let’s see by selecting a condition named Date Range and how it works –
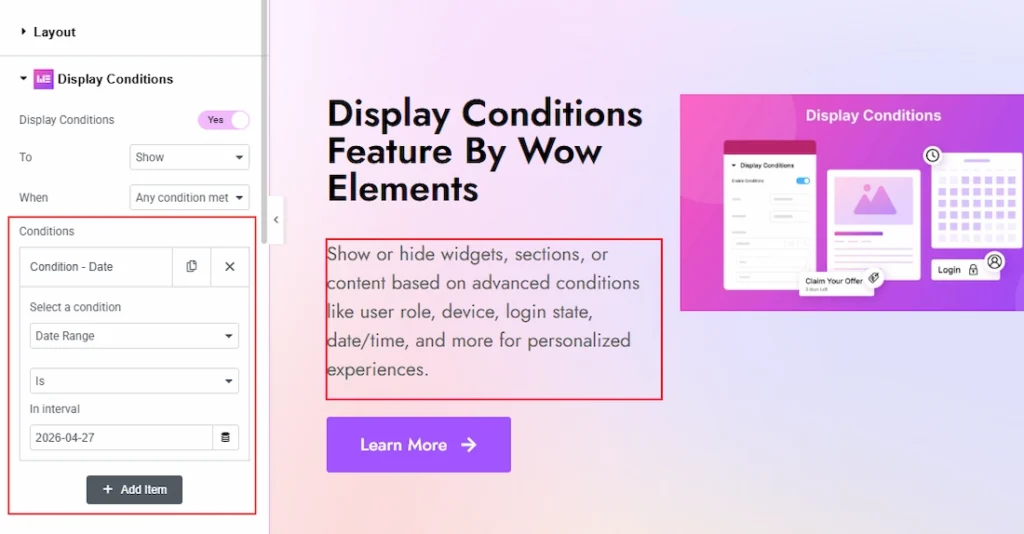
To make the condition valid, you need to go to the editor page and select the element on which you want to apply the condition. Here i have choose the text editor to apply the condition on it and add the date when the condition will apply.
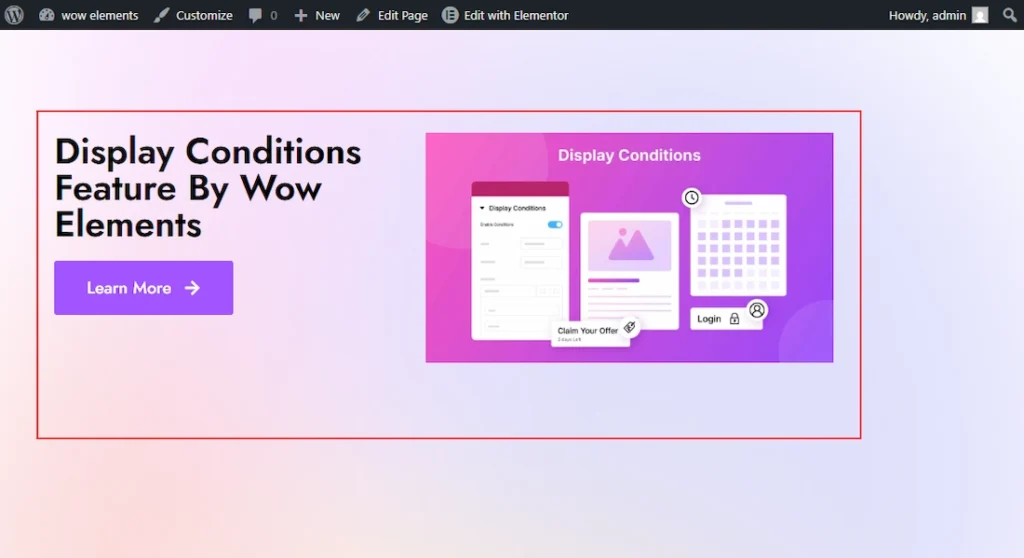
After that, open the link and here you can see the design without the text editor as you have applied the condition on it for that time period.
URL Condition of Display Conditions #
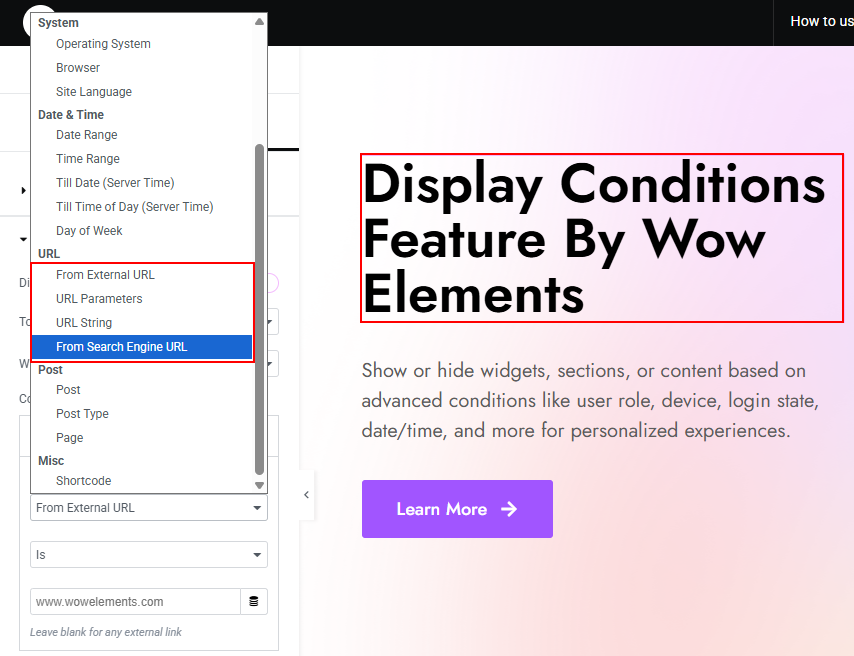
In the URL condition type, you will find multiple conditions available. These include From External URL, URL Parameters, URL String & From Search Engine URL. Let’s explore each of them –
- From External URL: You can show/hide the element when the visitor comes from a specific external website (referrer URL).
- URL Parameters: You can show/hide the element based on the presence/value of specific query parameters in the page URL (e.g., ?utm_source=google).
- URL String: You can show/hide the element when the current page URL contains (or matches) a specified text/keyword.
- From Search Engine URL: You can show/hide the element when the visitor lands on the page via a search engine (e.g., Google/Bing) referrer.
Example of URL Condition #
Let’s see by selecting a condition named From External URL and how it works –
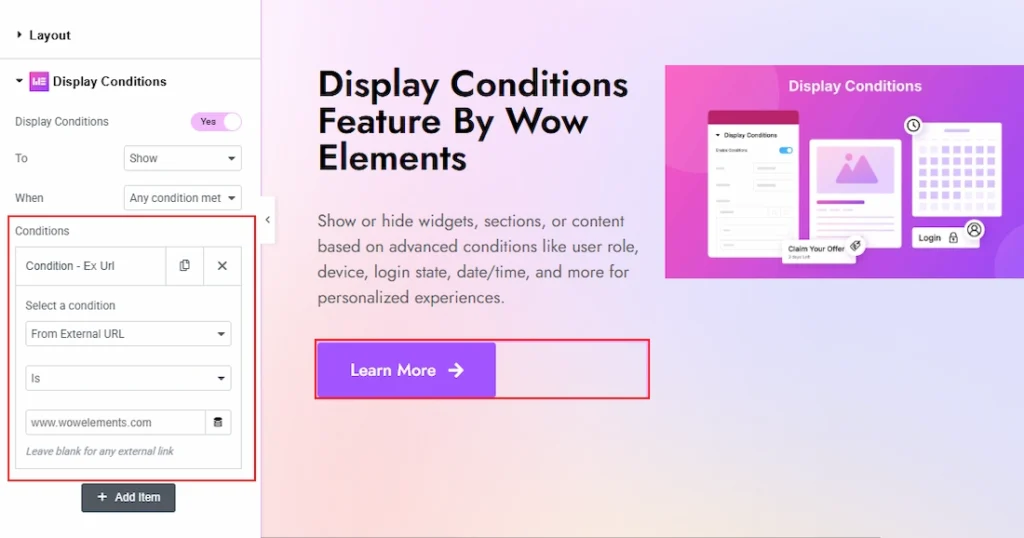
To make the condition, you need to go to the editor page and select the element on which you want to apply the condition. Here we have chosen the Button to apply the condition on it and add the URL link by which the condition will apply. You can leave the URL field blank to work with any external link.
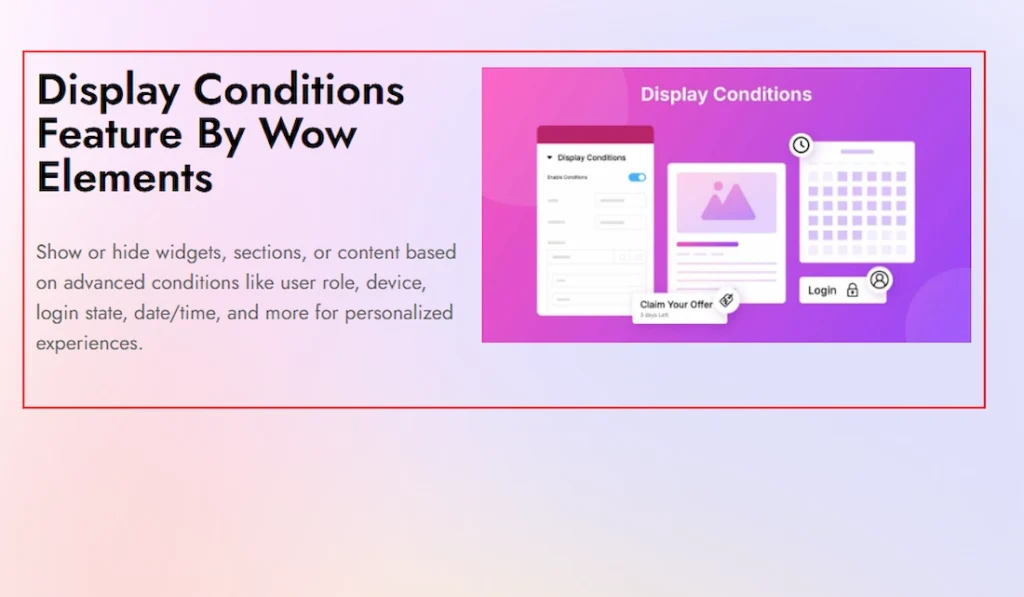
After that, open the link and here you can see the design without the Button as you have applied the condition on it.
Post Condition of Display Conditions #
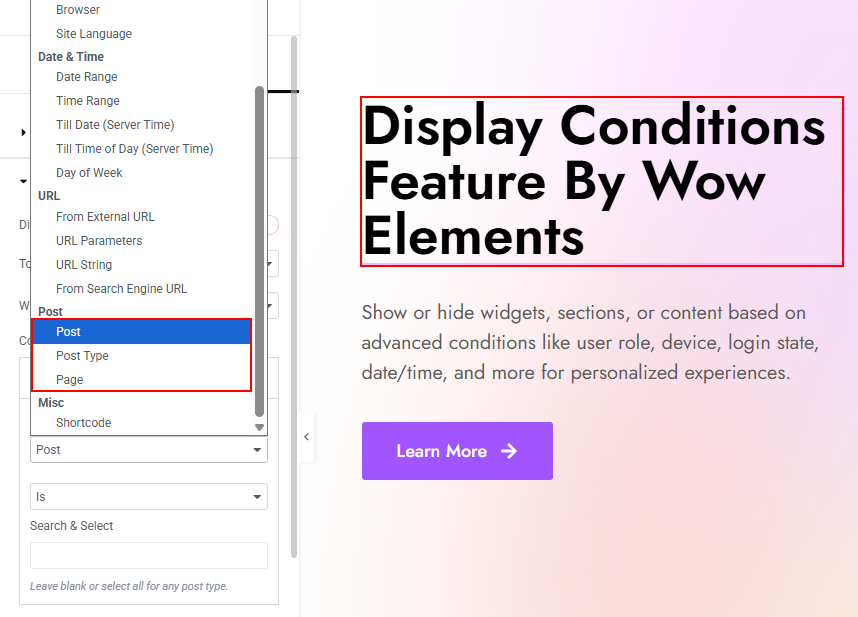
In the Post condition type, you will find multiple conditions available. These include Post, Post Type & Page. Let’s explore each of them –
- Post: You can show or hide the element on specific selected posts (or on all posts if none are selected).
- Post Type: You can show or hide the element based on the current content type (e.g., Posts, Pages,FAQs, or any custom post type).
- Page: You can show or hide the element on specific selected pages (or on all pages if none are selected).
Example of Post Condition #
Let’s see by selecting a condition named Page and how it works –
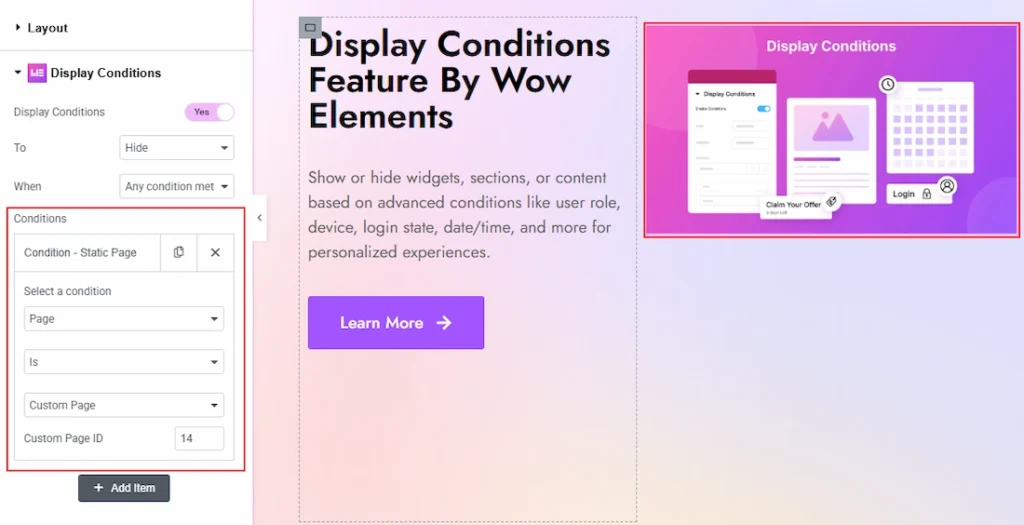
To make the condition, you need to go to the editor page and select the element on which you want to apply the condition. Here we have chosen the Image to apply the condition on it and select Custom Page and add the Custom Page ID on which the condition will apply.
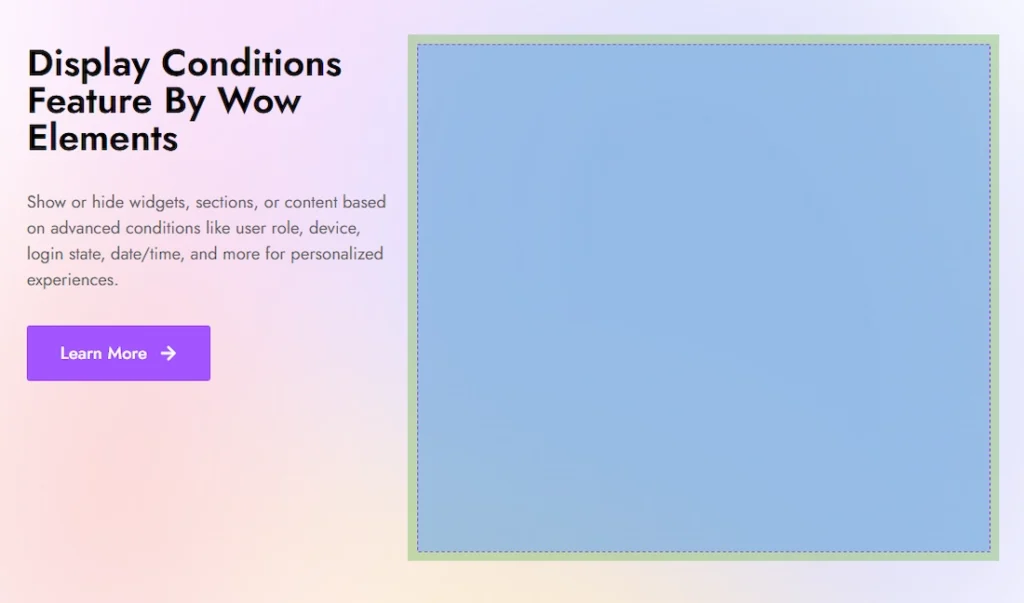
After that, open the link and here you can see the design without the Image as you have applied the condition on it.
Misc Condition of Display Conditions #
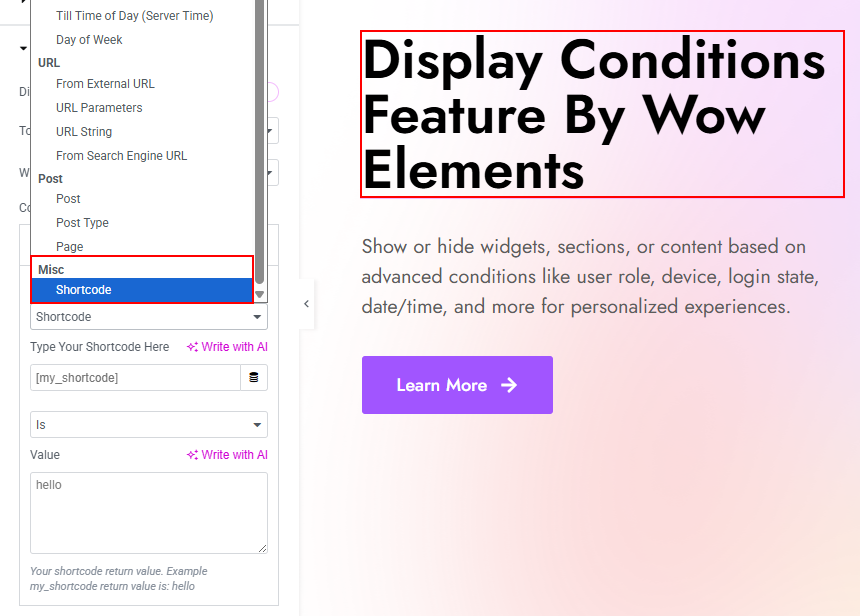
Shortcode: You can show/hide the element by evaluating a shortcode output and applying the condition based on the returned value (e.g., display only if the shortcode returns a specific text/number).
All done! You have successfully customized the Display Conditions on your website.
Video Assist #
You can also watch the video tutorial to learn more about the Display Conditions. Please visit the demo page for examples.